Saturday, March 27, 2021

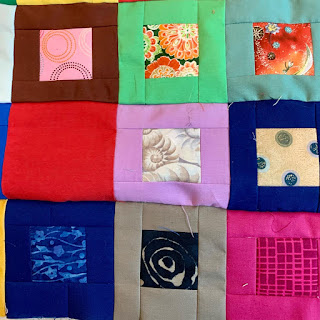
circled squares

Circled Squares

Block finishes 12 inches 
I plan to set this 7 by 6 (84 by 72) or 8 by 7 (96 by 84) so 42 or 56 blocks.

I have seen this block on the web. I have not been able to find the origin of it--if you know please let me know and I can include that information here.

UPDATE: Blog reader Mego says it is a block from a while back called Circle of Friends.
I did a bit of research and that name is used for several other blocks too, but one similar to this one I can trace to at least 2011.  I also saw it named as A Circle of Squares. All I have found had more pieces and were set in a 9-patch formation.
I'll update again when I learn more.
And, go check out Mego's blog--it is really fun!
https://basketfullofscraps.blogspot.com/
Reader JoyceLM reports Windham fabrics has a tutorial for the 9-patch version:
https://windhamfabrics.net/cgi-bin/fabricshop/projects.cgi?patternID=706
I am glad to see there are several versions of this out there so I am not appropriating one person's work. I do hope to eventually find out who came up with the idea.
There are also versions with circled triangles. Which are now on my list!


The blocks I saw were constructed in a 9-patch fashion.
Because I wanted to use prints for the background I re-drafted it to keep a larger portion un-pieced and oriented the corner units to keep their rectangles horizontal. This calms down the fracturing of the prints and allows the squares to visually float over the block.

Cutting
Solid:
eight squared 2 1/2 inches

Print: (be mindful of orientation of pieces with directional fabric)
one rectangle 4 1/2 by 6 1/2 inches 
six rectangles 1 1/2 by 4 1/2 inches
four rectangles 2 1/2 by 4 1/2 inches
four squares 2 1/2 inches
eight rectangles 2 1/2 by 1 1/2 inches

Block construction and pressing
Lay out block, keeping the 2 1/2 by 4 1/2 rectangles horizontal

Pressing is odd but it makes sense in keeping the block square and for when the quilt is ready for assembly. There is no nesting at all in block construction, so careful sewing is in order.
I press from the front of the blocks, so in the pictures when I say press to the right, some will show the back of the units and they will look like to the left--sorry about that bit of head twisting.

Corner units:
Sew four solid and print squares together, press towards the print
Sew the rectangles to the these units, lay out block and press the top two down towards the solid squares. Press the bottom two away from the solid squares.

Interior units:
Sew four solid squares and the 1 1/2 by 2 1/2 rectangles together, press towards the print. Sew the 1 1/2 by 4 1/2 rectangles to both sides of two of these units and to one side of the remaining two units. Sew those two to either side of the 4 1/2 by 6 1/2 rectangle.
Keeping the 4 1/2 sides vertical, sew them to the corner units.

Press the center unit so all seams go to the right.
row pressing shown from the back

Press the upper and lower unit so all seams go to the left. (except the seams around the solid squares--let them stay the way they were pressed earlier.
(In construction, some of the pressing is not necessary to be the way I do it. But it makes sense in keeping the pressing consistent in one direction for each row so I am not constantly thinking does this seam matter later on or not.)

Join the three rows. There are no seams to match, so be careful to not distort as you sew the long 12 inch seam.

Wait to press the final two horizontal seams until it is time for assembly.

Lay out the blocks is complicated to describe but is not complicated in process.
Lay into columns, rotating every other block, keeping the center row horizontal. Make sure you start each first block of a column rotated opposite of the one next to it, then rotate the blocks below it so all blocks nest both north and south and east and west.

Sew into columns.
Then, press all seams of odd columns up and even columns down.
Sew columns together. 
All seams will nest.

I will post pictures of this process when I assemble the quilt top. 

My adaptation of a block out there.
Use at your pleasure.


Thursday, March 25, 2021

calendar quilt, three quarters of the year on

I started this on my birthday in July. Andy likens it to a prisoner checking off days on the wall of a cell.
There is a square for each day. I don't work on it every day, rather get caught up on weekends.

Tuesday, March 23, 2021

jack and jill squares, quilt completed

Jack and Jill squares
2021
84 by 72 inches

Quilted by Sue Divarco using a pantograph of tumbling children

Made with 2 1/2 inch squares from my scrap boxes along with squares my small group has sent to each other in a round-robin envelope during these covid times.
Directions are here:
https://kleinmeisjequilts.blogspot.com/2020/08/jack-and-jill-with-round-robin-squares.html
My design, use at your pleasure.


Monday, March 22, 2021

Fading Charms from Wedding Dress Blue--top completed

Fading Charms
88 inches square

Deanna over at Wedding Dress Blue has a tutorial for her Fading Charms quilt. She offers it in three sizes, using 2 1/2, 2. or 1 1/2 inch patches. 

https://weddingdressblue.wordpress.com/2012/03/23/tutorial-fading-charms-quilt/

It isn't photographing well--it is more beautiful in person. I hope when it is quilted it will look better.

My 2 1/2 inch squares boxes--yes, there are multiples--were no longer shutting. This after making three quilts this past year from them: the Jack and Jill squares, the Orange Medallion 16-patch, and the ongoing Calendar quilt. So I went for Deanna's 2 1/2 inch size. I also went beyond her 72 inch top by adding a 16-patch border to use up even more of the squares. It took 40 16-patches for the border.

Deanna's pattern takes 846 squares. My 16-patch borders took another 640. That is 1486 squares out of my boxes. This used up 1/4th of my squares. I have more plans! I love having these squares ready to go when inspiration hits.
Thank you, Deanna, for sharing your great ideas.

I used a taupe Bella solid, BLK0119 for the frames. I cut them with the lengthwise grain. I found it best to always sew with the patchwork on top and to always press to the solid frame. Will likely use a wool batt to help reduce the weight of the quilt and bind with the taupe.

All my 2 1/2 inch squares quilts this past year include patches my small group shared in our mailed round-robin. These packets arrive about every 2 weeks and are such a joy to open and see what others have been using in their quilts. Those little LaCrosse sticks came from the exchange--love them.


Wednesday, March 17, 2021

Sunday, March 07, 2021

sample blocks


 Working out the pressing plan on these sample blocks to see if they will progress to actual projects.

Friday, March 05, 2021

my grandmothers' pincushions


My grandmothers’ pincushions. Both made of wool and stuffed with sawdust I believe. Left, the patchwork one belonged to Cynthia Meerdink Dykstra. She told me it was her mother’s, Lena Huibregtse Meerdink. On the right the knit one with the little pom poms belonged to Ella (Hillegen) Diekevers Scholten. Such fine knitting. My mom said she didn’t think her mother knitted and it may have been made by Ella’s mother, Carrie (Graada) Rabbers Diekevers who did knit.

Saturday, February 13, 2021

a five-generation quilt

38 by 37 inches

In 2013 my friend and pastor Avena asked me to make her a liturgical stole to wear during the white seasons (Christmas, Easter, and special occasions like weddings). You can read about the stole here:
https://kleinmeisjequilts.blogspot.com/2013/04/making-liturgical-piece.html

She asked me to incorporate a quilt top her grandmother made from Avena's childhood and youth clothing and other family sewing projects that her mother cut into squares. Her grandmother was quite far into dementia and the construction of polyesters, rayons, and cottons was puckered and poofed.
I used it as the lining of the stole so it was close and private to Avena. I loved how when she walked the bottom hems would flare out and we could see a peek of the patchwork.

I asked Avena what to do with the remainder of the patchwork and she said I could discard it. Instead I tucked it away thinking someday there might be a grandchild. And, over 7 years years later, and despite our move and Avena's retirement and move across the country, I knew where it was when I heard Baby was with us.

It was too fragile to handle quilting on my domestic machine, so my friend Sue Divarco took it on her longarm with my request that all I wanted was for it to be flat, let tucks form where they will. She quilted it quite densely. I used a 1930s reproduction for the back, a nod to Avena's grandmother. The fabrics of the patchwork I date to range from the 1920s to the 1970s. I used 6 leftover pieces of red binding from my own quiltmaking.
Because I had cut away a portion of the patchwork for the stole there was a remnant rectangle of patchwork I trimmed and bound to make a small table mat. I like that there is a stain in the black gingham!
14 by 5 inches

In the end very little was discarded. Most of the patchwork went into the stole, the quilt, and the mat.

I left about 6 inches to sew in the binding so Avena and her daughter can put the final stitches in the quilt.
The quilt is finished. It was made by the hands of Avena's grandmother and mother, by Avena and her daughter. And now, ready to swaddle Baby.
Five generations.

Tuesday, February 09, 2021

working on the alphabets

It has been a busy semester, but I have found time to make a few letters now and then. They will be my tax-prep-respite for the next few weeks.
Using the Moda alphabet, with my own modifications.
 

Friday, January 15, 2021

calendar quilt--a year half passed

I started this calendar quilt on my birthday in July. The thought behind it was marking off the days during quarantine. A bit of hubris to start a year-long project when we are in danger of the pandemic.
Most weeks I catch up on Saturdays as I do not work on it every day. I choose a square based on events, thoughts, moods. Most often I choose a fabric that reminds me of a family member or a friend, selected because I thought of them that day. Some of the fabrics are from these people. Sometimes it is just a fabric or color I love.
And sometimes it gets the mood of the day. There are little nurses and a Dr Fauci back when the vaccine was released. There is a Ruth Bader Ginsburg too.
Sadly, this week I included a chaos block for when the Capital was stormed.
Let us hope for calm going forward.

I cut solids when I have solids out for other projects. I cut squares ahead too.
Blocks are made ahead and kept in a box ready to pull from as they fit the day, or a fabric is sought out to commemorate a day.
The smartest thing I did in designing the quilt was to have a spacer between each Saturday and Sunday, making it easier to see where I left off.

Click on the "calendar quilt" label below to read previous posts detailing block construction and quilt design.
My design, use at your pleasure.


Friday, January 01, 2021

start at the very beginning

I started this alphabet today--actually two. One with batik scraps and the other with 30's repros and a constant green. I think I will go forward with both.
https://my.modafabrics.com/2019/02/moda-spell-it-with-fabric

If you download it and print double sided, then fold in half at the horizontal, staple it, it makes a book.
Letters finish 10 by 8 before sashings/spacers

I have learned so far:
-Write the cut sizes larger as they are small and in green print. I have already made mistakes.
-Change the cutting when it doesn't make sense. On the B the right side does not need so many pieces. I made the two squares and two rectangles of that side into two rectangles 3 1/2 by 2 1/2.
-Press the way it wants to be pressed, not the way they say to. With the batiks behaving differently from the 30's fabric, I let them do what they wanted.
-I am using Doug Leko's simple folded corners mini. Any flipped triangle method would work but I like this one. Link below.

Anyone want to join me on this?
I am not rushing this. It may turn out to be a several months project.
I am not worrying about the sashing/spacers/layout for now.
There is also a mini version of these. Link below.

Thursday, December 31, 2020

16-patch with orange medallion, quilt completed

16-patch with orange medallion

72 by 72 inches

Made from 16-patches using up many of my bin of neutral 2 1/2 inch squares, plus those gathered from my quilt group's covid round-robin where we put squares in envelopes and send them on, removing what we want, adding more to share.
The quilt was influenced by Kirstin Klasen and Wanda Hanson. You can read more about how it came together here:
https://kleinmeisjequilts.blogspot.com/2020/09/neutral-16-patch-with-orange-medallion.html
I do tend to push my neutrals! There are fabrics of my mother and grandmothers in this. I really like this soft orange used for the medallion and binding.
Quilted by Sue Divarco.

My design. Use at your pleasure.

My final finish for 2020.
I plan to hang this in our bedroom.

Tuesday, December 29, 2020

propeller, top completed

Propeller
90 by 72 inches
80 blocks set 8 by 10

Block finishes 9 inches
Solid: one square cut 3 1/2 inches, four rectangles cut 1 1/2 by 3 1/2 inches
Print: four rectangles cut 3 1/2 by 5 1/2 inches
Block construction details are posted here:
https://kleinmeisjequilts.blogspot.com/2020/05/propeller-2.html

Assembly:
Sew into 5-block units. Press joining seams in one direction
Sew together two 5-block units, flipping the second unit so seams nest

Sew together two rows each made up of four of the larger units
One final horizontal seam
My design. Use at your pleasure!

Friday, December 25, 2020

Merry Christmas 2020!

A Merry Christmas from the Dykstra Davis family in Chicago. 

Wednesday, December 23, 2020

letter box, quilt completed

My adaptation of the pattern Letter Box from the June 2009 McCalls Quilting magazine.

I worked with plaids a lot back then. I remember wanting to make a summer feeling quilt. The best source of these light plaids is in the women and the children sections of the thrift stores. The fabric yield is not as good as in a man's shirt, as they are smaller and a woman's shirt has darts that take up lots of fabric. But, the variety of plaids from these sections is really worth it.

 After more than 10 years as a top it is finally quilted and bound and in the mail from Tante Lynn to my great-niece Sybil. Sweet dreams my sunny child!

Tuesday, December 22, 2020

alphabet stars, quilt completed

This quilt predates the blog! I remember making the top while Eve was learning to read. I had the wonderful alphabet fabric I used for the border to honor her reading efforts.
I took little tucks here and there so the border grid would work with the center.
The center I think was from a magazine, long lost to my memory.
The top was made over 20 years ago, it was quilted shortly after that, then languished until Covid time when a binding was finally put on.
With Eve's blessing, it is on its way as a gift from Tante Lynn to my great-niece Meta whose reading efforts are impressive.

Sunday, December 20, 2020

propeller

Propeller 
Block finishes 9 inches.
I plan to set 8 by 10 to finish 72 by 90 (80 blocks) or 9 by 10 to finish 81 by 90 (90 blocks).

This is a simplified version of Tines I posted about a few months ago, again using partial seaming.  The orientation of the blades is different with them sewn to the short side of the print rectangles instead of the long side.
https://kleinmeisjequilts.blogspot.com/2020/08/tines_9.html

It is also visually a variation of the St Brigid cross (Whirlygig) that I made in 2019.
https://kleinmeisjequilts.blogspot.com/2019/09/whirlygig.html

Cutting
Solid: one square 3 1/2 inches, four rectangles 1 1/2 by 3 1/2 inches
Print: four rectangles 3 1/2 by 5 1/2 inches

Construction
Sew solid rectangles to prints, press towards the solid
Sew rectangles to center square using partial seaming, always stitching from the square toward the edge of the block, keeping the square on bottom and the seams off the center square pointing away from the square.
Press these seams away from center square first from the back, then from the front. I do a bit of spray starch for my final press.

My design, use at your pleasure.

Saturday, December 19, 2020

cake stand, top completed

Cake Stand
About 80 by 90 inches
Set on point with 98 blocks

Block finishes 8 inches
Cutting (using the EZ angle or Bonnie Hunter's tool for triangles)

Solid: one triangle from 4 1/2 inch strip, six triangles from 2 1/2 inch strip
Print: two triangles from 4 1/2 inch strip, four triangles from 2 1/2 inch strip, one 2 1/2 inch square, two 2 1/2 by 4 1/2 inch rectangles

Piecing directions are posted here:
https://kleinmeisjequilts.blogspot.com/2020/06/cake-stand.html

Setting triangles
I over-cut these so there would be a float. 
Corner triangles cut with sides about 8 1/2 inches
Side corners cut with hypotenuse about 14 inches

On point quilts are a pain, but I like the effect when it is done. Also, those setting triangles are a great place to use directional fabrics.

My design, use at your pleasure.

Dr Fauci made it into a setting triangle
Fabric from Spoonflower

Monday, November 30, 2020

bindings ready for winter handwork


It has been a busy semester. I manage to fit in a little piecing, quilting, and machine binding work. The larger quilts were made years ago and are finally quilted. Always good to have quilts come back from the longarmer!

The little Vote quilt was made in the lead up to this year's election, I quilted it  with the Bernina squiggle stitch.

My handwork pile is replenished for winter.

Monday, October 19, 2020

calendar quilt--three months in

My calendar quilt started on my birthday is coming together well. I catch up on weekends. Blocks finish 4 inches.