Showing posts with label jack and jill. Show all posts

Tuesday, July 01, 2025

red and white jack and jill variation, top completed

Jack and Jill 
Top completed 2025
94 by 80 inches

I think I've made four Jack and Jills now.
I've used different combinations of rectangles and/or squares. Each has been quilted by Sue DiVarco with a pantograph of tumbling children, which I will use again for this one.
The 2 1/2 inch cut red squares bin was pretty full when I started and is not so any longer. Good thing more red and white quilts are in progress so the scraps will accumulate!

The directions are for making as shown but are easily adapted for changing the size of the quilt. I wanted to go big, but may make another with my multi-color scraps a bit smaller down the road.

Cutting (note, my numbers might be off a bit)
White: 230 rectangles cut 4 1/2 by 2 1/2 inches; 10 squares cut 2 1/2 inches
Red: 1410 squares cut 2 1/2 inches

Unit Piecing (note again, my numbers might be off a bit)
The basic unit is made from one white rectangle 4 1/2 by 2 1/2 inches and six red 2 1/2 inch squares. Do not press yet.
MAKE 200 Basic Units with six red squares  and one white rectangle each.


The top is constructed in six panels of eight rows*
*NOTE that I left off Row 8 of the bottom panel as I did not want a lone white square floating on the left bottom corner. My numbers reflect this change.

Use 188 units to make 47 rows of 4 units.
Each row has 4 of the basic units, with the white rectangle on the left. Then adapted as described below to have the stair-step effect.
(Remaining 12 units will be used in next step.)

Panel construction
Row 1: Add one more basic unit with the row starting with a rectangle
Row 2: Add one square at the beginning and a rectangle and five squares on the end
Row 3: Add two squares at the beginning and a rectangle and four squarres on the end
Row 4: Add three square at the beginning and a rectangle and three squares on the end
Row 5: Add four squares at the beginning and a rectangle and two squares on the end
Row 6: Add five squares at the beginning and a rectangle and one square on the end
Row 7: Add one more basic unit with the row ending with a rectangle
Row 8: Add a WHITE square and six red squares at the beginning of the row and a WHITE square at the end

Left side of a panel, Rows 1-8

Right side of the panel, Rows 1-8

Row pressing
Press odd rows to the west and even rows to the east

Make 6 panels.

Panel pressing
Press panels south

Sew panels together and press joining seams south.
Everything nests!
Backing is this great 
Riley Blake 
Nautical pattern C8550 for Caskata
The ships are about 4 inches tall and 7 inches long

My design, use at your pleasure.

Tuesday, March 23, 2021

jack and jill squares, quilt completed

Jack and Jill squares
2021
84 by 72 inches

Quilted by Sue Divarco using a pantograph of tumbling children

Made with 2 1/2 inch squares from my scrap boxes along with squares my small group has sent to each other in a round-robin envelope during these covid times.
Directions are here:
https://kleinmeisjequilts.blogspot.com/2020/08/jack-and-jill-with-round-robin-squares.html
My design, use at your pleasure.


Thursday, August 20, 2020

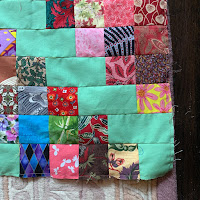
Jack and Jill with round robin squares, top completed

This Jack and Jill is made from my 2 1/2 inch squares bins and those exchanged with my quilt group's quarantine round robin exchange.

84 by 72 inches
You can make the quilt any size you want. These directions are for the 72 by 84 inch quilt top I made. I did include many objects and kept them oriented the same way but that is not necessary.

I sewed it in seven 6-row panels to help reduce the  stress on the fabrics to sew it as 42 individual rows. Also, sewing individual rows onto a mother-ship really irritates me.
Below is my process.

Cutting
Prints:
Cut lots of 2 1/2 inch scrap squares. For this quilt it took 1008.
Solid:
Cut lots of 2 1/2 by 4 1/2 inch rectangles. For this quilt it took 245.
Cut a few 2 1/2 inch squares. For this quilt it was 14
(note, numbers are by estimating and I may be off a few.)

Unit piecing
Piece four scrap squares into 224 units, sew a solid rectangle onto the end of each.
Sew a square onto the end of seven of them.
DO NOT PRESS YET
Remaining scraps and solids will be used to help make the rows stagger

Assembly
Sew 210 of the units with the rectangles into 5 unit rows.
DO NOT PRESS YET

Lay out six of these into rows. You will use the remaining units and squares and rectangles to bring your rows to 72 inches. This is six units long but most of the rows have the final unit split to the beginning and end of the row.

Row 1: five units with solid leading, add one unit to the end PRESS to left
Row 2: five units with added one scrap leading and a rectangle and three scraps ending PRESS to right
Row 3: five units with added two scraps leading and a rectangle and two scraps ending PRESS to left
Row 4: five units with added three scraps leading and a rectangle and one scrap ending PRESS to right
Row 5: five units with scraps leading, add one unit to the end PRESS to the left
Row 6: five units with a solid square and four scraps leading, one solid square ending PRESS to the right
Left side of panel 
Right side of panel
Assemble the six rows, pressing seams up as each row is added.
Make seven panels.

Assemble the 7 panels into the top
All seams will nest

My design, use at your pleasure.

Tuesday, July 07, 2020

round robin squares

My monthly small group of twelve members is not able to meet in these Covid-19 times. Instead we have a weekly 40 minute Zoom meeting where we rotate having three members do show-and-tell then we talk quilting and have personal life sharing for the rest of the time. It is a highlight of my week.

We started a round-robin with 2 1/2 inch cut squares. We have about 15 squares in the envelope so it takes only one postage stamp. When you receive the envelope you take the ones you want and replace with some from your fabrics. It brings a bit of the tactile part of our meetings back to us. We have about 5 packets in the rotation. Some get lost along the way so we start up new ones.

Last week we challenged each other to make a quilt using the squares as a way to mark this time of isolation. I already have almost three shoe-boxes of 2 1/2 inch squares so there is plenty to work with in this house. It is so fun to add in the round robin squares. The green used for the 2 1/2 by 4 1/2 inch rectangles is something I had in my bins. I am not sure the origin, I believe it is a Kona.

I am using a variation of the Jack and Jill design I used a few years ago. The name is mine--the design is one I have seen on the internet and I do not know the origin.
Jack and Jill is made with all 2 1/2 by 4 1/2 inch rectangles and had two irritating construction issues: the long rows and no seams met so there was a lot of pinning. The variation I am making with the 2 1/2 inch print squares will have seams meet so I can have nesting seams and no pins. Still the long rows, though.
Jack and Jill, 2015

Monday, December 28, 2015

jack and jill--a quilt for Beth


Jack and Jill. Measures 60 " by 78".

Made with rectangles cut 2 1/2 by 4 1/2 inches (finish at 2 by 4). I ran out of the teal and decided to keep going with the strong yellow. I debated what was the top of the quilt and the yellow kept saying it belonged on the bottom.
Backed with a delightful toys fabric given to me by a quilting friend--when I showed her how I used it she said she could not for the life of her figure out why she gave it away.

I usually don't like cute quilting patterns, but this tumbling boys and girls continuous line one seemed made for this set. Quilted in red.

For my sister Beth with whom I spent many times rolling down the hay and straw bales in the haymow.