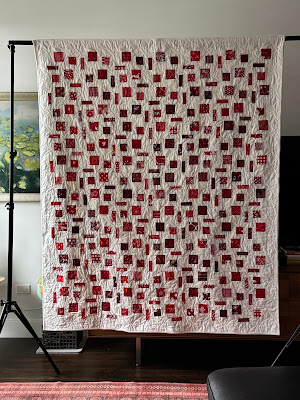
Showing posts with label red and white. Show all posts

Wednesday, September 03, 2025

red and white Zip: directions, top completed

Red and White Zip
80 by 66 inches
top completed 2025
white is Kona Snow

Back in 2016 I designed the Zip Block that I love.
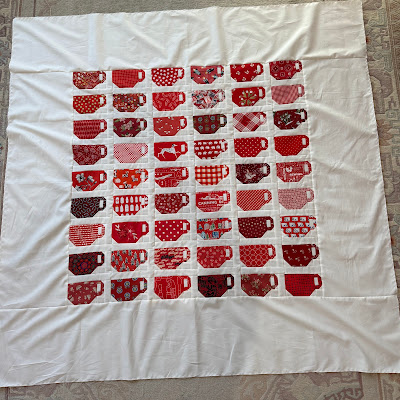
Block details HERE, quilt is shown HERE.
This current variation has a similar effect but a very different construction.
NOTE: numbers may be off but measurements are correct.

Cutting
Red: 560 rectangles 2 1/2 by 4 1/2 inches, 40 squares cut 2 1/2 inches
White: 160 squares cut 2 1/2 inches

Make segments
Make 160 A: three rectangles and one white square
and
Make 40 B: two rectangles and one red square
It will make later pressing easier if you press each segment towards the end with the square now.

Make 40 rows: (pictured below)
Each row is made from 
four segments of three rectangles and one white square
AND
one segment of 2 rectangles and one red square
Press each row towards the end with the red square

Make 20 pairs: (pictured below)
Take two rows, rotate one, and sew into pairs, keeping the row starting with the red square at the top of each pair.
Press the seam down

Make 10 panels: (pictured below)
Take two pairs and sew together into a panel of four rows, keeping the pressing in same direction.
Again, press seam down

Lay out panels and sew together.

Press all horizontal seams down
All seams will nest along the zip white squares

My design, use at your pleasure.
It can be easily adapted to making it wider or longer, or with a horizontal orientation.

backing is Contempo's Gathering by Benartex


Monday, August 18, 2025

chickens, "Henny and her friends" top completed

Henny and her friends
Chickens
62 by 58 inches
Top completed 2025

My sisters and I are naming the chickens for my mom's childhood friends.

I finished this top in June and just realized I hadn't posted about it.
Read HERE about how I constructed the block.
I used Kona Rich Red for the constant and will also bind with it.
I adapted and revised the chickens from a block shown in the Special Spring 2013 edition of Quiltmania Hen Party designed by Kim Gaddy of Buttons and Bees. I cannot find an active link to the designer. Quiltmania is defunct, old copies of the issue are available online.

My block finishes 12 by 14 inches. I added a sprocket sashing of 1 1/2 inch cut squares.
This quilt will go to my sister Beth.
The back is made from chicken feed sacks of my mother. The photo shows the back in progress--there is another print added. I will photograph the back when it returns from the quilter.

Block revisions and set are mine--use at your pleasure.

Sunday, August 17, 2025

tulips! Using pattern by Bess Casey Wilke of Side Lake Stitch: top completed

Tulips
top completed 2025
83 by 65 inches

After the sunflowers, I had to make tulips.
Bess Casey Wilke of Side Lake Stitch has a great tulip pattern Flower Block HERE
I modified piecing a bit by using a goose for the center tip of the tulip and by using the Doug Leko tool for the leaves. And I widened the frame a bit to 2 inches cut.
LOVE THIS!!
Get her delightful pattern and read about her natural dye work!

I used Kona Snow for the constant and made each block with a different red print.

Backing is Farm Family Red by Marshall Dry Goods Co.

LOVE this beaters fabric of Robert Kaufman

Wednesday, August 06, 2025

scottie dogs, binding! quilt completed


Scottie Dogs

top completed 2024
Quilt completed 2025
68 by 62 inches

Quilted by Sue Divarco

48 blocks set 6 across and 8 down
Block finishes 5 by 6 inches
I used Kona Snow for the white
Go HERE to read about the quilt and links to directions.

My design, use at your pleasure.

Saturday, July 19, 2025

Petal Patch in Red and White, pattern by Meghan Buchanan , top completed

Flowers
89 by 65 inches
top completed 2025

I had been sketching out flower designs for my Red & White series when I came upon Then Came June's Meghan Buchanan's delightful Petal Patch pattern available to purchase as a pdf HERE
It moved to the top of my list and my sketches can wait.
Check out all her variations of the pattern on her blog.

Her pattern has great directions and graphics.
I adapted to my construction preferences and eliminated a few seams, mainly by using Doug Leko's mini simple folded corners ruler available HERE. I love this ruler and the larger size too.
I also prefer to press seams to the side rather than open and in making my sample block found this worked.
For the centers instead of piecing, I used 6 different red on white prints. 
I used a different single red print fabric for each flower and its leaves giving it more a silhouette feel. 
Kona Snow for the background. I buy it by the bolt and tear off lengths as I use it.

With CAREFUL cutting, I could get a block out of a fat quarter by cutting along the 18" side:
-Two strips the width of the leaf block in her directions (the longer number) then cutting the two squares for the outside triangles of the center of the flower from the remaining of those strips
-Two strips the length in her directions (the longer number) of the petals
-One strip the width of the stem in her directions
Cut the small squares for the four little squares used in the petals from the leftovers after cutting all the other pieces.

(The block uses nearly the entire fat-quarter. One fat-quarter was a bit short and I had to cut into the selvage for the stem. Fortunately the selvedge words ended up in the seam allowance or I would have had to find a replacement.)

A few other changes:
-I over-cut the length the the stem pieces and backgrounds, sewed them, then trimmed to her stated size.
-I eliminated the outer framing pieces of the block and instead used sashing cut 2 1/2 inches.
-I added a narrow border to the top to give some space to the flowers.

Use my adaptations at your pleasure--buy her pattern!!

I am thinking of making another with a variety of colors using just the flower part of the pattern.

Love Meghan's designs. Check out her Then Came June website and blog.


Backing is Winter at the Farm by Dianna Swartz for Benartex #13456


Tuesday, July 01, 2025

red and white jack and jill variation, top completed

Jack and Jill 
Top completed 2025
94 by 80 inches

I think I've made four Jack and Jills now.
I've used different combinations of rectangles and/or squares. Each has been quilted by Sue DiVarco with a pantograph of tumbling children, which I will use again for this one.
The 2 1/2 inch cut red squares bin was pretty full when I started and is not so any longer. Good thing more red and white quilts are in progress so the scraps will accumulate!

The directions are for making as shown but are easily adapted for changing the size of the quilt. I wanted to go big, but may make another with my multi-color scraps a bit smaller down the road.

Cutting (note, my numbers might be off a bit)
White: 230 rectangles cut 4 1/2 by 2 1/2 inches; 10 squares cut 2 1/2 inches
Red: 1410 squares cut 2 1/2 inches

Unit Piecing (note again, my numbers might be off a bit)
The basic unit is made from one white rectangle 4 1/2 by 2 1/2 inches and six red 2 1/2 inch squares. Do not press yet.
MAKE 200 Basic Units with six red squares  and one white rectangle each.


The top is constructed in six panels of eight rows*
*NOTE that I left off Row 8 of the bottom panel as I did not want a lone white square floating on the left bottom corner. My numbers reflect this change.

Use 188 units to make 47 rows of 4 units.
Each row has 4 of the basic units, with the white rectangle on the left. Then adapted as described below to have the stair-step effect.
(Remaining 12 units will be used in next step.)

Panel construction
Row 1: Add one more basic unit with the row starting with a rectangle
Row 2: Add one square at the beginning and a rectangle and five squares on the end
Row 3: Add two squares at the beginning and a rectangle and four squarres on the end
Row 4: Add three square at the beginning and a rectangle and three squares on the end
Row 5: Add four squares at the beginning and a rectangle and two squares on the end
Row 6: Add five squares at the beginning and a rectangle and one square on the end
Row 7: Add one more basic unit with the row ending with a rectangle
Row 8: Add a WHITE square and six red squares at the beginning of the row and a WHITE square at the end

Left side of a panel, Rows 1-8

Right side of the panel, Rows 1-8

Row pressing
Press odd rows to the west and even rows to the east

Make 6 panels.

Panel pressing
Press panels south

Sew panels together and press joining seams south.
Everything nests!
Backing is this great 
Riley Blake 
Nautical pattern C8550 for Caskata
The ships are about 4 inches tall and 7 inches long

My design, use at your pleasure.

Tuesday, May 13, 2025

teacups, red and white, binding


Teacups

I Need a Cup of Tea
about 54 inches square
Pieced in the days following the November election.

54 blocks
Block finishes 3 by 5 inches
Exquisitely quilted by Sue DiVarco. She quilted a tealeaf in each teacup.

Block constructions is HERE.
Sashing directions are HERE.
Top assembly is HERE.


Thursday, February 27, 2025

red and white ladder, binding!

Red and White Ladder
top completed 2024
quilt completed 2025
81 by 68 inches
quilted by Sue Divarco

I realize I don't get completed quilts photographed very often and it often is years after I finish them that I do so.
I have decided to start posting them at the binding stage as that is something I can photograph more easily and can post them when I am actually at the completion stage.
Here is my Red and White Ladder quilt.
Directions on how to make it are HERE.

I have asked the kids to help me photograph the backlog of dozens of quilts!

Tuesday, December 31, 2024

fragments, quilt completed


Fragments

(Floating Fragments pattern by Jamie Siel)

Quilt completed 2024
78.5 by 65 inches
Quilted by Sue DiVarco

White is Kona Snow
Red scraps

Jamie Siel of Sew Brainy Designs has a delightful pillow pattern series she does for Riley Blake. Her October 2023 "Floating Fragments" pillow begged to be scaled up to quilt size.
Her description of it is HERE.
The pattern tutorial is HERE.
My adaptation is described HERE.

My final finish for 2024.

Saturday, December 21, 2024

teacups: I Need a Cup of Tea, top completed

Teacups

I Need a Cup of Tea
about 54 inches square

54 blocks
Block finishes 3 by 5 inches

I describe how to make the block HERE.
And how to do the sashings HERE
Quilt was constructed in vertical columns and no outside sashings so outer blocks touch the borders.

A good quilt to piece and quiet my mind. A calming cup of tea was in order in November.
Love it in the red and white. And I am making it in the Solids + Prints style too as a long range project.

I included 10 inch wide borders, a place for Sue DiVarco to do her longarm magic.

My design, use at your pleasure.

Backing is this delightful Ski Hill
by Corrine Wells for Riley Blake.
LOVE those crabapple shaped gondolas.

Friday, December 20, 2024

Jump on In designed by Julia Davis of Red Rainboots Handmade, top completed

I love how the quilt looks with different orientations


Jump on In (designed by Julia Davis)
top completed 2024
96 by 80 inches

Last winter Julia Davis of Red Rainboots Handmade (her main business is making wooden barn quilts--those tulips are calling me) had a fabric swap and quilt-along called Jump on In. I did not participate in the swap, but purchased her pattern and watched the progress of the project on instagram.

The pattern is available HERE.
Read about the swap HERE. It was a fun process to follow on her Instagram. She was very organized!
And HERE is a link to the hashtagged quilts made by the participants.

I  kept the idea on the back burner, cutting triangles while cutting reds for other projects and sewing stacks of the units behind the scenes.

Two things I changed to fit my sewing preferences:
I dislike trimming down units, so I cut my triangles from strips to finished size using the Easy Angle or Bonnie Hunter's Essential Triangle tool.
Are my triangles a bit less accurate than if I over-cut/pieced/trimmed?
Yes.
And I am ok with that.

I also dislike sewing lots and lots of long rows together onto a mothership, so I sewed the units into 16-patch style blocks. Once the 16-patches were made I laid out, I sewed into rows, pressing each row east or west, alternating.
All seams nest.

Sew into strips of 4. Press half of these strips up and half down.
Make half-block of 8 units.
Do not press these units yet
Sew two half-blocks together into a block
Do not press these units yet

My reds range from tomato/madder to berry/maroon. The white is Kona Snow.

Thanks, Julia, for the delightful design!

Backing by Timeless Treasures