Monday, March 10, 2025
framed coins
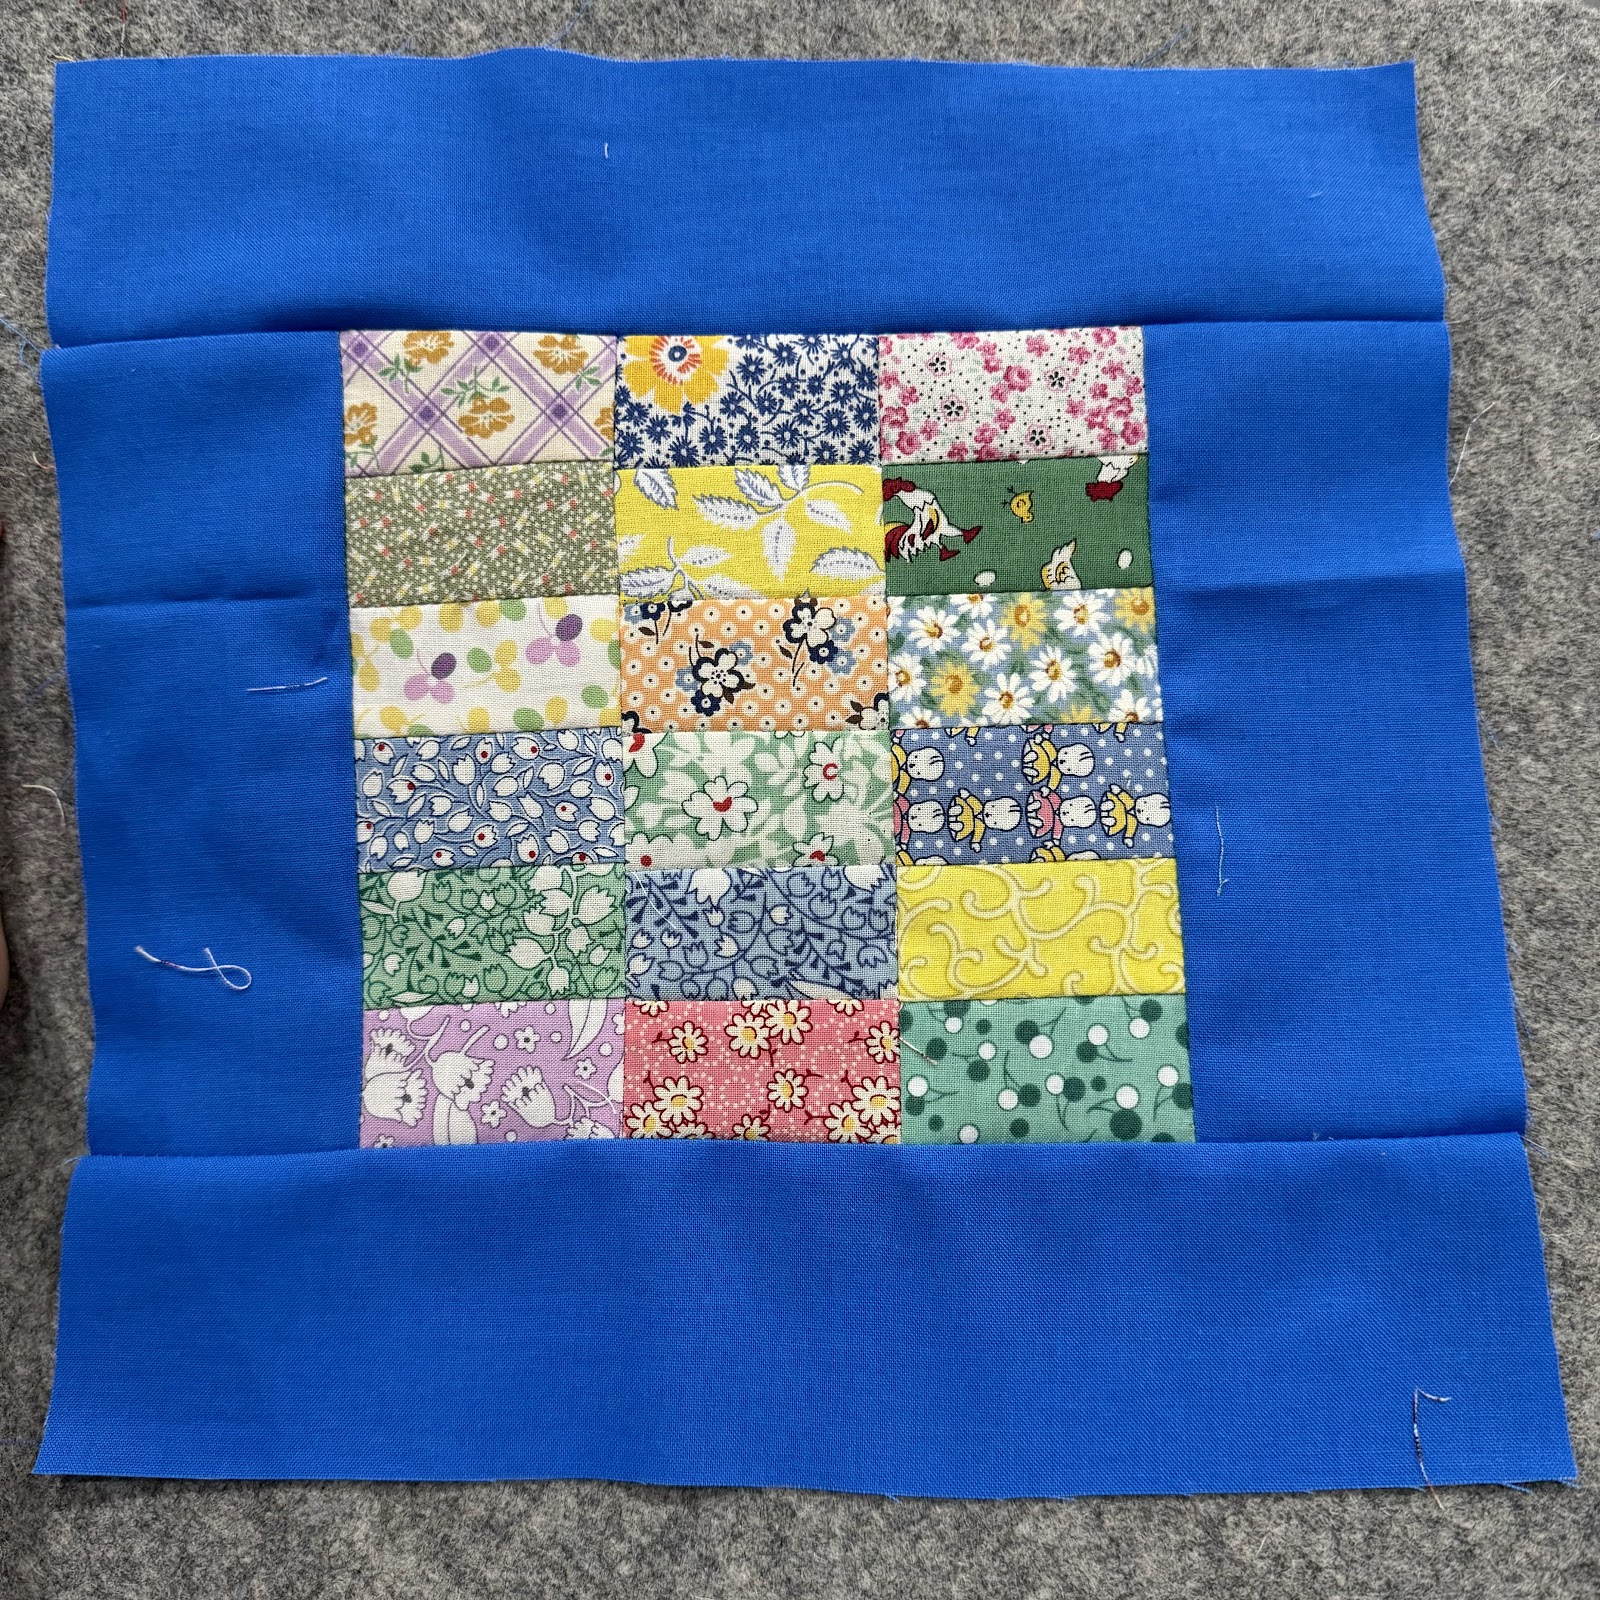
Chinese coins, 1930's repros framed blocks
Top completed 2024
Quilt completed 2025
70 by 50 inches
35 blocks
Blocks finish 10 inches
Directions on making this quilt are HERE.
Saturday, June 08, 2024
Chinese coins, framed blocks: top completed, construction details
Top completed 2024
70 by 50 inches
35 blocks
Blocks finish 10 inches
Scraps are 1930's/40's repros, plus a few vintage scraps of my mother, all from my bins of cut down scraps.
(One of the bins I sort scraps into is 30's repros rectangles 1 1/2 by 2 1/2 inches. So no cutting needed for this quilt other than the blue frames.)
The blue is Kona Harbor (love the 1940's feel this color gives to the scraps)
Block A |
Block B |
18 scraps 1 1/2 by 2 1/2 inches (((324 for quilt)))
Frame: two rectangles 2 1/2 by 6 1/2 inches, two rectangles 2 1/2 by 10 1/2 inches (((36 each for quilt)))
Block B (17 blocks)
50 scraps 1 1/2 by 2 1/2 inches (((850 for quilt)))
SO,
1174 scrap rectangles total for this quilt.
Process:
I sewed into 587 twos
I set aside 139 of the twos.
The remainder, 448, were sewed into 224 fours.
(This is not how I actually work--I sew twos until I am tired of it, then fours, etc. I count up when they are at the fours stage. I always think I am way over; I am always under and need to make more.)
Block A
I took 54 of the fours and added a two to each making 54 sixes.
These units were pressed with all seams going one direction.
I sewed these into 18 blocks of three units, flipping the center unit so all seams nest.
I added the frames onto these.
The short sides frames were pressed to the frames.
The top and bottom frames were pressed north (this helps with nesting later).
Block B
The remaining 170 fours were sewn into 85 eights.
A two was sewn onto each of these to make tens.
These units were pressed with all seams going in one direction.
5 units were sewn into blocks, flipping every other unit so all seams nest.
Joining blocks
Orient the Block B so the outer seams are pressed south and it will nest into Block A with its sashing seams pressed north.
Sew in rows and press rows north.
My design, use at your pleasure.
I am trying to make smaller quilts so my initial sketch was for 63 blocks coming to 70 by 90. I scaled back to 34 blocks coming to 50 by 70.
It is hard for me to work smaller.
My beloved Bernina 830 take-up lever broke off. I gently packed it for repairs and brought out this lovely Bernina 930 I had in reserve. I wisely purchased it a few years ago during the lock down from a man moving out of town. $350. At the time I tested it to make sure it worked, bought what was missing (case, flatbed, accessories box, manual) and it went into the closet.
I needed to get to know the machine so I chose this project from my sketchbook as I knew there would be lots of repetitive sewing.
I already had the scraps cut to size, so this was a pleasant sew.
And I fell in love with this machine.
Tuesday, November 16, 2021
alphabet blocks, quilt completed
Alphabet Blocks
93 by 70 inches
2021
Quilted by Sue Divarco.
Made loosely using the Moda Spell it with Fabric directions found here:
https://www.fatquartershop.com/moda-spell-it-with-fabric-quilt-free-pdf-pattern
My setting direction are here:
https://kleinmeisjequilts.blogspot.com/2021/07/30s-repro-alphabet-top-completed.html
I didn't have to cut any squares for the corner blocks, the sashings, or for the border. All were in my 30s reproduction bins of 2 1/2, 2, and 1 1/2 inch squares.
It was one of two alphabet quilts I started this year on New Years Day. It is the fourth alphabet quilt I have made. I am pretty sure more are in my future.
Setting is my design. Use at your pleasure.
Monday, July 19, 2021
30's repro alphabet, top completed (setting directions)
30's repro alphabet
93 by 70 inchesI made two alphabet quilts using the Moda Spell it with Fabric pattern.
Here is a link to the free booklet:
https://www.fatquartershop.com/moda-spell-it-with-fabric-quilt-free-pdf-pattern
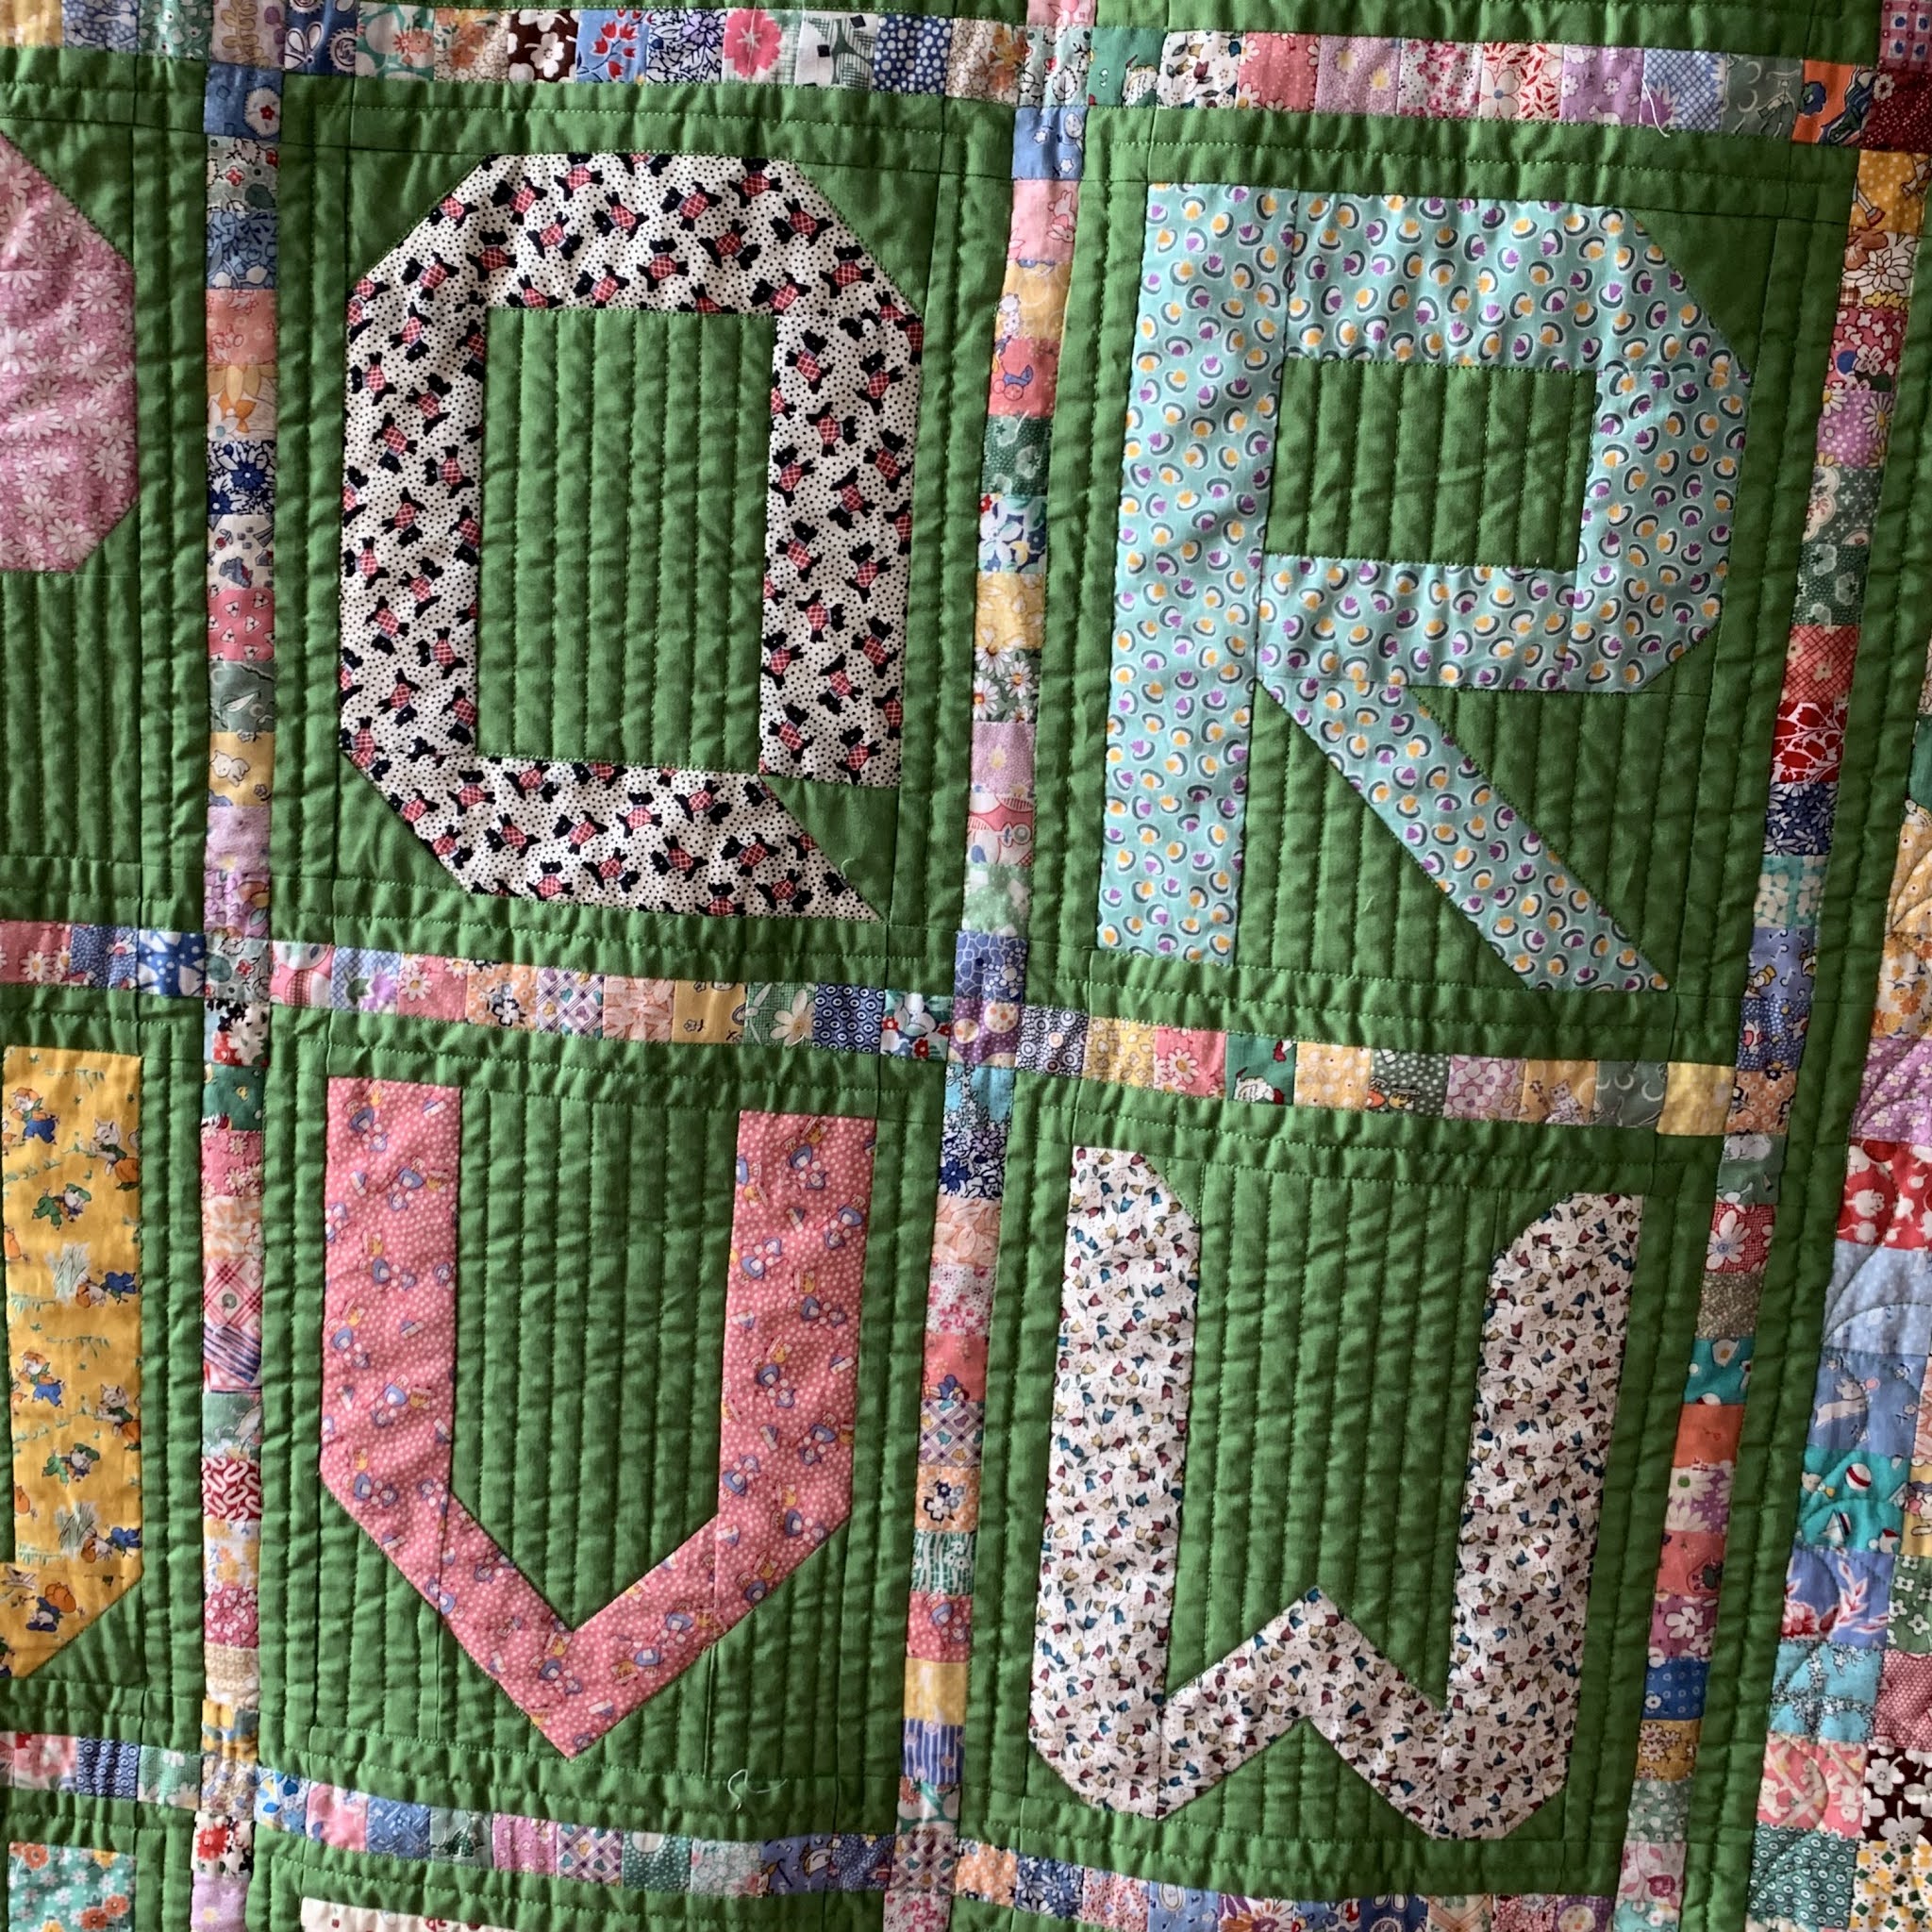
I made lots of changes in construction. Their directions are for using 2 1/2 inch strips. Because I used scraps and yardage I was able to simplify many of the letters. For example, their Z uses 13 pieces. I made it with 5.
I think I started with 4 yards of the green and very little was left at the end.
I don't remember the manufacturer or the color name. It is a fabulous green!
Here are my directions for this 30's repro set. I earlier put up directions for the modern set.
All the squares used for the setting sashings, cornerstones, and 16-patch border were from my bins--none needed to be cut for this set. And many remain for future endeavors.
Make the letters. They will measure 8 1/2 by 10 1/2 inches, to finish 8 by 10.
Make four scrap blocks for the corners
Cut 80 squares 2 1/2 inches
Sew into rows of 4
Sew five rows into blocks that will be 4 by 5, 20 squares. They will measure 8 1/2 by 10 1/2 inches, to finish 8 by 10
Sashing
I used about 640 scrap squares for the sashings and about 184 more for the corner stones. These numbers may be way off, I just used them from my bin of 30's repro scrap squares.
Hint with sashing: cut the solids along the length of grain--long part of sashing parallel to the selvage--the stability of length of grain is always helpful with sashing.
Theoretically, you could make the same look for the sashing by bordering each block with the solid then making sashings with just the 1 inch finished squares. However, these would be very fragile and unstable, so I instead sandwiched them between two solid sashings.
![]() |
sashing (A is pictured) |
The vertical sashes
Make 36 of this size
Cut two 1 1/2 by 10 1/2 inch solid for each sashing, so 72 total
Cut ten 1/12 inch squares of prints, so 360 total
Sew prints into a row. Press in one direction
Sew solid on each side of the squares. Press towards the solid
Sashing B
The horizontal sashes
Make 35 of this size
Cut two 1 1/2 by 8 1/2 inch solid for each sashing, so 70
Cut eight 1/12 inch squares of prints, so 280 total
Sew prints into a row. Press in one direction
Sew solid on each side of the squares. Press towards the solid
![]() |
cornerstones |
Cornerstones made with 184 scrap 1 1/2 inch cut squares, 120 green squares and a few 1 1/2 by 2 1/2 inch and 1 1/2 by 3 1/2 inch rectangles.
Scraps:
1 1/2 inch squares
Solid:
1 1/2 inch squares
1 1/2 by 3 1/2 inch rectangles
1 1/2 by 2 1/2 inch rectangles
The interior cornerstones
Make 20
The edge cornerstones (except for the corners)
Make 18
Cornerstone C
The actual corners!
Make 4
They can be all made the same or, like I did, with the long green kept in the horizontal position
Assembly
Sew Sashing A onto the left side of all blocks and also to the right side of the blocks that will be on the right side of the quilt (that will be two of the scrap square blocks and the letters H, M, R, W.
Sew the rows.
Press blocks towards the sashings.
Lay out rows and remaining sashings and corners.
The corners are constructed in a way that the outside will be of the solid fabric.
Press cornerstones towards the sashings.
Sashing can be simplified with a 3 1/2 inch cut solid, or if you like the pieced one but don't want to bother with all the tiny squares, replace that center section with a print or another solid cut 1 1/2 by 8 1/2 and 1 1/2 by 10 1/2. The cornerstones can be simple squares cut 3 1/2 inches too instead of 9-patches.
At this point the top measures 81 by 58 inches finished (81 1/2 by 58 1/2 by measuring)
Borders
I made borders out of about 816 2 inch cut squares sewn into 16-patches. (and 16 rectangles 2 by 2 1/2 inches cut for the centers of the top and bottom borders, see note below.) Again, my numbers may be off.
For the side borders:
Thirteen and a half 16-patches for each side
For the top and bottom borders:
Five and a half 16-patches, a center unit, Five and a half more 16 patches for each.
To make the math correct, make a half-16 patch with patches cut 2 by 2 1/2 inches, one each for top and bottom borders. These were placed in the center of the top and bottom borders. I think they melt into the other 16-patches well.
Press all borders towards the sashings
Finish with stay stitching the edge to keep intact until quilting.
Note the larger patches in the center position |
Final quilt top comes to 93 by 70 inches.
Letters are adapted from Moda's Spell it with Fabric pattern.
Setting is my design.
Use my setting at your pleasure.
Wednesday, November 16, 2016
a new grand-niece!
Welcome, dear Sybil, to the family!
Friday, November 04, 2016
madder sew-a-long at Humble Quilts, completed
I have maybe 2 madders prints, so instead decided to use the 2016 Pantone color(s) of the year, rose quartz and serenity. The pink is a Kona solid, I think peony. The blues are 30s repro. The colors are a bit more true in the progress photo below.
The whole thing has a 1950s vibe to it. It loses some movement of Lori's in my use of just one solid for the background, but it takes it in a different direction with the shapes having less to do with each other in blocks and gives more of an all over effect.
Measures about 24 inches square.
Machine quilted by manipulating the meandering stitch on my Bernina 1530.
Thanks, Lori, for another great sew!
Saturday, August 06, 2016
seeing stars sew-a-long, quilt completed
http://www.turningtwenty.com/store-detail.php?ID=2762
I changed the set a bit and made an additional eight large sized blocks with different star patterns to make my variation work.
78 1/2 by 99 inches
I used several yellow solids for the backgrounds and 30s repros (plus one vintage!) in the blocks, and a great yellow print for the setting pieces.
A cheerful quilt! Thank you, Tricia and Sue!
The back is made in what I call a "storybook" style, with a variety of light prints with figures on them. I will post later on how I put these together.
Sunday, June 26, 2016
orange! 25 patch/framed nine patch quilt, completed
Saturday, January 30, 2016
seeing stars sew-a-long, top completed
80 by 99 inches
Turning Twenty had a sew-a-long Seeing Stars. I altered their set a bit, making extra blocks to make my version work. I used several yellow solids for the block backgrounds and found this fun yellow floral for the setting blocks and borders.
It was a fun sew--I look forward to seeing more versions.
Friday, January 22, 2016
stars sew-a-long
Monday, December 28, 2015
jack and jill--a quilt for Beth
Jack and Jill. Measures 60 " by 78".
Made with rectangles cut 2 1/2 by 4 1/2 inches (finish at 2 by 4). I ran out of the teal and decided to keep going with the strong yellow. I debated what was the top of the quilt and the yellow kept saying it belonged on the bottom.
Backed with a delightful toys fabric given to me by a quilting friend--when I showed her how I used it she said she could not for the life of her figure out why she gave it away.
I usually don't like cute quilting patterns, but this tumbling boys and girls continuous line one seemed made for this set. Quilted in red.
For my sister Beth with whom I spent many times rolling down the hay and straw bales in the haymow.
Sunday, December 27, 2015
rick rack--a quilt for Henrietta
Made with 2 1/2 by 4 1/2 inches cut (2 by 4 finished) rectangles. The construction left one side with more of the solid--I could have trimmed it to match the other, but I like this little quirk.