Saturday, August 29, 2020

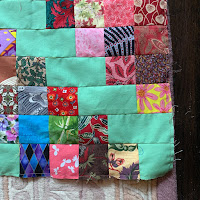
tines, top completed

Tines
90 by 80 inches
Block finishes 10 inches
72 blocks set 9 by 8

Details on making block at
https://kleinmeisjequilts.blogspot.com/2020/08/tines_9.html

My design, use at your pleasure.

Thursday, August 20, 2020

Jack and Jill with round robin squares, top completed

This Jack and Jill is made from my 2 1/2 inch squares bins and those exchanged with my quilt group's quarantine round robin exchange.

84 by 72 inches
You can make the quilt any size you want. These directions are for the 72 by 84 inch quilt top I made. I did include many objects and kept them oriented the same way but that is not necessary.

I sewed it in seven 6-row panels to help reduce the  stress on the fabrics to sew it as 42 individual rows. Also, sewing individual rows onto a mother-ship really irritates me.
Below is my process.

Cutting
Prints:
Cut lots of 2 1/2 inch scrap squares. For this quilt it took 1008.
Solid:
Cut lots of 2 1/2 by 4 1/2 inch rectangles. For this quilt it took 245.
Cut a few 2 1/2 inch squares. For this quilt it was 14
(note, numbers are by estimating and I may be off a few.)

Unit piecing
Piece four scrap squares into 224 units, sew a solid rectangle onto the end of each.
Sew a square onto the end of seven of them.
DO NOT PRESS YET
Remaining scraps and solids will be used to help make the rows stagger

Assembly
Sew 210 of the units with the rectangles into 5 unit rows.
DO NOT PRESS YET

Lay out six of these into rows. You will use the remaining units and squares and rectangles to bring your rows to 72 inches. This is six units long but most of the rows have the final unit split to the beginning and end of the row.

Row 1: five units with solid leading, add one unit to the end PRESS to left
Row 2: five units with added one scrap leading and a rectangle and three scraps ending PRESS to right
Row 3: five units with added two scraps leading and a rectangle and two scraps ending PRESS to left
Row 4: five units with added three scraps leading and a rectangle and one scrap ending PRESS to right
Row 5: five units with scraps leading, add one unit to the end PRESS to the left
Row 6: five units with a solid square and four scraps leading, one solid square ending PRESS to the right
Left side of panel 
Right side of panel
Assemble the six rows, pressing seams up as each row is added.
Make seven panels.

Assemble the 7 panels into the top
All seams will nest

My design, use at your pleasure.

Sunday, August 09, 2020

tines


I saw a quilt called Cogs from the 2012 Texas Mennonite Quilt Sale that I really liked. I could not find the origin of the design so I drafted my block with different proportions and fabric placement. I am making another version with yet another proportion and placement change.
https://www.chron.com/neighborhood/bellaire/news/article/Texas-Mennonite-Sale-and-Auction-features-quilts-9510245.php

It is made with partial seam sewing and goes together very quickly. I let the directional fabrics spin though the center square lines up with one of the tines units.
(If you know the origin of the block please let me know so I can credit the designer.)

EDIT: Nann Hilyard alerted me to this similar pattern from GE Designs. The proportions are a bit different and it uses 2 1/2 inch strips.
https://gequiltdesigns.com/collections/patterns/products/strip-twist-pattern

EDIT 2: Preeti also has a delightful tutorial with a similar block with different proportions:
https://sewpreetiquilts.blogspot.com/2014/10/paulitiks.html

I am naming it Tines because it looks like the tines of the rake we used for straw and alfalfa. I showed the block to my sister without telling her this and she said, "It looks like tines." So, at least two of us get the agricultural reference!

Block finishes 10 inches
I am making 72 blocks to set 9 by 8, to finish 90 by 80.

Cutting
Solid: four rectangles 1 1/2 by 6 1/2 inches
Print: four rectangles 3 1/2 by 6 1/2 inches, one 2 1/2 inch square

Sewing and Pressing
Sew solid rectangles to print rectangles, press towards solid

Using partial seam sewing technique, sew one of these units to the square, sewing along the solid fabric, about 1 1/2 inches down the square, then backstitch a few stitches.
Starting the partial seam
Add remaining units, sewing from the square to the outside of the block--wait with pressing until all seams are finished.
Adding the units
Finish sewing the partial seam. This step is a bit fiddly. Depending on the fabric, start from the outside of the block or from the square. I find batiks work better from the square and regular fabrics work better from the outside.
Completing the partial seam
From back of block press all assembly seams away from center square. All seams will be pressed to the solid.
Finish pressing from the front of the block, using spray.
I found I kept organized by sewing the solids to the rectangles of a stack of blocks, then sew the square partial seam to the stack. Then I would work with 3 or 4 blocks to completion.
You could do strip sewing of the solids to the prints then cut apart. I don't bother with that as I don't work from yardage and it would be impractical.
It would require a length of 26+ inches of solid (1 1/2 inch) and print (3 1/2 inches).

Friday, August 07, 2020

15 years of blogging

This week marks 15 years of blogging.
Below is a repeat of my first post, the one that explains the naming of this blog.
Klein meisje is Dutch for little girl--what my beloved grandfather called his 12 granddaughters because, I fear, it was easier than trying to remember our names.

Thursday, August 06, 2020

calendar quilt--A Year in the Life: 62 to 63

For several years I've admired calendar quilts, some showing global warming, others showing the seasons. I decided to embark on a calendar quilt and started on my birthday.
Mine is less a statement calendar, more a meditative one. I select a square of fabric for whatever reason that is meaningful to me that day. Sometimes I am remembering someone with the fabric. There are several from my mother's scraps included, even one of her mother who died in 1949; others of my sewing for my family. At times it is a fabric given to me by a friend who is in my thoughts or a fabric I am using that day in a project. Most often it is less contemplative--I just like the fabric and it has been a favorite to sew with.

I don't sew on this every day, but do try to pick out the center daily. A goal is to have the week completed on Saturday. I am planning on setting these 19 by 22. That comes to 418 blocks. One a day (366--I'm including both birthdays) plus a spacer after each week (52).
The spacer block has two purposes. Esthetic in I like how it breaks up the grid because the rows do not end with a multiple of 7 so these spacers will look scattered over the quilt. And practical, in that as it is used after every seven days I don't have to count beyond that if I forget where I am in adding blocks.

Calendar Quilt
Blocks finish 4 inches

Cutting
Print: one 2 1/2 inch square
Solid: two 1 1/2 by 2 1/2 inch rectangles, two 1 1/2 by 4 1/2 inch rectangles
Press all seams away from center block

Spacers: one 4 1/2 inch square

Assembly: Rotate every other block so all seams nest. (The spacer is part of the sequence so the blocks on either side of it are oriented the same)

Monday, August 03, 2020

the binding queue

Always a good day when my long arm quilter calls and my binding queue is once again replenished.
Chevron
Target
Vamoose! (Tunnel)