Showing posts with label postage stamp. Show all posts

Tuesday, August 10, 2021

thirteen, block construction and quilt assembly, top completed

91 by 78 inches

Thirteen is made from my 1 1/2 by 2 1/2 inch rectangles bin and my 1 1/2 inch squares bin and is so named because the block finishes 13 inches.

I used the darker and medium scraps making sure to add some brights and lights.

The design is heavily influenced by the fabulous Tonya Riccui's fabulous Lego quilt.
Tutorial showing antique quilt inspiration: http://lazygalquilting.blogspot.com/2011/08/lego-tutorial.html
Finished quilt named Ellis Island: https://lazygalquilting.blogspot.com/2011/11/ellis-island.html
Tonya using varying lengths of fabric and has a 10 inch block. 

Why 13 inches?
The block needs to be an odd number in size to allow for the staggered piecing. 9 and 11 inches didn't seem to show the movement I wanted in setting blocks together. I discovered 13 inches was as far as I could sew non-nesting rows without needing pins.
So 13 it is.

Each block has a 78 rectangles and 13 squares

Sew the rectangles into 26 pairs, add a third rectangle, sew these into 13 sets of six, and add a square to the end to make a row unit

Press towards the square.

Turn one row unit opposite of the other. I feed the pair into the machine with the small square first of the top row unit.
Sew row units into pairs, then into fours. 

I press these row units down.
Sew three of these 4-units together
Again press down
Add a one row unit

It now measures  13 inches finished (13 1/2 inches unfinished). 
Make sure the top and bottom left corners have a square instead of a rectangle.
Press all seams down.

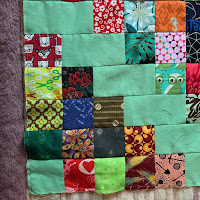
Rotate the blocks and sew together, in pairs, keeping the orientation as pictured. Sew into pairs with the rectangles in vertical orientation on top. The seams are pressed in a way that aids with nesting. I found using an awl or seam ripper to be very helpful in feeding the small pieces and sweeping the underside seam allowances in the correct direction.

In laying out I find it helpful to have the back sides of the blocks showing so the pressing is evident. One miss-turned block can cause issues (speaking from experience).

NOTE: looking at your completed block it will likely not look square. This is due to the accordion effect of the narrow rows. If your sewing was consistent, they will fit.
IF NOT, use the "Plan B" setting I'll describe below.
 
From the back showing block orientations

I set these 6 by 7 blocks to finish 78 by 91 inches.

PLAN B setting:
Keep block with horizontal or vertical orientation, flipping blocks so they will nest to next block. The accordion affect will still happen, but will not distort the quilt top.
The rows will visually keep straight across the quilt. 
This is a pleasing setting and I may experiment with this in neutrals.

plan B horizontal
plan B vertical
SO, for 42 blocks:
3,276 rectangles
sewn into 1092 three patches
sewn into 546 six patches
546 squares
add a square to each row
Press each row towards the square patch
546 rows
Set aside one row for each block, so 42 rows
Sew remaining 504 rows into 252 pairs, these into 126 fours, these into 42 blocks, add the set aside rows, and end up with 42 final blocks!
(the math may be off on this...)
Press each block with the seams towards the bottom
Decide if you are going with Plan A or Plan B and lay out the blocks accordingly.
Sew into pairs
Lay out 7 by 6 blocks
Everything nests!

My adaptation of Tonya's design--use my changes at your pleasure.

Thursday, August 20, 2020

Jack and Jill with round robin squares, top completed

This Jack and Jill is made from my 2 1/2 inch squares bins and those exchanged with my quilt group's quarantine round robin exchange.

84 by 72 inches
You can make the quilt any size you want. These directions are for the 72 by 84 inch quilt top I made. I did include many objects and kept them oriented the same way but that is not necessary.

I sewed it in seven 6-row panels to help reduce the  stress on the fabrics to sew it as 42 individual rows. Also, sewing individual rows onto a mother-ship really irritates me.
Below is my process.

Cutting
Prints:
Cut lots of 2 1/2 inch scrap squares. For this quilt it took 1008.
Solid:
Cut lots of 2 1/2 by 4 1/2 inch rectangles. For this quilt it took 245.
Cut a few 2 1/2 inch squares. For this quilt it was 14
(note, numbers are by estimating and I may be off a few.)

Unit piecing
Piece four scrap squares into 224 units, sew a solid rectangle onto the end of each.
Sew a square onto the end of seven of them.
DO NOT PRESS YET
Remaining scraps and solids will be used to help make the rows stagger

Assembly
Sew 210 of the units with the rectangles into 5 unit rows.
DO NOT PRESS YET

Lay out six of these into rows. You will use the remaining units and squares and rectangles to bring your rows to 72 inches. This is six units long but most of the rows have the final unit split to the beginning and end of the row.

Row 1: five units with solid leading, add one unit to the end PRESS to left
Row 2: five units with added one scrap leading and a rectangle and three scraps ending PRESS to right
Row 3: five units with added two scraps leading and a rectangle and two scraps ending PRESS to left
Row 4: five units with added three scraps leading and a rectangle and one scrap ending PRESS to right
Row 5: five units with scraps leading, add one unit to the end PRESS to the left
Row 6: five units with a solid square and four scraps leading, one solid square ending PRESS to the right
Left side of panel 
Right side of panel
Assemble the six rows, pressing seams up as each row is added.
Make seven panels.

Assemble the 7 panels into the top
All seams will nest

My design, use at your pleasure.

Sunday, July 07, 2019

living with my quilts, postage stamp

What I find wonderful about this quilt is I know all of the fabrics, I have memory of each one.

Saturday, May 12, 2018

visiting my quilts--Eve's apartment

Chinese coin/postage stamp
I love this one. Pieces were cut 1 1/2 by 2 1/2 inches, finishing 1 by 2 inches.

Friday, July 15, 2016

postage stamp, quilt completed

The postage stamp is completed!
I loved every minute of making this quilt.
No strip piecing involved--each block has 32 pieces of a constant solid and 32 different scraps.
The scraps include some of my mother and both grandmothers.
You can read more about how it came together by clicking on the label postage stamp below.
Measures 72 by 72 inches.
Beautifully quilted with an all over floral pattern by Sue DiVarco. She worked very hard to keep it square.
Bound with Kona Celery.
The back is a lovely print from Jane Sassaman's first collection for Free Spirit. Hancock Fabrics was down the street, and when they had her fabric I would buy the whole bolt. I was talking to a friend this week about doing this and she said, "I never saw they carried her fabric." I said that was because I got there ahead of her every time.
This was the last of my bolts. There are scraps of all of them remaining in my fabrics.

Sunday, June 14, 2015

postage stamp--top completed

Pieces cut 1 1/2 inch squares, made into 64 patch blocks, with 32 each solids and scraps.
I didn't do any strip piecing for this--all scraps from my shoebox of 1 1/2 inch squares and solids from my stash--most solids were Kona.
It used a lot of thread!

Wednesday, June 03, 2015

postage stamp progress


It is nearly finished! I haven't posted about this quilt since February. After a rapid start, it needed to be set aside due to a very busy semester. I fit in a few blocks here and there, and today completed the final two blocks. Along the way I decided to make it larger than originally planned.
It is 81 blocks, 9 by 9.
I made each block with scraps from my 1 1/2 inch scrap bin--which is greatly reduced but still has several quilts in it. The scraps include many of my mother's. The solids were also in my stash as small yardage pieces.
I sew them together in 2s, then 4s, then 8. I press to one side and nest the 8 rows together into a block.
The block is then pressed all to one side.
This pressing allows the whole quilt to have butted seams.
I put the quilt together into nine sections of nine blocks each.
Then, put these together in sections, leaving only one long seam that goes for the whole 9 block length.

I have 5 seams left to go!

Monday, May 25, 2015

another graduation!

Our son Paul graduated last week in New York from Columbia University's Mailman School of Public Health.
We wish you well, Paul!
The processional was very formal with Elgar, and the recessional was a fun surprise with a Frank Sinatra recording of "New York, New York!"
This quilt will be his--a postage stamp made with 2 inch cut (1 1/2 finished) squares, with fabrics coming from my mother's scraps and my own. Over 70 years worth!
The back is made from more green and terracotta fabrics from my shelves.
Quilted by Sue DiVarco

Friday, February 27, 2015

postage stamp progress


My one or two blocks a week plan went out the window. I am finding myself thinking about this quilt while at work and can't wait to get home to work on a few more blocks.
I have 36 completed. I plan to make the quilt in the image of the block, so 64 blocks set 8 by 8.
28 to go!
All the solids are from my stash. This is using up lots of smaller leftovers. My 1 1/2 inch squares bin is noticeably reduced! But it still has plenty for the remaining blocks.

As with all scrap quilts, there is a lot of thought going into how I select fabrics. I include a few very low contrast scraps in each block to help break up the checkerboard effect. The solids are varied. Just a few clear brights. I am making sure to include light solids and drab solids to keep the "Easter Egg" look in check.

Saturday, February 14, 2015

postage stamp

I've been making postage stamp blocks with my bin of 1 1/2 inch squares and cutting down various solids.
Each block has 64 squares, 32 solids and 32 scraps.
If I make a block or two a week there should be enough in about a year for a nice sized top.