
84 by 72 inches


I sewed it in seven 6-row panels to help reduce the stress on the fabrics to sew it as 42 individual rows. Also, sewing individual rows onto a mother-ship really irritates me.
Below is my process.
Cutting
Prints:
Cut lots of 2 1/2 inch scrap squares. For this quilt it took 1008.
Solid:
Cut lots of 2 1/2 by 4 1/2 inch rectangles. For this quilt it took 245.
Cut a few 2 1/2 inch squares. For this quilt it was 14
(note, numbers are by estimating and I may be off a few.)
Unit piecing
Piece four scrap squares into 224 units, sew a solid rectangle onto the end of each.
Sew a square onto the end of seven of them.
DO NOT PRESS YET
Remaining scraps and solids will be used to help make the rows stagger
Assembly
Sew 210 of the units with the rectangles into 5 unit rows.
DO NOT PRESS YET
Lay out six of these into rows. You will use the remaining units and squares and rectangles to bring your rows to 72 inches. This is six units long but most of the rows have the final unit split to the beginning and end of the row.
Row 1: five units with solid leading, add one unit to the end PRESS to left
Row 2: five units with added one scrap leading and a rectangle and three scraps ending PRESS to right
Row 3: five units with added two scraps leading and a rectangle and two scraps ending PRESS to left
Row 4: five units with added three scraps leading and a rectangle and one scrap ending PRESS to right
Row 5: five units with scraps leading, add one unit to the end PRESS to the left
Row 6: five units with a solid square and four scraps leading, one solid square ending PRESS to the right
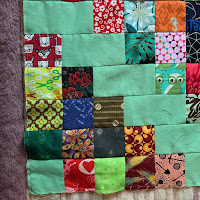 |
| Left side of panel |
 |
| Right side of panel |
Make seven panels.
Assemble the 7 panels into the top
All seams will nest
My design, use at your pleasure.

14 comments:
As always, love your quilts and use of solids. That green, oh my!
When I went to pin the quilt, I did not have a link to "edit".
I always like to give credit to the maker. Not sure if it was user error on my part or what. I have been able to edit your pins in the past.
Just letting you know
d
ps...I also wanted to add: when I "googled" you, you have your own section on using solids in quilts! Way to go Lynn!!!!
This is perfect for my box of 2 1/2" squares cut from the last pieces of fabric. Might try this with a blue print as the main fabric. Thanks!
I was just rooting around my 30s repro prints, and found a stack of solids. This may just be my way out of two tubs down to one! Thanks, Lynn!
Oooh, that's a lot of work. Such a great idea to join in with other friends for a scrap exchange to use during these trying times. I'm sure all the 2020 year quilts will have stories to tell, why they were made, and what was happening in our countries as the pandemic sweeps around the world.
Stay safe.
I like your instructions: "cut lots." (I think back to a book I bought when I was a novice quilter. It featured an elaborate chart system to determine exactly how much of each fabric was needed by calculating the precise measurement of each patch in a block, then multiplying by the number of blocks, and adding the precise measurement of each part of the sashing and border. That was far too fussy and tedious for me -- and shortly thereafter I discovered scrappy quilts where "cut lots" makes perfect sense.)
I am really enjoying making this quilt. You are so generous with your instructions/patterns/advice. Thank you!
Sharon
HI! I love your quilts and I can't thank you enough for posting this one. My 2 1/2 inch squares box/tote/storage unit is overflowing. I will be able to skip the cut "lots" step!!
Very pretty quilt. "Mothership", ha ha. I feel the same, and love piecing a quilt in sections, not rows.
Thanks for the instructions. I love it and will be making one.
Thank you Lynn, this one has been added to my list!
What a gorgeous looking top! Very rich looking.:)
Thank you for posting this tutorial. This is a fun way to use up scraps.
I have a ton of mini charms that i need to use up--(don't know why I bought so many) anyway...I like this idea a lot...that green is lovely...hugs, Julierose
Post a Comment