
Showing posts with label an extravagant welcome. Show all posts
Showing posts with label an extravagant welcome. Show all posts
Sunday, September 24, 2017
Monday, June 22, 2015
an extravagant welcome, installed

The project was made replicating the ideas and lay-out of a group quilt designed by Melissa Kane for a raffle quilt made by members of Illinois Quilters, Inc.
Beautifully quilted by Sue DiVarco.
Measures about 80 by 120. Blocks finish 4 by 6.
Andy and I donated it to St Pauls with gratitude for our children's church school education. It was installed in the Social Hall.


Thursday, December 25, 2014
Merry Christmas!

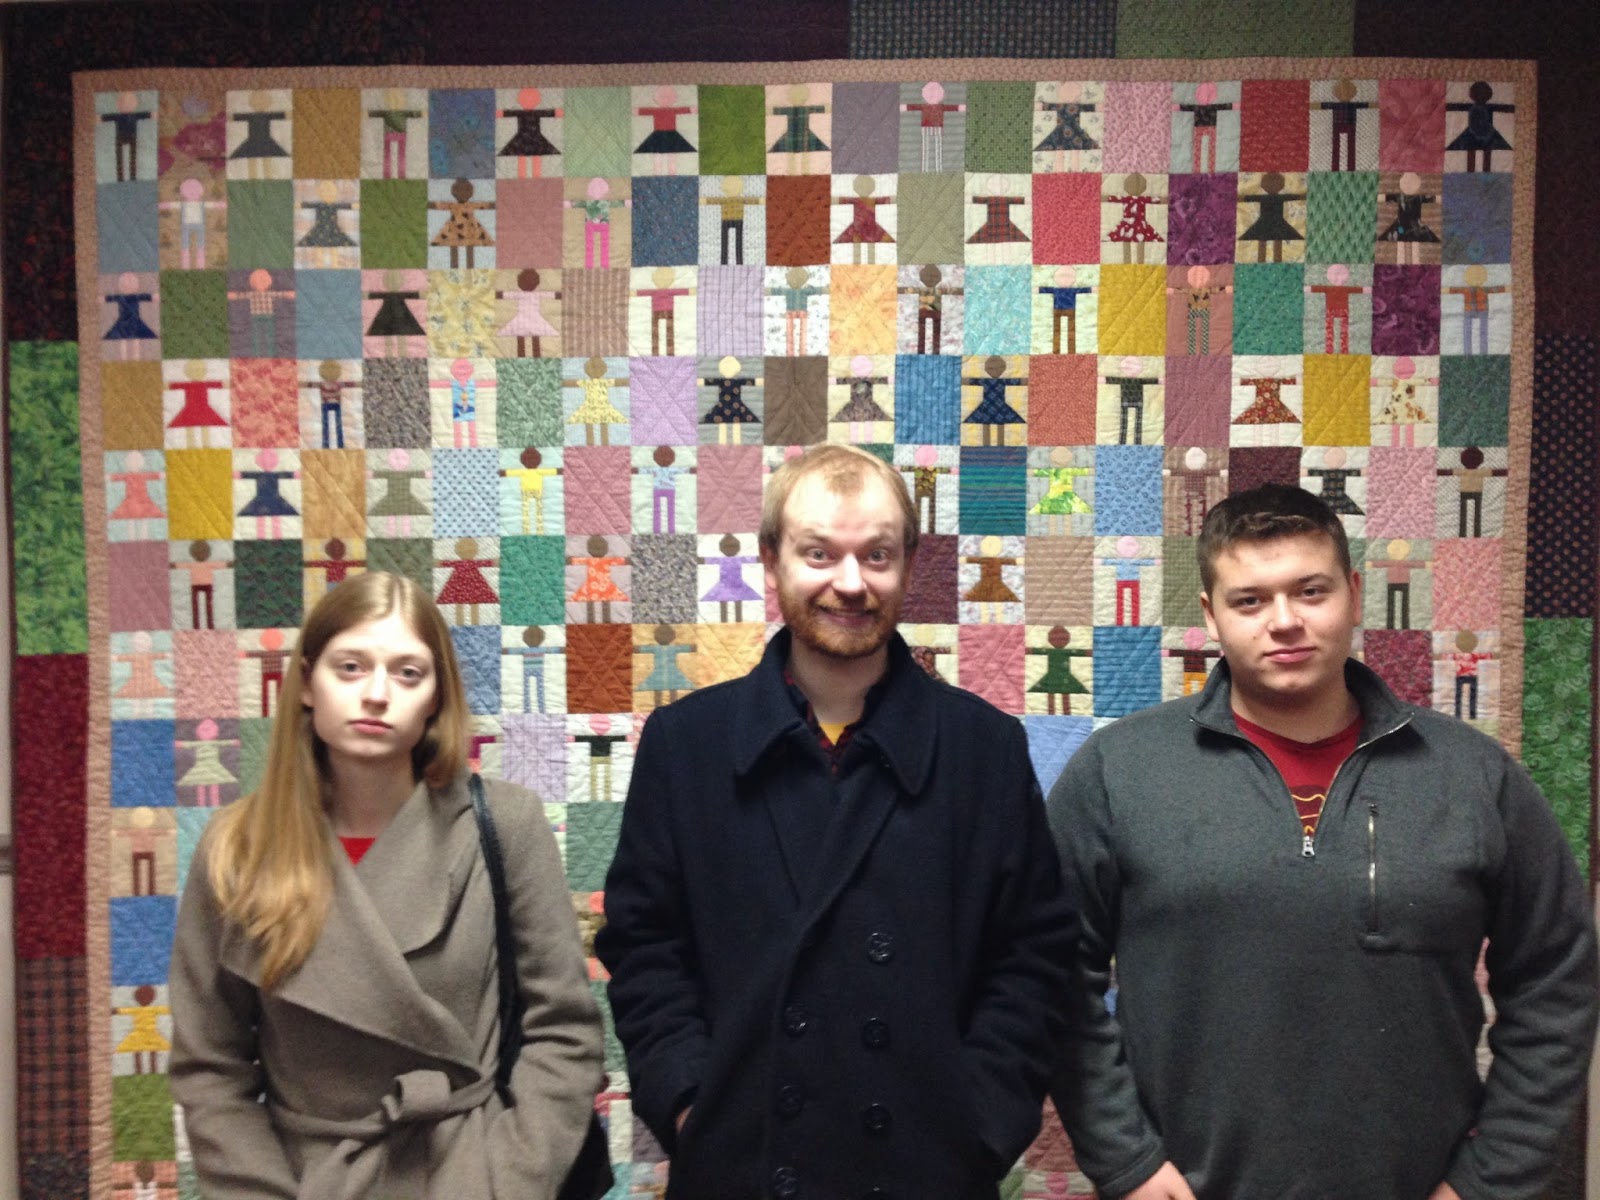
My uncooperative children, standing in front, are not impressed. Watch soon for detailed photographs.
Saturday, December 01, 2012
doll quilts--and a sneak peak!

In the background is the quilt of children, An Extravagant Welcome! My mother helped me finish the binding.
I will post photographs of it once I have a good weather day along with willing and cooperative quilt holders. By the behavior of those I live with, this may be a while.

Sunday, September 23, 2012
some children come to play

Several quilters who have used my tutorials for the children blocks have sent me some of their blocks--THANK YOU!! They are a delight. I love the Olympian Bolt.
Friday, August 03, 2012
an extravagant welcome: comes home!

Just a peek for now.
LOTS of binding ahead.
Saturday, April 21, 2012
an extravagent welcome: they all show up

Tuesday, March 13, 2012
an extravagant welcome--putting it together part 3

There are times when I work in rows--especially with on point settings, but in straight settings I like to work in sections rather than rows.
Why?
I don't like long seams.
They are boring.
They have more potential for getting the quilt out of square.
And I think they put more stress on the quilt. By working in sections, there are just a few long seams. If someone sits on the quilt, that long thread will most likely snap. That is ok if it is just one or two seams, but if I have 20 rows, there is a potential for 20 snapped threads.
There are more twisted seams with this method, but I am ok with that.
There are more twisted seams with this method, but I am ok with that.
At this point, I have 28 full blocks and 7 partial blocks and I will use my wall.
I put up the blocks, and rearrange to my content. I then start putting together in segments, placing a pin in what will be the top right corner when that segment returns to the board.
I work in segments that are of different sizes so I can quickly place it back on the board when I return from the machine.
So, I am making giant 9-patches and 12-patches and whatever else until I have one final seam to make that will be the entire width or length of the quilt.
Borders? I will use a neutral 2 inch border, then finish with a 4 1/2 inch scrappy dark border, the same I one I used in the original. When I get there, I will post some hints on how to make that work easier!
Borders? I will use a neutral 2 inch border, then finish with a 4 1/2 inch scrappy dark border, the same I one I used in the original. When I get there, I will post some hints on how to make that work easier!
So, have any of you been making these blocks?
I'd love to hear from you.
It will take me a bit to get this all together, but did you note the date? I said I thought I could get the blocks done in a month, and I did!
Watch for the completed top in the next 6 weeks.
Watch for the completed top in the next 6 weeks.
And, thanks again to Melissa Kane for her wonderful inspiration.
an extravagant welcome--putting it together part 2
Now take your 98 segments (49 of each type) and make 14 of each of these 9 patch blocks.


And make 4 partial blocks like this.

And make 3 partial blocks like this.

Next time: how to put the blocks into sections and putting the top together.


And make 4 partial blocks like this.

And make 3 partial blocks like this.

Next time: how to put the blocks into sections and putting the top together.
an extravagant welcome--putting it together part 1
Inspect your blocks. Press each one with starch and make sure they are the correct size (5 by 6 1/2 inches). I can work with blocks that are off a bit with easing.
You can put the blocks together any which way you want.
The hands do interlock so you can put them side by side, flipping the seam allowance if you want to put similar blocks next to each other. You will definitely have to flip seam allowances at the top and bottom when putting together rows. Or, you can put sashing and make a strippy quilt. If your blocks are really of varying sizes, I recommend you frame each block and cut the framed blocks to a consistent size.
I am going with the original setting of medium value alternate blocks. Each child is a jewel in this set, and I love it.
This setting will use the 147 children blocks, and 147 alternate blocks (cut 5 by 6 1/2 inches from a medium fabric).
I do not want too much of a checkerboard effect, more of a checkerboard suggestion, so my mediums range from the light side to the dark side. This is also why I used mediums for the backgrounds of some of the children blocks.
NOTE: Although I made about half shirt and pants blocks and half dress blocks, I am not concerned about alternating placement in my quilt--boys and girls can clump together as they do in life.
I do NOT put all the blocks up on the board and work on placement. There are 294 blocks, and that is too many decisions to deal with. Instead, I put the children into larger blocks.
Why?
First, serendipity. Letting a few blocks be "too close" by chance, makes a better quilt. Being too strict with the rules makes a more static look, and I like the serendipity factor to get me out of that control.
Also, by over thinking "this block goes here" 294 times (number of children and alternate blocks) I would drive myself crazy.
Instead, I make nine-patches of the blocks, bringing the total blocks down to 28 full blocks and 7 partial blocks (35).
Here is how to get started:
Sew the blocks into two types of segments--one with one child and two alternate blocks, the other with two children and one alternate block. Make 49 of each.


Next time: how to put these segments into 9-patches (and a few partial blocks).
Tuesday, March 06, 2012
an extravagant welcome--mob rule

Sunday, February 26, 2012
an extravagant welcome--at the barre

The Kingdom of the Shades.

Friday, February 24, 2012
an extravagant welcome--heading to the beach

There are lots of beaches here in Chicago--33 of them according to the Park District website.
When the children were little, I liked Jarvis Beach and Pratt Beach for walks and sitting--very quiet.
For swimming, we would head to Foster Beach at 1000 and leave by noon, before the sun got too high and the crowd too big, but even with SPF 40, my children would tend to get as burned as those in these three blocks.
All are made in vertical rows.
Background is cut as for the shirt and pants block, but the between the legs section is cut long to allow for variations.
Arms are cut 2 by 1 inches on all swim suit blocks.
Hint--when dealing with very small fiddly pieces, I am finding it best to cut the legs section a bit long, and cut the center section down to 6 1/2 inches after it is sewn together. This also allows you to play with proportions a bit.
If in your fiddling, the center section of the block looks off, throw it away. The tiny bits of fabric are not worth reworking at a certain point, and will stretch and not lay right.
Don't over-think this obsession with proportion--these blocks are not to scale with human children. There is a primitive feel to the block, and by messing with embellishments and such, you will lose that appeal.

One piece suit:
straps and chest cut from 1 inch squares
suit cut 2 inches by 2 3/4 inches to accommodate the mermaid--can be shorter for another style.
Legs cut 3 inches and sewn in, then cut down to center section measuring 6 1/2 inches.

Swim trunks:
chest skin cut 2 inch square
trunk top cut 2 by 1 inches
trunk legs cut 2 by 1 inches
legs cut 3 inches and sewn in, then cut down to center section measuring 6 1/2 inches.

Two-piece suit:
straps and chest cut from 1 inch squares.
suit top is 1 inch by 2 inches
midrift skin is 1 inch by 2 inches
suit bottom is cut 1 1/4 inch by 2 inches
legs are cut 3 1/2 inches and sewn in, then cut down to center section measuring 6 1/2 inches.
Fabric for the bathing children was given to me by my friend Nancy.
Anyone making a speedo?
Seth and Eve, Foster Avenue Beach, about 2005

an extravagant welcome--fashion forward children


To mix things up a bit, try making some changes in the clothing.
I find it easiest to take graph paper, make a 6 by 4 1/2 inch grid block, fill in the head and arms, then sketch in some alternate lines.
Don't overdo this. There is a primitive feel to the block, and by messing too much with embellishments and such, you will lose that appeal.
I've made shorts, apron, skirt and blouse, robe, empire waist, swim suit, suspenders, belt, and short sleeves.
The simplest change to make is to give the child short sleeves. This works with both the shirt and the dress.
Everything is cut and sewn the same except the sleeves are cut 1 inch squares and the arms are 1 by 1 1/2 inch of the skin fabric.

Changing the silhouette:
Because I really, really hate paper piecing, I don't go that route.
Instead, to have a different silhouette of a dress, I make a mark at a certain point on the back of the 3 by 2 inch background rectangle and draw a line from that point to the outer corner. I then take an oversized 3 inch square piece of dress fabric, sew and flip, and trim to the 3 by 2 inch size. Then do so as a mirror image on the other side. This works best with a non-directional dress fabric


These three silhouettes were with marks made at 1/2 inch, 3/8 inch, and flush with the top corner, then down to the bottom corner.

Coming next, swim suits!
extravagant welcome--pushing the fabrics


To mix things up a bit, I have been having friends select fabrics. This adds some personality to the quilt. I've included scraps a friend brought home from Ghana, some pieces from my mother's sewing basket, treasured fabrics I bought in Japan, and used many from shirts I take apart.
(I do see the irony in taking clothing, deconstructing it, and making an image of clothing.)

Stripes are great for backgrounds--look like wallpaper.
And, little prints bring whimsy. I also use the back of some fabrics for a muted look.
If you wish to have a directional background consistent in a block, here is a time saver--
when laying out the little background squares to sew onto the head fabric, make sure the stripe is in the same direction for each little square.

When you sew and flip it, it will all be in a consistent direction. I don't always do this--with some I let things go every which way.


Saturday, February 18, 2012
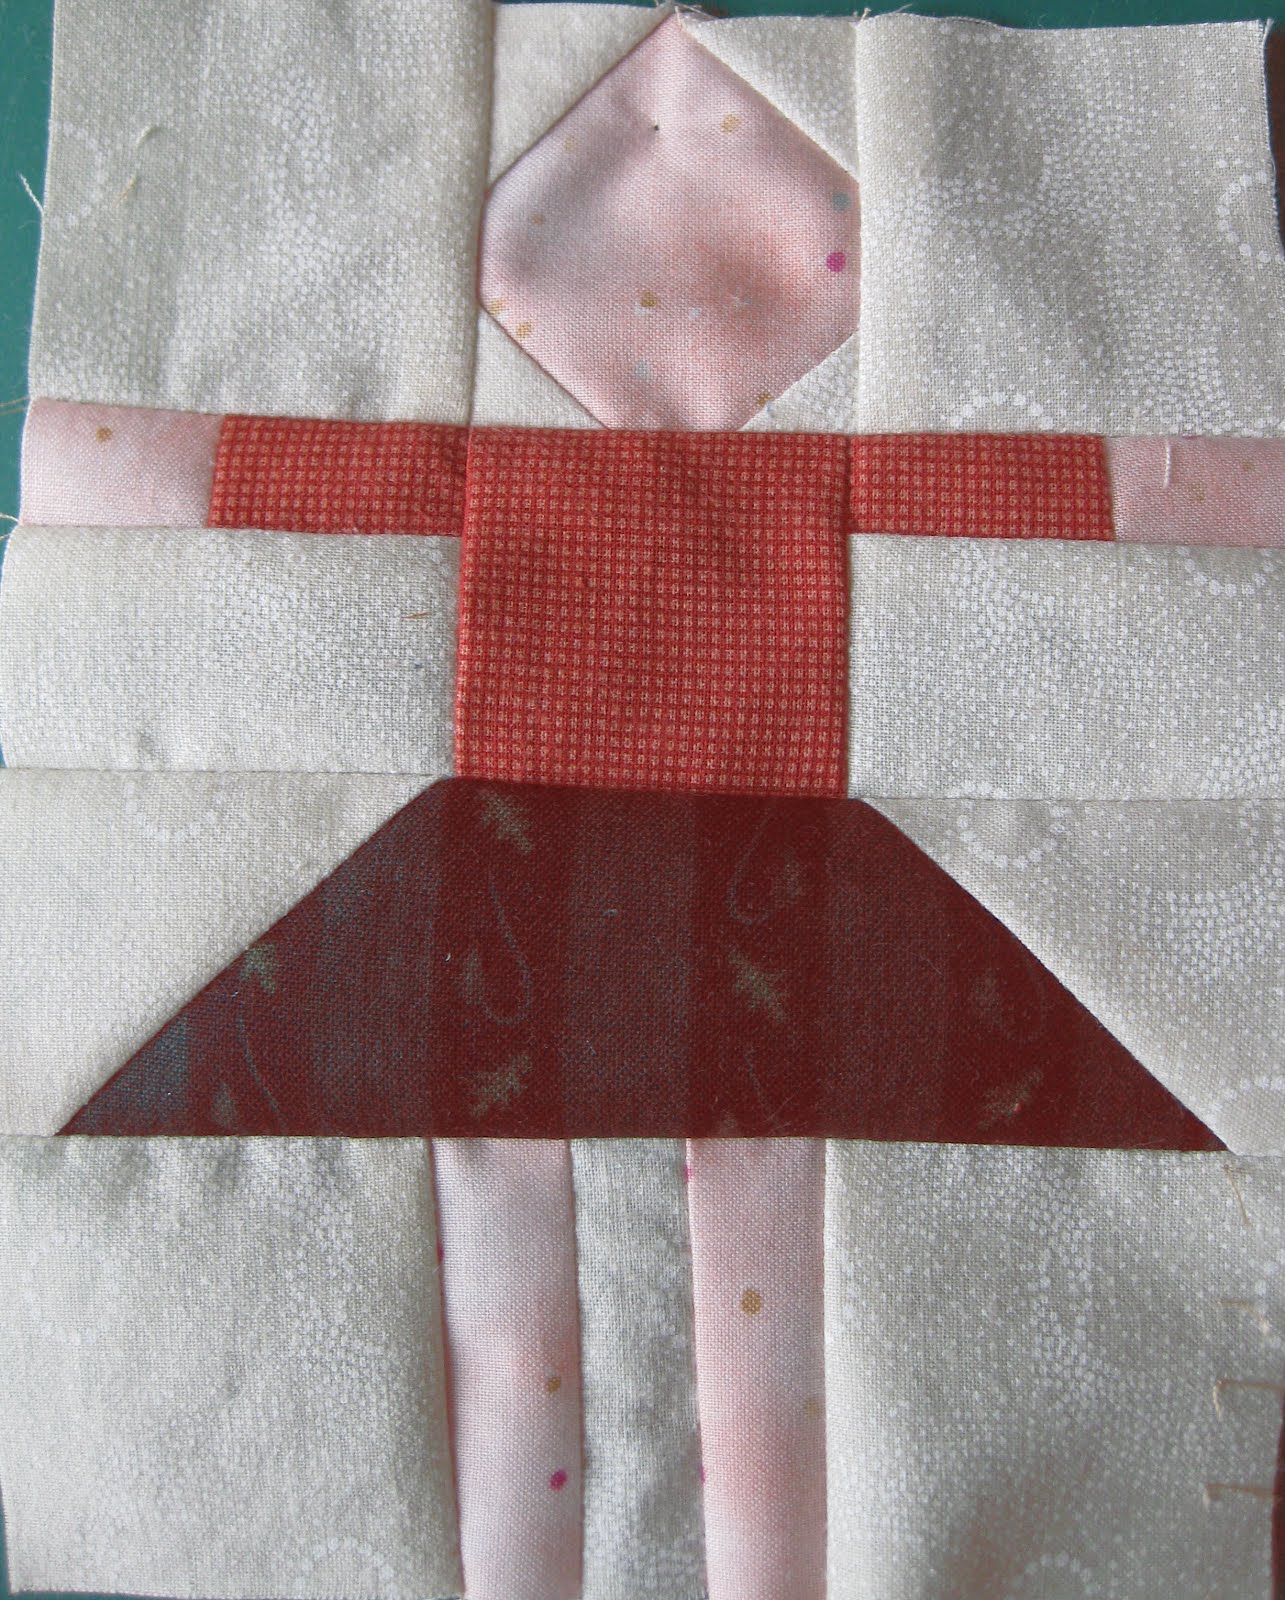
an extravagant welcome--playing with paper dolls

I loved playing with paper dolls as a child and these blocks bring back that same enjoyment.
Select background, body, and clothing and just have fun!
I make a few stacks, lay out three, then sew three blocks at a time.
an extravagant welcome--cutting dresses, pants, and shirts
Hint:
Do not cut all these in one grand cutting day. You want your children to have different personalities, and you will make different fabric choices on different days, depending on what is going on in your life. Some of my children are ready for work, others a good time. Some are rather morose and some are the life of the party. I have asked friends to give me scraps of their actual clothing so they can hunt for their doppelgangers.
Below are the standard clothing parts. Soon I will post a few variations.

Dress
From a 2 inch strip, cut:
one piece 2 by 3 1/2 inches for the dress center
two 2 by 2 inch squares for the skirt
two 1 inch pieces, then cut down to 1 by 1 1/2 inches for the sleeves

Pants
From a 1 inch strip cut:
one piece 1 by 2 inches for the top of the pants
two pieces 1 by 3 inches for the legs

Shirt
From a 2 inch strip cut:
one piece 2 by 2 inches square for the center of the shirt
two 1 inch pieces, then cut down to 1 by 1 1/2 inches for the sleeves.
an extravagant welcome--cutting body parts in mass

Previously I explained how to make the blocks and how to cut backgrounds in bulk.
This is how to cut multiple body parts.
Each dress block needs a head, two hands, and two legs.
Each shirt and pants block needs a head and two hands.
From smaller scraps I cut parts for one block at a time. But, I needed more variety than I had in the house so I bought several quarter yards of fabric (9 inches).
I stack 3 doubled pieces of fabric so there are 6 layers.
I cut from the selvage end one 2 by 9 inch strip and one 1 by 9 inch strip.

From the 2 inch strip I cut:
2 legs (yielding 12 total)
3 heads (yielding 18 total)
2 hands (yielding 12 total)
From the 1 inch strip I cut:
4 hands (yielding 24 total)
1 legs (yielding 6 total)
This is enough for 18 children-9 with dresses and 9 with shirts and pants.
The remainder of the 1 inch strip can be saved for the alternate clothing styles you may wish to try.
Subscribe to:
Posts (Atom)
