Tuesday, May 25, 2021

horizon

Horizon
Block finishes 9 1/2 by 4 1/2 inches 
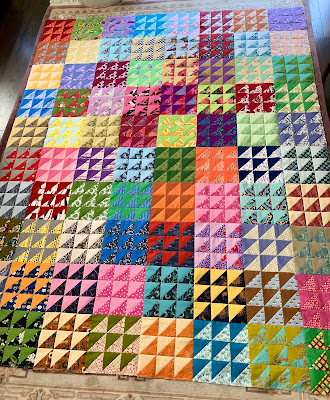
I plan to set it 18 by 10, to finish 95 by 81 inches or 18 by 9, to finish 85 1/2 by 81 inches.

When making a complicated block I like to also make a simpler one to use as a break. This one was a good companion sewing project while making the Circled Squares.
It is a variation of the Riven block I made a couple years ago.
I like rectangle blocks. And this one gives a good amount of space to showcase prints. 

Cutting
Solid:
one 1 1/2 by 5 inch rectangle
Print:
one 9 1/2 inch by 5 inch rectangle, cut into a 6 by 5 inch rectangle and a 3 1/2 by 5 inch rectangle. 
(I do not always cut it from a 9 1/2 inch rectangle. When using scraps that are shorter than that I cut them individually.)

Sewing and pressing
Sew the solid rectangle between the print rectangles.
Do not press until time for assembly.

Assembly
I like to start by sewing all blocks into pairs. This gets me from 180 blocks to 90 units. 
Press every other block seams up or down.
I put pairs into the machine with the down pressing on top. At this point I have the most control over the blocks and by keeping the non-butting seams in this orientation, I save the more accurate butting together of the seams for when I am joining the units.

Then I sew three units together to have 30 large sections of 6 blocks.

These are put three sections to a row.
When rows are completed, press every other row left or right.
Join rows.
All seams will nest.
Watch for the completed top to be posted soon!

My design. Use at your pleasure.

Sunday, May 23, 2021

broken dishes

Broken Dishes
Block finishes 7 inches
I plan to set it 14 by 12, to measure 98 by 84 inches; 168 blocks.

I love this simple traditional block and knew I would eventually get around to using it for one of these quilts.

Cutting
Solid:
four triangles cut from a 4 inch strip, using the EZ angle or Bonnie Hunter's Essential triangle tool
Print:
four triangles cut from a 4 inch strip, using the EZ angle or Bonnie Hunter's Essential triangle tool.
Hint with directional fabrics: cut a piece 18 inches. Fold it back on itself and make the cuts. The four resulting triangles will be oriented 4 different ways keeping the print directional in the resulting block

Sewing and pressing
Lay out the triangles to watch for orientation. I lay it out on a reference block so I keep the orientations correct.

Sew triangle prints to solids. Press towards the prints.
Lay out the squares, watch for orientation. 
Sew them together into 2-square units
Press towards the solid triangle
Sew together the horizontal seam
Do not press this seam until assembly.

Assembly with long columns (making 12 long columns to sew together):
Keeping horizontal seams horizontal, sew into 12 columns of 14 blocks.
Press each odd column with all horizontal seams going to the top.
Press each even column with all horizontal seams going towards the bottom
Assemble columns.
All seams will nest.

OR
(this is how I am doing it--I hope to complete the top this week--watch for that post!)

Assembly into units (leaving just 3 long seams to sew together at the end):
Sew 144 blocks into 36 4-block columns
Press horizontal seams going up
Take two units and rotate one, sew into an 8-block unit 
Make 18 of these
Do not press the vertical seams yet

Also, sew 24 into 12 2-block columns
Press horizontal seams going up
Take two of these units and rotate one, sew into a 4-block 
Do not press the vertical seams yet.

Set the 8-block units into three rows of 6 units each row.
Set the 4-block units into one row of 6 units.
Press every other row's vertical seams left or right.
Sew rows together.
All seams will nest.

Watch for my post of the completed top soon.

My directions of a traditional block.
Use at your pleasure.

Wednesday, May 12, 2021

thousand triangles, top completed

 Thousand Triangles

90 by 72 inches

Block finishes 9 inches
80 blocks set 10 by 8

There are actually 1440 triangles in this quilt!
I love this simple block and how the scraps make different shapes with the blocks next to them.
Go here to read details of block construction and assembly:
https://kleinmeisjequilts.blogspot.com/2021/04/thousand-triangles.html

My design using a traditional block.
Use at your pleasure.