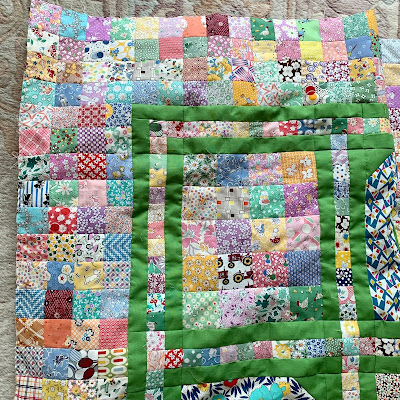
Showing posts with label tutorial. Show all posts

Saturday, December 07, 2024

tutorial: using L sashing, two examples


Cornerstones keep you honest. They help line up blocks when making the field of a sashed quilt. But they also add a visual that I don't always want in a quilt.
When I want to have sashings but NOT cornerstones, I don't like the pinning/easing/moving/instability that happens with long segments of sashings joining rows
My work-around is using L sashings.
I don't know if there is another word for this, but I call it L or 7 as that is the shape it makes around two sides of the block.
*note--the outer blocks may be treated differently as I will explain later.

Measure the block. Decide on a sashing width.
Do the math to make sure you cut the sashings the correct size. complete a sample block before cutting all the sashings.
If an asymmetrical block, put the first sashing on the most irritating side of the block. (I should have done this with the snout side of the dogs but didn't figure this out until I was too far into the quilt.)

Here is an example using my Scottie Dog blocks.
*I decided to have the sashings go all around the field, so some blocks will need to be resolved.
The block finishes 6 inches across and 5 inches down.
Unfinished it is 6 1/2 by 5 1/2 inches.
I used a 1 inch finished sashing, so I cut 1 1/2 inch strips.

I sashed the longer side of rectangle blocks first, so I cut this piece 6 1/2 inches and sewed onto the bottom of the blocks.
Sewn on the block height is now also 6 1/2 inches.
Press towards the sashing
I sash the right side at 6 1/2 inches.
DO NOT press yet.
The sashed block now measures 7 1/2 by 6 1/2 inches, to finish 7 by 6 inches.
See how the sashes make a L or 7 shape?


*I decided to have sashings surround the field so:
I resolved the left blocks with a 6 1/2 inch sashed on the left sides.
I resolved the top blocks with a 7 1/2 inch sashed top sides EXCEPT the top right corner block
I resolved the top right corner block with a top sash of 8 1/2 inches

resolved left side blocks
resolved top row blocks

resolved top corner block

Lay out the quilt and sew into rows or columns I did rows for the dogs. Press sashings to the left or right on alternate rows.
Everything nests.


Now an example with the Teacups.
*I decided NOT to have the sashing go around the field, so I set aside the Right and Top blocks.
The block finishes 5 inches across and 3 inches down.

Unfinished it is 5 1/2 by 3 1/2 inches.
I want to use a 1 inch finished sashing, so I cut1 1/2 inch strips.

This time I remembered to sash the irritating side first, so I cut the initial cup ear sashes 3 1/2 inches. Press to the sash.
Sewn on the block width is now 6 1/2 inches.
I sash the bottom at 6 1/2 inches. DO NOT press yet.
The sashed block now measures 6 1/2 by 4 1/2 inches, to finish 6 by 4 inches.

*Resolving the sides:
I eliminate the side sash of the right edge blocks and just put the lower sash on them (except for the bottom right corner block which remains unsashed). These sashes were cut 5 1/2 inches.
I eliminate the bottom sash on the bottom row and just put the side sash, cut 3 1/2 inches, on all of the lower row blocks (except the bottom right corner block which remained un-sashed). 

Lay out the quilt and sew into rows or columns I did columns for the teacups. Press sashings up or down on alternate columns.
Everything nests. 
Watch for these tops to be completed soon. The semester is ending!
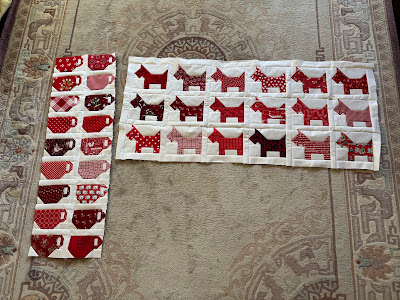
My directions of the concept--use at your pleasure.

Tuesday, August 10, 2021

thirteen, block construction and quilt assembly, top completed

91 by 78 inches

Thirteen is made from my 1 1/2 by 2 1/2 inch rectangles bin and my 1 1/2 inch squares bin and is so named because the block finishes 13 inches.

I used the darker and medium scraps making sure to add some brights and lights.

The design is heavily influenced by the fabulous Tonya Riccui's fabulous Lego quilt.
Tutorial showing antique quilt inspiration: http://lazygalquilting.blogspot.com/2011/08/lego-tutorial.html
Finished quilt named Ellis Island: https://lazygalquilting.blogspot.com/2011/11/ellis-island.html
Tonya using varying lengths of fabric and has a 10 inch block. 

Why 13 inches?
The block needs to be an odd number in size to allow for the staggered piecing. 9 and 11 inches didn't seem to show the movement I wanted in setting blocks together. I discovered 13 inches was as far as I could sew non-nesting rows without needing pins.
So 13 it is.

Each block has a 78 rectangles and 13 squares

Sew the rectangles into 26 pairs, add a third rectangle, sew these into 13 sets of six, and add a square to the end to make a row unit

Press towards the square.

Turn one row unit opposite of the other. I feed the pair into the machine with the small square first of the top row unit.
Sew row units into pairs, then into fours. 

I press these row units down.
Sew three of these 4-units together
Again press down
Add a one row unit

It now measures  13 inches finished (13 1/2 inches unfinished). 
Make sure the top and bottom left corners have a square instead of a rectangle.
Press all seams down.

Rotate the blocks and sew together, in pairs, keeping the orientation as pictured. Sew into pairs with the rectangles in vertical orientation on top. The seams are pressed in a way that aids with nesting. I found using an awl or seam ripper to be very helpful in feeding the small pieces and sweeping the underside seam allowances in the correct direction.

In laying out I find it helpful to have the back sides of the blocks showing so the pressing is evident. One miss-turned block can cause issues (speaking from experience).

NOTE: looking at your completed block it will likely not look square. This is due to the accordion effect of the narrow rows. If your sewing was consistent, they will fit.
IF NOT, use the "Plan B" setting I'll describe below.
 
From the back showing block orientations

I set these 6 by 7 blocks to finish 78 by 91 inches.

PLAN B setting:
Keep block with horizontal or vertical orientation, flipping blocks so they will nest to next block. The accordion affect will still happen, but will not distort the quilt top.
The rows will visually keep straight across the quilt. 
This is a pleasing setting and I may experiment with this in neutrals.

plan B horizontal
plan B vertical
SO, for 42 blocks:
3,276 rectangles
sewn into 1092 three patches
sewn into 546 six patches
546 squares
add a square to each row
Press each row towards the square patch
546 rows
Set aside one row for each block, so 42 rows
Sew remaining 504 rows into 252 pairs, these into 126 fours, these into 42 blocks, add the set aside rows, and end up with 42 final blocks!
(the math may be off on this...)
Press each block with the seams towards the bottom
Decide if you are going with Plan A or Plan B and lay out the blocks accordingly.
Sew into pairs
Lay out 7 by 6 blocks
Everything nests!

My adaptation of Tonya's design--use my changes at your pleasure.

Monday, July 19, 2021

30's repro alphabet, top completed (setting directions)


30's repro alphabet
93 by 70 inches

I made two alphabet quilts using the Moda Spell it with Fabric pattern.
Here is a link to the free booklet:
https://www.fatquartershop.com/moda-spell-it-with-fabric-quilt-free-pdf-pattern

I made lots of changes in construction. Their directions are for using 2 1/2 inch strips. Because I used scraps and yardage I was able to simplify many of the letters. For example, their Z uses 13 pieces. I made it with 5.
I think I started with 4 yards of the green and very little was left at the end.
I don't remember the manufacturer or the color name. It is a fabulous green!

Here are my directions for this 30's repro set. I earlier put up directions for the modern set.
All the squares used for the setting sashings, cornerstones, and 16-patch border were from my bins--none needed to be cut for this set. And many remain for future endeavors. 

Make the letters. They will measure 8 1/2 by 10 1/2 inches, to finish 8 by 10.

Make four scrap blocks for the corners
Cut 80 squares 2 1/2 inches
Sew into rows of 4
Sew five rows into blocks that will be 4 by 5, 20 squares. They will measure 8 1/2 by 10 1/2 inches, to finish 8 by 10

Sashing
I used about 640 scrap squares for the sashings and about 184 more for the corner stones. These numbers may be way off, I just used them from my bin of 30's repro scrap squares.

Hint with sashing: cut the solids along the length of grain--long part of sashing parallel to the selvage--the stability of length of grain is always helpful with sashing.

Theoretically, you could make the same look for the sashing by bordering each block with the solid then making sashings with just the 1 inch finished squares. However, these would be very fragile and unstable, so I instead sandwiched them between two solid sashings.

sashing (A is pictured)

Sashing A
The vertical sashes
Make 36 of this size
Cut two 1 1/2 by 10 1/2 inch solid for each sashing, so 72 total
Cut ten 1/12 inch squares of prints, so 360 total
Sew prints into a row. Press in one direction
Sew solid on each side of the squares. Press towards the solid

Sashing B
The horizontal sashes
Make 35 of this size
Cut two 1 1/2 by 8 1/2 inch solid for each sashing, so 70
Cut eight 1/12 inch squares of prints, so 280 total
Sew prints into a row. Press in one direction
Sew solid on each side of the squares. Press towards the solid
cornerstones

Cornerstones made with 184 scrap 1 1/2 inch cut squares, 120 green squares and a few 1 1/2 by 2 1/2 inch and 1 1/2 by 3 1/2 inch rectangles.

Scraps:
1 1/2 inch squares

Solid:
1 1/2 inch squares
1 1/2 by 3 1/2 inch rectangles
1 1/2 by 2 1/2 inch rectangles

Cornerstone A
The interior cornerstones
Make 20

Cornerstone B
The edge cornerstones (except for the corners)
Make 18

Cornerstone C
The actual corners!
Make 4 
They can be all made the same or, like I did, with the long green kept in the horizontal position

Assembly
Sew Sashing A onto the left side of all blocks and also to the right side of the blocks that will be on the right side of the quilt (that will be two of the scrap square blocks and the letters H, M, R, W.
Sew the rows. 
Press blocks towards the sashings.

Lay out rows and remaining sashings and corners.
The corners are constructed in a way that the outside will be of the solid fabric. 
Press cornerstones towards the sashings.

Sashing can be simplified with a 3 1/2 inch cut solid, or if you like the pieced one but don't want to bother with all the tiny squares, replace that center section with a print or another solid cut 1 1/2 by 8 1/2 and 1 1/2 by 10 1/2. The cornerstones can be simple squares cut 3 1/2 inches too instead of 9-patches.

At this point the top measures 81 by 58 inches finished (81 1/2 by 58 1/2 by measuring)

Borders
I made borders out of  about 816 2 inch cut squares sewn into 16-patches. (and 16 rectangles 2 by 2 1/2 inches cut for the centers of the top and bottom borders, see note below.) Again, my numbers may be off.

For the side borders:
Thirteen and a half 16-patches for each side

For the top and bottom borders:
Five and a half 16-patches, a center unit, Five and a half more 16 patches for each.

To make the math correct, make a half-16 patch with patches cut 2 by 2 1/2 inches, one each for top and bottom borders. These were placed in the center of the top and bottom borders. I think they melt into the other 16-patches well.

Press all borders towards the sashings
Finish with stay stitching the edge to keep intact until quilting.

Note the larger patches in the center position

Final quilt top comes to 93 by 70 inches.

Letters are adapted from Moda's Spell it with Fabric pattern.
Setting is my design.
Use my setting at your pleasure.


Tuesday, May 25, 2021

horizon

Horizon
Block finishes 9 1/2 by 4 1/2 inches 
I plan to set it 18 by 10, to finish 95 by 81 inches or 18 by 9, to finish 85 1/2 by 81 inches.

When making a complicated block I like to also make a simpler one to use as a break. This one was a good companion sewing project while making the Circled Squares.
It is a variation of the Riven block I made a couple years ago.
I like rectangle blocks. And this one gives a good amount of space to showcase prints. 

Cutting
Solid:
one 1 1/2 by 5 inch rectangle
Print:
one 9 1/2 inch by 5 inch rectangle, cut into a 6 by 5 inch rectangle and a 3 1/2 by 5 inch rectangle. 
(I do not always cut it from a 9 1/2 inch rectangle. When using scraps that are shorter than that I cut them individually.)

Sewing and pressing
Sew the solid rectangle between the print rectangles.
Do not press until time for assembly.

Assembly
I like to start by sewing all blocks into pairs. This gets me from 180 blocks to 90 units. 
Press every other block seams up or down.
I put pairs into the machine with the down pressing on top. At this point I have the most control over the blocks and by keeping the non-butting seams in this orientation, I save the more accurate butting together of the seams for when I am joining the units.

Then I sew three units together to have 30 large sections of 6 blocks.

These are put three sections to a row.
When rows are completed, press every other row left or right.
Join rows.
All seams will nest.
Watch for the completed top to be posted soon!

My design. Use at your pleasure.

Sunday, May 23, 2021

broken dishes

Broken Dishes
Block finishes 7 inches
I plan to set it 14 by 12, to measure 98 by 84 inches; 168 blocks.

I love this simple traditional block and knew I would eventually get around to using it for one of these quilts.

Cutting
Solid:
four triangles cut from a 4 inch strip, using the EZ angle or Bonnie Hunter's Essential triangle tool
Print:
four triangles cut from a 4 inch strip, using the EZ angle or Bonnie Hunter's Essential triangle tool.
Hint with directional fabrics: cut a piece 18 inches. Fold it back on itself and make the cuts. The four resulting triangles will be oriented 4 different ways keeping the print directional in the resulting block

Sewing and pressing
Lay out the triangles to watch for orientation. I lay it out on a reference block so I keep the orientations correct.

Sew triangle prints to solids. Press towards the prints.
Lay out the squares, watch for orientation. 
Sew them together into 2-square units
Press towards the solid triangle
Sew together the horizontal seam
Do not press this seam until assembly.

Assembly with long columns (making 12 long columns to sew together):
Keeping horizontal seams horizontal, sew into 12 columns of 14 blocks.
Press each odd column with all horizontal seams going to the top.
Press each even column with all horizontal seams going towards the bottom
Assemble columns.
All seams will nest.

OR
(this is how I am doing it--I hope to complete the top this week--watch for that post!)

Assembly into units (leaving just 3 long seams to sew together at the end):
Sew 144 blocks into 36 4-block columns
Press horizontal seams going up
Take two units and rotate one, sew into an 8-block unit 
Make 18 of these
Do not press the vertical seams yet

Also, sew 24 into 12 2-block columns
Press horizontal seams going up
Take two of these units and rotate one, sew into a 4-block 
Do not press the vertical seams yet.

Set the 8-block units into three rows of 6 units each row.
Set the 4-block units into one row of 6 units.
Press every other row's vertical seams left or right.
Sew rows together.
All seams will nest.

Watch for my post of the completed top soon.

My directions of a traditional block.
Use at your pleasure.

Tuesday, June 05, 2018

barn--tutorial

Barn
finishes  by 6 by 8 inches

I designed this block to have a float at the top so I wouldn't have to watch the triangle points while sewing long rows.
I plan to make 143 blocks, set 13 by 11, 78 by 88 inches.
My design, use at your pleasure.

For this tutorial I feature a block made with a delightful vintage fabric depicting gold panning, pick axes, and bags of gold dust. My neighbor Sharon took in the sewing stash of a neighbor who died and I chose this. It was the cut aways from a shirt construction and there was just enough for this block. It is a rough weave cotton and I guess it is from the 1950s.

Cutting:
Solid
Cut one 3 1/2 by 2 1/2 inch rectangle and two triangles from a 4 inch strip using Bonnie Hunter's Essential Triangle tool or the EZ angle
Print
Cut two 3 1/2 by 2 1/2 inch rectangles, one 2 1/2 by 6 1/2 inch rectangle, and one triangle from a 3 1/2 inch strip using Bonnie Hunter's tool or the EZ Companion Angle.

Trimming:
After sewing left sky to the roof and pressing to the roof, use ruler to trim away excess

Pressing:
Press left sky to the barn roof; press right roof to the sky
Press away from the door to the barn
Press the lintels up in half the blocks and down in the other half so every other block will nest into each other.
Press left sky to roof
Carefully trim excess sky to have a straight sewing line for right sky
Press roof to right sky piece. Trim dog ears.
Sew three sections together
Press horizontal seams up or down every other block so seams nest