Tuesday, September 15, 2020

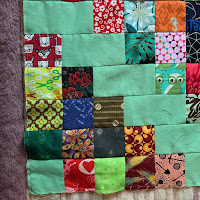
neutral 16-patch with orange medallion, top completed

16-patch with orange medallion.
72 by 72 inches

Made with over 1200 neutral (low volume) 2 1/2 inch squares pieced into 16-patch blocks.

How an idea is sparked.
When I sorted out the light 2 1/2 inch squares from the dark squares used for the Jack and Jill Round Robin Squares quilt, they sorted themselves into a pile that had me make neutral 16-patches.

I loved Kirstin Klasen's purple scrap squares with its off-center medallion. Then Wanda Hanson posted her bowties with medallions that messed with the grid.
These two ideas came together with the neutral 16-patches.
Kristin's quilt
Wanda's quilt top
Influenced by Kirstin Klasen's purple quilt on her July 26th Instagram augusthimmel and Wanda Hanson's blog Exuberant Color August 25th bowties quilt. (screenshots taken with permission)
https://www.instagram.com/p/CDGsVb5nu45/
https://exuberantcolor.blogspot.com/2020/08/a-quilt-top.html
I first worked on graph paper to get my proportions. Moving to cloth had me re-think and I added some more blocks.
I made a pile of 16-patches, then assembled the medallion. To complete the quilt I worked my layout with the blocks showing back-sides to ensure nesting of most seams. There are a few "twisted sisters" on one side of the medallion.
This could be planned out in advance, but it worked well improvising.

I wanted the medallion to mess with the grid in two ways, that not all the squares in it line up with the 16-patches. And the medallion itself is a rectangle and is not in the exact equivalent proportions of the 16-patches.

16-patches, made from:
16 neutral 2 1/2 inch squares
Blocks finish 8 inches.

Medallion piecing: (I intended to use a stronger orange, but this soft one worked better. I am not sure of the manufacturer.)
23 orange rectangles cut 2 1/2 by 4 1/2 inches
8 orange squares cut 2 1/2 inches
THEN I added 3/4th sections of 16-patches to the bottom of the orange section so the medallion would measure 2 by 3 16-patches and it could nest into the surrounding 16-patches.

Because this was improvisational work the blocks were not assembled in rows. I did manage to make all seams nest except along one side of the medallion.

This quilt is leading to another using 16-patches made with darker squares and a different medallion.
I'll also work on a post about how I construct 16-patches with an eye for how they will nest later into a quilt.


Saturday, August 29, 2020

tines, top completed

Tines
90 by 80 inches
Block finishes 10 inches
72 blocks set 9 by 8

Details on making block at
https://kleinmeisjequilts.blogspot.com/2020/08/tines_9.html

My design, use at your pleasure.

Thursday, August 20, 2020

Jack and Jill with round robin squares, top completed

This Jack and Jill is made from my 2 1/2 inch squares bins and those exchanged with my quilt group's quarantine round robin exchange.

84 by 72 inches
You can make the quilt any size you want. These directions are for the 72 by 84 inch quilt top I made. I did include many objects and kept them oriented the same way but that is not necessary.

I sewed it in seven 6-row panels to help reduce the  stress on the fabrics to sew it as 42 individual rows. Also, sewing individual rows onto a mother-ship really irritates me.
Below is my process.

Cutting
Prints:
Cut lots of 2 1/2 inch scrap squares. For this quilt it took 1008.
Solid:
Cut lots of 2 1/2 by 4 1/2 inch rectangles. For this quilt it took 245.
Cut a few 2 1/2 inch squares. For this quilt it was 14
(note, numbers are by estimating and I may be off a few.)

Unit piecing
Piece four scrap squares into 224 units, sew a solid rectangle onto the end of each.
Sew a square onto the end of seven of them.
DO NOT PRESS YET
Remaining scraps and solids will be used to help make the rows stagger

Assembly
Sew 210 of the units with the rectangles into 5 unit rows.
DO NOT PRESS YET

Lay out six of these into rows. You will use the remaining units and squares and rectangles to bring your rows to 72 inches. This is six units long but most of the rows have the final unit split to the beginning and end of the row.

Row 1: five units with solid leading, add one unit to the end PRESS to left
Row 2: five units with added one scrap leading and a rectangle and three scraps ending PRESS to right
Row 3: five units with added two scraps leading and a rectangle and two scraps ending PRESS to left
Row 4: five units with added three scraps leading and a rectangle and one scrap ending PRESS to right
Row 5: five units with scraps leading, add one unit to the end PRESS to the left
Row 6: five units with a solid square and four scraps leading, one solid square ending PRESS to the right
Left side of panel 
Right side of panel
Assemble the six rows, pressing seams up as each row is added.
Make seven panels.

Assemble the 7 panels into the top
All seams will nest

My design, use at your pleasure.

Sunday, August 09, 2020

tines


I saw a quilt called Cogs from the 2012 Texas Mennonite Quilt Sale that I really liked. I could not find the origin of the design so I drafted my block with different proportions and fabric placement. I am making another version with yet another proportion and placement change.
https://www.chron.com/neighborhood/bellaire/news/article/Texas-Mennonite-Sale-and-Auction-features-quilts-9510245.php

It is made with partial seam sewing and goes together very quickly. I let the directional fabrics spin though the center square lines up with one of the tines units.
(If you know the origin of the block please let me know so I can credit the designer.)

EDIT: Nann Hilyard alerted me to this similar pattern from GE Designs. The proportions are a bit different and it uses 2 1/2 inch strips.
https://gequiltdesigns.com/collections/patterns/products/strip-twist-pattern

EDIT 2: Preeti also has a delightful tutorial with a similar block with different proportions:
https://sewpreetiquilts.blogspot.com/2014/10/paulitiks.html

I am naming it Tines because it looks like the tines of the rake we used for straw and alfalfa. I showed the block to my sister without telling her this and she said, "It looks like tines." So, at least two of us get the agricultural reference!

Block finishes 10 inches
I am making 72 blocks to set 9 by 8, to finish 90 by 80.

Cutting
Solid: four rectangles 1 1/2 by 6 1/2 inches
Print: four rectangles 3 1/2 by 6 1/2 inches, one 2 1/2 inch square

Sewing and Pressing
Sew solid rectangles to print rectangles, press towards solid

Using partial seam sewing technique, sew one of these units to the square, sewing along the solid fabric, about 1 1/2 inches down the square, then backstitch a few stitches.
Starting the partial seam
Add remaining units, sewing from the square to the outside of the block--wait with pressing until all seams are finished.
Adding the units
Finish sewing the partial seam. This step is a bit fiddly. Depending on the fabric, start from the outside of the block or from the square. I find batiks work better from the square and regular fabrics work better from the outside.
Completing the partial seam
From back of block press all assembly seams away from center square. All seams will be pressed to the solid.
Finish pressing from the front of the block, using spray.
I found I kept organized by sewing the solids to the rectangles of a stack of blocks, then sew the square partial seam to the stack. Then I would work with 3 or 4 blocks to completion.
You could do strip sewing of the solids to the prints then cut apart. I don't bother with that as I don't work from yardage and it would be impractical.
It would require a length of 26+ inches of solid (1 1/2 inch) and print (3 1/2 inches).

Friday, August 07, 2020

15 years of blogging

This week marks 15 years of blogging.
Below is a repeat of my first post, the one that explains the naming of this blog.
Klein meisje is Dutch for little girl--what my beloved grandfather called his 12 granddaughters because, I fear, it was easier than trying to remember our names.

Thursday, August 06, 2020

calendar quilt--A Year in the Life: 62 to 63

For several years I've admired calendar quilts, some showing global warming, others showing the seasons. I decided to embark on a calendar quilt and started on my birthday.
Mine is less a statement calendar, more a meditative one. I select a square of fabric for whatever reason that is meaningful to me that day. Sometimes I am remembering someone with the fabric. There are several from my mother's scraps included, even one of her mother who died in 1949; others of my sewing for my family. At times it is a fabric given to me by a friend who is in my thoughts or a fabric I am using that day in a project. Most often it is less contemplative--I just like the fabric and it has been a favorite to sew with.

I don't sew on this every day, but do try to pick out the center daily. A goal is to have the week completed on Saturday. I am planning on setting these 19 by 22. That comes to 418 blocks. One a day (366--I'm including both birthdays) plus a spacer after each week (52).
The spacer block has two purposes. Esthetic in I like how it breaks up the grid because the rows do not end with a multiple of 7 so these spacers will look scattered over the quilt. And practical, in that as it is used after every seven days I don't have to count beyond that if I forget where I am in adding blocks.

Calendar Quilt
Blocks finish 4 inches

Cutting
Print: one 2 1/2 inch square
Solid: two 1 1/2 by 2 1/2 inch rectangles, two 1 1/2 by 4 1/2 inch rectangles
Press all seams away from center block

Spacers: one 4 1/2 inch square

Assembly: Rotate every other block so all seams nest. (The spacer is part of the sequence so the blocks on either side of it are oriented the same)

Monday, August 03, 2020

the binding queue

Always a good day when my long arm quilter calls and my binding queue is once again replenished.
Chevron
Target
Vamoose! (Tunnel)

Tuesday, July 07, 2020

round robin squares

My monthly small group of twelve members is not able to meet in these Covid-19 times. Instead we have a weekly 40 minute Zoom meeting where we rotate having three members do show-and-tell then we talk quilting and have personal life sharing for the rest of the time. It is a highlight of my week.

We started a round-robin with 2 1/2 inch cut squares. We have about 15 squares in the envelope so it takes only one postage stamp. When you receive the envelope you take the ones you want and replace with some from your fabrics. It brings a bit of the tactile part of our meetings back to us. We have about 5 packets in the rotation. Some get lost along the way so we start up new ones.

Last week we challenged each other to make a quilt using the squares as a way to mark this time of isolation. I already have almost three shoe-boxes of 2 1/2 inch squares so there is plenty to work with in this house. It is so fun to add in the round robin squares. The green used for the 2 1/2 by 4 1/2 inch rectangles is something I had in my bins. I am not sure the origin, I believe it is a Kona.

I am using a variation of the Jack and Jill design I used a few years ago. The name is mine--the design is one I have seen on the internet and I do not know the origin.
Jack and Jill is made with all 2 1/2 by 4 1/2 inch rectangles and had two irritating construction issues: the long rows and no seams met so there was a lot of pinning. The variation I am making with the 2 1/2 inch print squares will have seams meet so I can have nesting seams and no pins. Still the long rows, though.
Jack and Jill, 2015

Friday, July 03, 2020

remains 16-patch, top completed

Remains 16-patch quilt

54 by 72 inches

1336 neutral 2 inch cut squares
80 16-patches
7 half 16-patches
49 solid rectangles cut 3 1/2 by 6 1/2 inches

When I was making the 16-patches for Calico Rose I would set aside the lighter/neutral squares. These filled up their own shoe-box and in sorting them out I discovered I had sorted them in--into their own project.
I made a pile of 16 patches. This quilt used up 80 of the blocks. There are several projects ahead in that stack.

There are many ways to piece a 16-patch. Here is what worked for this project to kept all seams nesting:

Sew 2 inch cut squares into a unit of 4, pressing seams to one direction.
Flip alternate units and sew 4 units together to make a 16-patch block.
Press all seams to one side
Sew solid unit to 16-patch, keeping orientation of seams vertical.
Press towards the 16-patch. 
Sew together 7 of these units, adding on a 16-patch and a half 16-patch onto one end. This will make one vertical row.
Make seven rows.
Press all seams in same direction the 16-patches are pressed
Flip alternate rows and sew together.

Make two more rows, one each for the right and left side with twelve 16-patch blocks. Press joining seams in same direction the 16-patches are pressed.
Orient these side rows to make the seams nest with the sewn center section of the quilt.
All seams will nest.
I used Kona 855 Prairie Sky for the blue. I love the summer feel to this quilt. Scraps are from decades of quilt projects, including some from my mother and my friends.
My design, use at your pleasure.

Thursday, July 02, 2020

calico rose, quilt completed

Calico Rose
Finishes 96 inches square

Made from a design by Deanna at Wedding Dress Blue.
https://weddingdressblue.wordpress.com/calico-rose-quiltalong/
I changed the star point construction to geese and changed the border to be all 16-patches.

Quilted by Sue DiVarco, using a Tuscany wool batt.

It used many, many 2 inch squares from my bins.
The blue solid is Prairie Sky 855 by Kona.
Thank you Deanna for delightful design.
It is for my sister Beth.

Saturday, June 20, 2020

cake stand

Cake Stand
Block finishes 8 inches
I plan to set it on point.

Cutting (using the EZ angle or Bonnie Hunter's tool for triangles)
Solid: one triangle from 4 1/2 inch strip, six triangles from 2 1/2 inch strip
Print: two triangles from 4 1/2 inch strip, four triangles from 2 1/2 inch strip, one 2 1/2 inch square, two 2 1/2 by 4 1/2 inch rectangles

Piecing
Make four 2 1/2 inch half square triangle units and one 4 1/2 inch triangle unit
Lay out block for remainder of construction

Pressing
For this project I am assembling the quilt block-to-block, no sashing or setting squares. To make sure seams nest I am using this first pressing plan for the base of the basket. (I figured this out before I had to re-stitch too many of these areas.)
The second picture is how I would press it if I were using sashings as it lies a bit better and gives better visibility to keep triangle points.
pressing for blocks abutting

Thursday, June 11, 2020

some more sample blocks

Trying out some more sample blocks.
Rake tines
Propeller 
Cake Stand
My sisters may be the only ones to get my reference to rake tines in naming the first block. Broken ones became playthings in our sandbox. Which was made from an old tractor tire.
I sent a picture of the block to my sister Beth and asked, "what does this remind you of?" Her immediate text back: "rake tines".

Thursday, June 04, 2020

Morningside College 1980 Nursing graduates

40 years ago this spring.
We took on the world.