Monday, August 03, 2020
Tuesday, July 07, 2020
round robin squares
My monthly small group of twelve members is not able to meet in these Covid-19 times. Instead we have a weekly 40 minute Zoom meeting where we rotate having three members do show-and-tell then we talk quilting and have personal life sharing for the rest of the time. It is a highlight of my week.
We started a round-robin with 2 1/2 inch cut squares. We have about 15 squares in the envelope so it takes only one postage stamp. When you receive the envelope you take the ones you want and replace with some from your fabrics. It brings a bit of the tactile part of our meetings back to us. We have about 5 packets in the rotation. Some get lost along the way so we start up new ones.
Last week we challenged each other to make a quilt using the squares as a way to mark this time of isolation. I already have almost three shoe-boxes of 2 1/2 inch squares so there is plenty to work with in this house. It is so fun to add in the round robin squares. The green used for the 2 1/2 by 4 1/2 inch rectangles is something I had in my bins. I am not sure the origin, I believe it is a Kona.
I am using a variation of the Jack and Jill design I used a few years ago. The name is mine--the design is one I have seen on the internet and I do not know the origin.
Jack and Jill is made with all 2 1/2 by 4 1/2 inch rectangles and had two irritating construction issues: the long rows and no seams met so there was a lot of pinning. The variation I am making with the 2 1/2 inch print squares will have seams meet so I can have nesting seams and no pins. Still the long rows, though.
![]() |
| Jack and Jill, 2015 |
Labels:
covid round robin squares,
jack and jill
Friday, July 03, 2020
remains 16-patch, top completed
Remains 16-patch quilt
54 by 72 inches
1336 neutral 2 inch cut squares
80 16-patches
7 half 16-patches
49 solid rectangles cut 3 1/2 by 6 1/2 inches
When I was making the 16-patches for Calico Rose I would set aside the lighter/neutral squares. These filled up their own shoe-box and in sorting them out I discovered I had sorted them in--into their own project.
I made a pile of 16 patches. This quilt used up 80 of the blocks. There are several projects ahead in that stack.
There are many ways to piece a 16-patch. Here is what worked for this project to kept all seams nesting:
Sew 2 inch cut squares into a unit of 4, pressing seams to one direction.
Flip alternate units and sew 4 units together to make a 16-patch block.
Press all seams to one side
Sew solid unit to 16-patch, keeping orientation of seams vertical.
Press towards the 16-patch.
Sew together 7 of these units, adding on a 16-patch and a half 16-patch onto one end. This will make one vertical row.
Make seven rows.
Press all seams in same direction the 16-patches are pressed
Flip alternate rows and sew together.
Make two more rows, one each for the right and left side with twelve 16-patch blocks. Press joining seams in same direction the 16-patches are pressed.
Orient these side rows to make the seams nest with the sewn center section of the quilt.
All seams will nest.
I used Kona 855 Prairie Sky for the blue. I love the summer feel to this quilt. Scraps are from decades of quilt projects, including some from my mother and my friends.
My design, use at your pleasure.
54 by 72 inches
1336 neutral 2 inch cut squares
80 16-patches
7 half 16-patches
49 solid rectangles cut 3 1/2 by 6 1/2 inches
When I was making the 16-patches for Calico Rose I would set aside the lighter/neutral squares. These filled up their own shoe-box and in sorting them out I discovered I had sorted them in--into their own project.
I made a pile of 16 patches. This quilt used up 80 of the blocks. There are several projects ahead in that stack.
There are many ways to piece a 16-patch. Here is what worked for this project to kept all seams nesting:
Sew 2 inch cut squares into a unit of 4, pressing seams to one direction.
Flip alternate units and sew 4 units together to make a 16-patch block.
Press all seams to one side
Sew solid unit to 16-patch, keeping orientation of seams vertical.
Press towards the 16-patch.
Sew together 7 of these units, adding on a 16-patch and a half 16-patch onto one end. This will make one vertical row.
Make seven rows.
Press all seams in same direction the 16-patches are pressed
Flip alternate rows and sew together.
Make two more rows, one each for the right and left side with twelve 16-patch blocks. Press joining seams in same direction the 16-patches are pressed.
Orient these side rows to make the seams nest with the sewn center section of the quilt.
All seams will nest.
I used Kona 855 Prairie Sky for the blue. I love the summer feel to this quilt. Scraps are from decades of quilt projects, including some from my mother and my friends.
My design, use at your pleasure.
Thursday, July 02, 2020
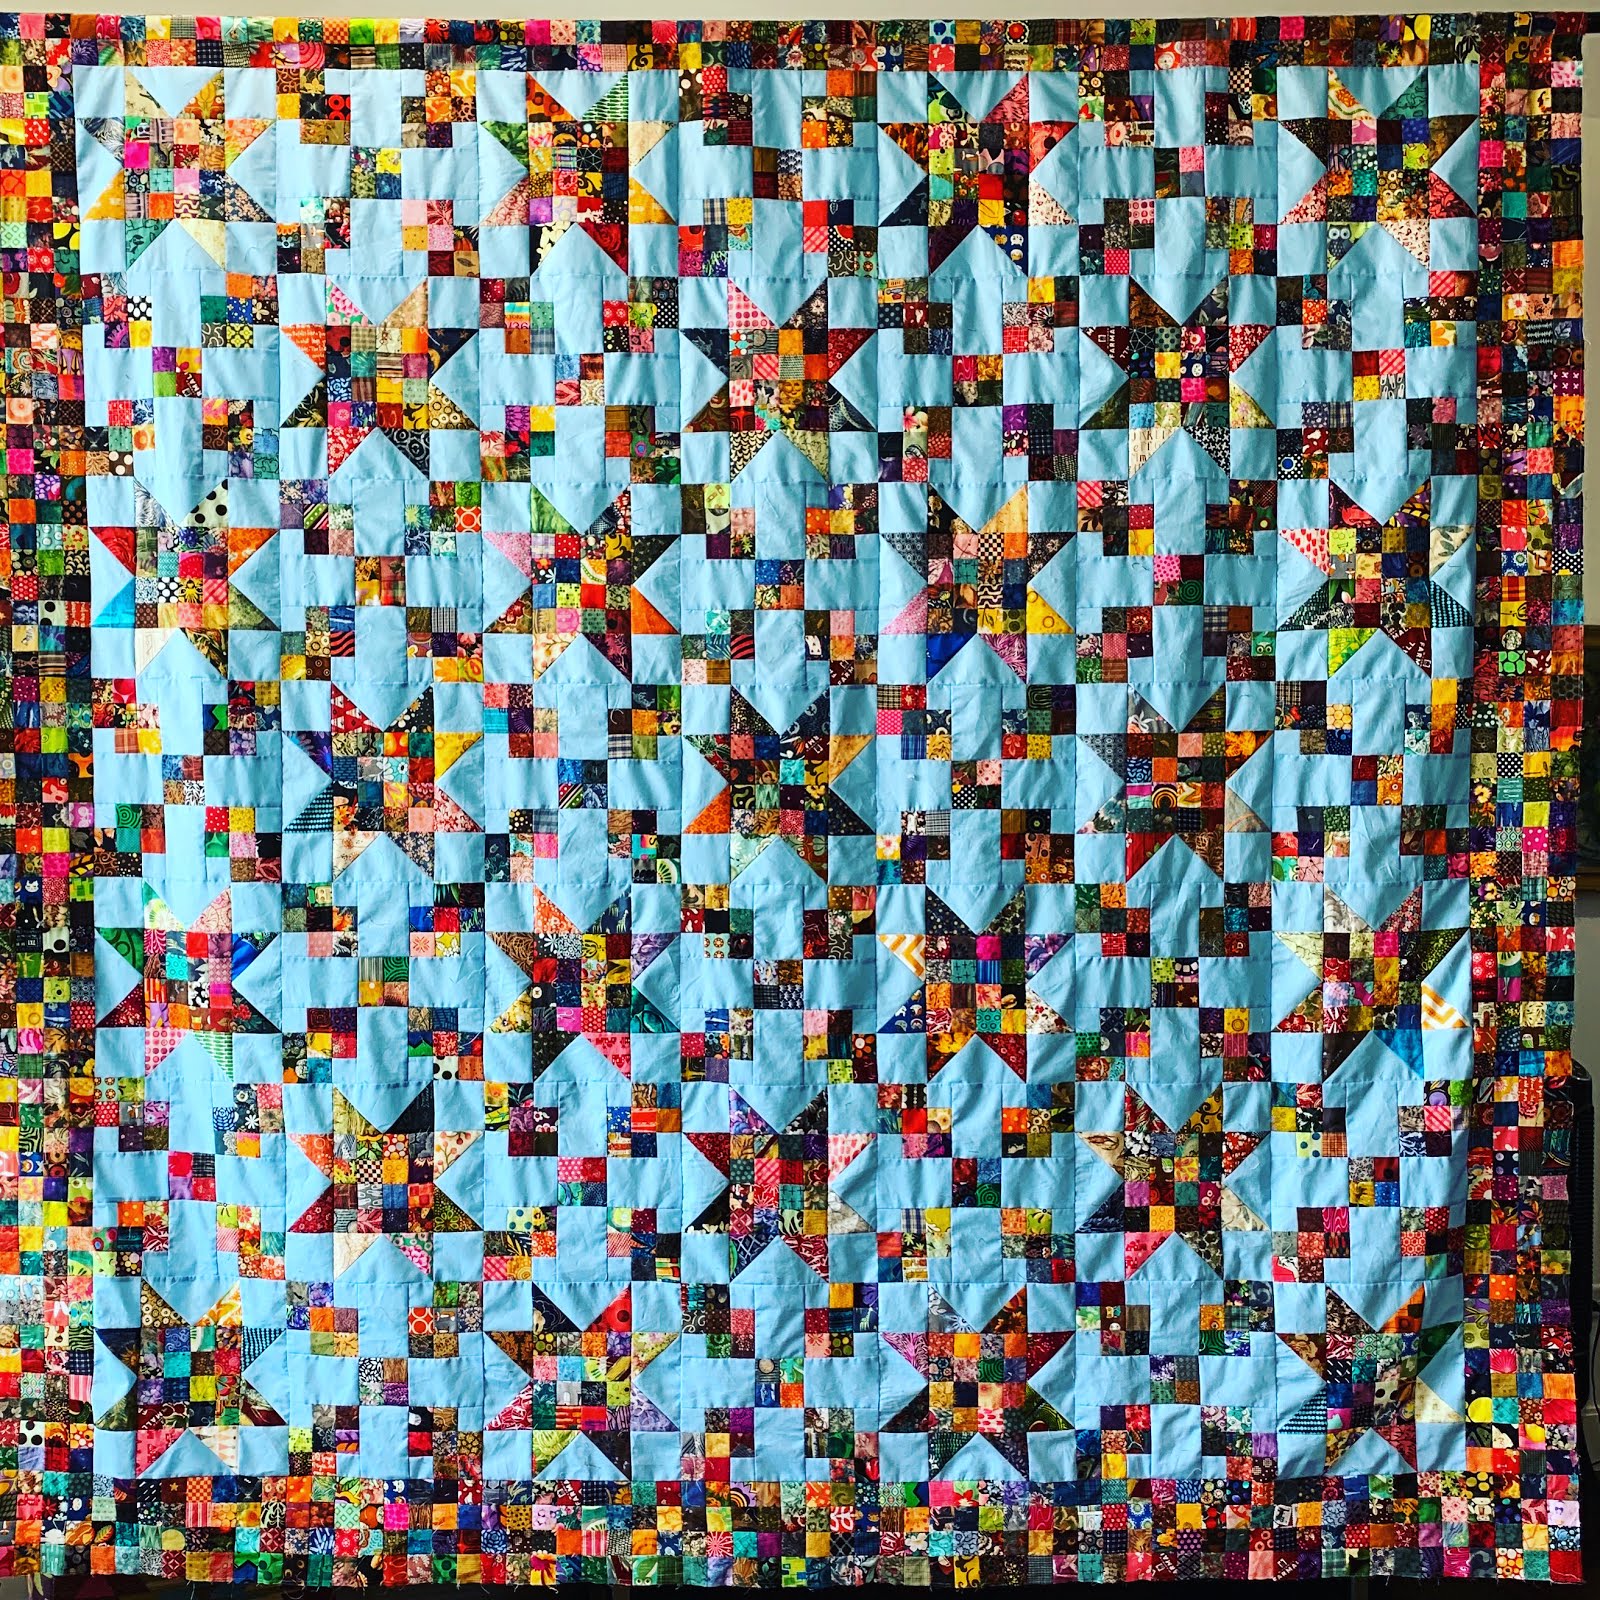
calico rose, quilt completed
Calico Rose
Finishes 96 inches square
Made from a design by Deanna at Wedding Dress Blue.
https://weddingdressblue.wordpress.com/calico-rose-quiltalong/
I changed the star point construction to geese and changed the border to be all 16-patches.
Quilted by Sue DiVarco, using a Tuscany wool batt.
It used many, many 2 inch squares from my bins.
The blue solid is Prairie Sky 855 by Kona.
Thank you Deanna for delightful design.
It is for my sister Beth.
Finishes 96 inches square
Made from a design by Deanna at Wedding Dress Blue.
https://weddingdressblue.wordpress.com/calico-rose-quiltalong/
I changed the star point construction to geese and changed the border to be all 16-patches.
Quilted by Sue DiVarco, using a Tuscany wool batt.
It used many, many 2 inch squares from my bins.
The blue solid is Prairie Sky 855 by Kona.
Thank you Deanna for delightful design.
It is for my sister Beth.
Labels:
16 patch,
quilt completed,
sew-a-long
Saturday, June 20, 2020
cake stand
Cake Stand
Block finishes 8 inches
I plan to set it on point.
Cutting (using the EZ angle or Bonnie Hunter's tool for triangles)
Solid: one triangle from 4 1/2 inch strip, six triangles from 2 1/2 inch strip
Print: two triangles from 4 1/2 inch strip, four triangles from 2 1/2 inch strip, one 2 1/2 inch square, two 2 1/2 by 4 1/2 inch rectangles
Piecing
Make four 2 1/2 inch half square triangle units and one 4 1/2 inch triangle unit
Lay out block for remainder of construction
Pressing
For this project I am assembling the quilt block-to-block, no sashing or setting squares. To make sure seams nest I am using this first pressing plan for the base of the basket. (I figured this out before I had to re-stitch too many of these areas.)
The second picture is how I would press it if I were using sashings as it lies a bit better and gives better visibility to keep triangle points.
Block finishes 8 inches
I plan to set it on point.
Cutting (using the EZ angle or Bonnie Hunter's tool for triangles)
Solid: one triangle from 4 1/2 inch strip, six triangles from 2 1/2 inch strip
Print: two triangles from 4 1/2 inch strip, four triangles from 2 1/2 inch strip, one 2 1/2 inch square, two 2 1/2 by 4 1/2 inch rectangles
Piecing
Make four 2 1/2 inch half square triangle units and one 4 1/2 inch triangle unit
Lay out block for remainder of construction
Pressing
For this project I am assembling the quilt block-to-block, no sashing or setting squares. To make sure seams nest I am using this first pressing plan for the base of the basket. (I figured this out before I had to re-stitch too many of these areas.)
The second picture is how I would press it if I were using sashings as it lies a bit better and gives better visibility to keep triangle points.
![]() |
| pressing for blocks abutting |
Thursday, June 11, 2020
some more sample blocks
Trying out some more sample blocks.
![]() |
| Rake tines |
![]() |
| Propeller |
My sisters may be the only ones to get my reference to rake tines in naming the first block. Broken ones became playthings in our sandbox. Which was made from an old tractor tire.
I sent a picture of the block to my sister Beth and asked, "what does this remind you of?" Her immediate text back: "rake tines".
Thursday, June 04, 2020
Sunday, May 31, 2020
more thoughts on artifact quiltmaking
https://kleinmeisjequilts.blogspot.com/2019/11/tip-50-make-artifact.html
We make quilts in joy, in sorrow, and in anger.
Political work needs to be seen as a snapshot in time. There was a reason it was made, it made sense in context.
The nature of our work is it is very labor consuming and time consuming. The emotions and ideals that are present at the start of a work can dissipate and the work seems irrelevant or can grow so intense the work itself seems inadequate.
In either case I think it is valuable to finish these artifacts.
I started on my "Hillary" quilt with excitement and set it aside in my sadness in the results of the election. But, I was determined to complete it as an artifact of that optimism.
When the 2016 election happened I named a quilt to reflect my wariness.
"...may you live in interesting times" took an otherwise traditional quilt made of the plus block on point (giving it a times symbol appearance) and making it political by naming it with the Chamberlain curse.
Now, my "Impeach" quilt. I made the top during the impeachment hearings. It channeled my frustrations during that time. It too was set aside when the Senate made their choices. But this week, after the "when the looting starts, the shooting starts" quote was used by our president, who then claimed he did not know the history of it (this white girl from Iowa knew the history of it) I decided to finish this artifact. Complete with its pink pussycat back.
I am leaving the sleeve untacked so the pussycats show.
When we are faced with these very troubling times one can feel helpless.
But,
I can be angry
I can support the afflicted
I can call attention to injustice
I can vote
I can sew
Sunday, May 24, 2020
calico rose, top completed
Calico rose
96 inches square
From a sew-a-long on Deanna's delightful blog Wedding Dress Blue:
https://weddingdressblue.wordpress.com/calico-rose-quiltalong/
Changes I made:
I used flying geese for the star points instead of half-square triangles
I used 16-patches for the border
Look carefully for the orientation of the blocks for the border.
I sewed together the border blocks with the block seams perpendicular to the edge of the quilt. I sewed the border pieces to the center flipping the border seams to nest with the center seams. I then stay-stitched the edges before pressing to these nested orientations.
This is the second quilt I've made from Deanna's pattern. The first, made in 2015, belongs to my sister Janna. My sister Beth asked me if I could some day make her one like it. That day is today.
Over the past few years if I was using a 3 1/2 in strip I would cut a few triangles for this quilt. I keep my 2 inch scrap squares at the ready in shoeboxes and there are fabrics here from decades of work--some of my mom's scraps are included too.
The square prints parts of the blocks were done last year during a busy semester and were welcomed mindless sewing.
Last week I pulled out my Studio Cutter and cut the 3 1/2 inch and 2 inch solid strips to make the remaining parts.While this feels it went together quickly, it really has had years of prep work behind it.
I have an appointment for a drive-by drop-off with my longarm quilter this week. We decided a wool batt would be best to keep the quilt from being overwhelmingly heavy.
Thank you Deanna, for sharing this great design.
My obsessive pressing made sure every seam in the quilt top nested.
96 inches square
From a sew-a-long on Deanna's delightful blog Wedding Dress Blue:
https://weddingdressblue.wordpress.com/calico-rose-quiltalong/
Changes I made:
I used flying geese for the star points instead of half-square triangles
I used 16-patches for the border
Look carefully for the orientation of the blocks for the border.
I sewed together the border blocks with the block seams perpendicular to the edge of the quilt. I sewed the border pieces to the center flipping the border seams to nest with the center seams. I then stay-stitched the edges before pressing to these nested orientations.
This is the second quilt I've made from Deanna's pattern. The first, made in 2015, belongs to my sister Janna. My sister Beth asked me if I could some day make her one like it. That day is today.
Over the past few years if I was using a 3 1/2 in strip I would cut a few triangles for this quilt. I keep my 2 inch scrap squares at the ready in shoeboxes and there are fabrics here from decades of work--some of my mom's scraps are included too.
The square prints parts of the blocks were done last year during a busy semester and were welcomed mindless sewing.
Last week I pulled out my Studio Cutter and cut the 3 1/2 inch and 2 inch solid strips to make the remaining parts.While this feels it went together quickly, it really has had years of prep work behind it.
I have an appointment for a drive-by drop-off with my longarm quilter this week. We decided a wool batt would be best to keep the quilt from being overwhelmingly heavy.
Thank you Deanna, for sharing this great design.
My obsessive pressing made sure every seam in the quilt top nested.
![]() |
| star block pressing |
![]() |
| alternate block pressing |
![]() |
| 16-patch border orientation and pressing |
Friday, May 15, 2020
patience corner, top completed
Patience Corner
80 by 96"
120 blocks set 10 by 12
Block finishes 8 inches
My design, use at your pleasure.
Cutting:
Solid: four 1 1/2 by 3 1/2 inch rectangle, four 1 1/2 by 4 1/2 inch rectangles
Print: four 3 1/2 inch squares
Pressing:
Press units away from square
Press halves towards side with square at seam
Do not press final horizontal seam until assembly
Sew 4 blocks together into a unit
Press all connecting seams and block horizontal seams into one direction
Rotating one, sew two 4-block units into an 8-block unit.
Sew 5 of these together for a row.
Make 3 rows
All seams will nest
80 by 96"
120 blocks set 10 by 12
Block finishes 8 inches
My design, use at your pleasure.
Cutting:
Solid: four 1 1/2 by 3 1/2 inch rectangle, four 1 1/2 by 4 1/2 inch rectangles
Print: four 3 1/2 inch squares
Pressing:
Press units away from square
Press halves towards side with square at seam
Do not press final horizontal seam until assembly
Press all connecting seams and block horizontal seams into one direction
Rotating one, sew two 4-block units into an 8-block unit.
Sew 5 of these together for a row.
Make 3 rows
All seams will nest
Labels:
solids on prints series,
top completed
Friday, May 08, 2020
rickrack, top completed
Rickrack
About 75 by 88 inches
72 blocks, set on point
Block finishes 9 inches
Cutting
Solid: one each rectangle 1 1/2 by: 2 1/2, 3 1/2, 5 1/2, 6 1/2, 8 1/2, 9 1/2
Print: One square 2 1/2; one each rectangle 2 1/2 by: 3 1/2, 5 1/2, 6 1/2, 8 1/2
Setting triangles over-cut from triangles 10 1/2 inches on sides and about 15 on base. Corner triangles over-cut from 9 1/2 inch square.
Pressing:
In block construction press all seams away from the 2 1/2 inch square.
(((You could chose to wait to press final solid strip seam and press them up or down every other block for nesting in assembly--I did not press them differently as I needed to ease seams a bit and I wanted the full 9 1/2 inches to do so.)))
Assembly:
Sew together in diagonal rows.
Press every other row of blocks to the left or right to allow rows to nest. Press final seams to the top left.
My design, use at your pleasure.
This is another quilt that everyone sees something different: feathers, dragon scales. I see Rickrack.
My Great-grandma Dykstra loved to sew and embellish dresses for her granddaughters. My dad said his sisters didn't like that she put so much rickrack on them.
Last year my sister was helping one of these aunts clean out her house. They ran across a dress from the 1940s and my aunt said, "That is grandma's burial dress." Which begged the question, why was it not in the grave. My aunt said her grandma sewed the dress and designated it to be worn in the casket. When she died her daughters-in-law thought it would not be appropriate because she had sewn sequins on it.
I want that dress. You may bury me with sequins.
Elizabeth Vander Hoef Dykstra and Joe Dykstra. She was known to be a very bright woman who did the business side of their farming. And for loving sequins and rickrack.
My father adored his grandparents.


About 75 by 88 inches
72 blocks, set on point
Block finishes 9 inches
Cutting
Solid: one each rectangle 1 1/2 by: 2 1/2, 3 1/2, 5 1/2, 6 1/2, 8 1/2, 9 1/2
Print: One square 2 1/2; one each rectangle 2 1/2 by: 3 1/2, 5 1/2, 6 1/2, 8 1/2
Setting triangles over-cut from triangles 10 1/2 inches on sides and about 15 on base. Corner triangles over-cut from 9 1/2 inch square.
Pressing:
In block construction press all seams away from the 2 1/2 inch square.
(((You could chose to wait to press final solid strip seam and press them up or down every other block for nesting in assembly--I did not press them differently as I needed to ease seams a bit and I wanted the full 9 1/2 inches to do so.)))
Assembly:
Sew together in diagonal rows.
Press every other row of blocks to the left or right to allow rows to nest. Press final seams to the top left.
My design, use at your pleasure.
This is another quilt that everyone sees something different: feathers, dragon scales. I see Rickrack.
My Great-grandma Dykstra loved to sew and embellish dresses for her granddaughters. My dad said his sisters didn't like that she put so much rickrack on them.
Last year my sister was helping one of these aunts clean out her house. They ran across a dress from the 1940s and my aunt said, "That is grandma's burial dress." Which begged the question, why was it not in the grave. My aunt said her grandma sewed the dress and designated it to be worn in the casket. When she died her daughters-in-law thought it would not be appropriate because she had sewn sequins on it.
I want that dress. You may bury me with sequins.
Elizabeth Vander Hoef Dykstra and Joe Dykstra. She was known to be a very bright woman who did the business side of their farming. And for loving sequins and rickrack.
My father adored his grandparents.
| My dad said his grandpa stood on a stone for this photograph so he could match his wife's height |


Labels:
archives,
solids on prints series,
top completed
Tuesday, May 05, 2020
remains, quilt completed
Remains, 2015
47 by 69 inches
This uses the "serendipity snakes" method I explain here on my blog. My mom taught me this method over 30 years ago, she learned it from a friend.
The strips were the leftovers from my 1 1/2 inch strip drawer, picked over and not used after several projects that made a big dent in them. I love this quilt. It reminds me of the rugs made on a treadle loom by our neighbor Charlotte Pals. I liked to lie on her floor and feel the vibrations of the loom as she worked.
It was beautifully quilted by Suzette Fisher.
I must draw attention to my long-arm quilters, Suzette Fisher and Sue DiVarco who allow me to be as productive as I am.
I have been posting a quilt a day on my Facebook (private family) page as a way to ward off a bit of despair in these quarantine times. I decided to re-post here some of my past quilts that never had a proper photograph taken.
47 by 69 inches
This uses the "serendipity snakes" method I explain here on my blog. My mom taught me this method over 30 years ago, she learned it from a friend.
The strips were the leftovers from my 1 1/2 inch strip drawer, picked over and not used after several projects that made a big dent in them. I love this quilt. It reminds me of the rugs made on a treadle loom by our neighbor Charlotte Pals. I liked to lie on her floor and feel the vibrations of the loom as she worked.
It was beautifully quilted by Suzette Fisher.
I must draw attention to my long-arm quilters, Suzette Fisher and Sue DiVarco who allow me to be as productive as I am.
I have been posting a quilt a day on my Facebook (private family) page as a way to ward off a bit of despair in these quarantine times. I decided to re-post here some of my past quilts that never had a proper photograph taken.
Labels:
quilt completed,
serendipity snakes
Monday, May 04, 2020
Tuesday, April 14, 2020
vamoose! (tunnel), top completed
Tunnel, Suitcase, Purse, Fireplace, Hurdles
This has become the Rorschach test of patterns with every viewer seeing something different. I thought to call this Away, but that is the name of a suitcase company (a suitcase I own and really like) and I don't want to get into any copyright disagreements.
Vamoose is a word I don't think I've ever used. It was an exotic one we would hear on tv, one that someone from a city would use. And a funny word. (I now live in the city and have never heard it here either--I wonder if city people think it is something farm people say.)
So, Vamoose! it is.
Vamoose!
117 blocks set 9 by 13 to finish 81 by 91 inches
Block finishes 7 by 9 inches
Cut
Solid: one 5 1/2 by 1 1/2 inch rectangle, two 2 1/2 by 1 1/2 inch rectangle
Print: one 4 1/2 by 9 1/2 inch rectangle, three 3 1/2 by 2 1/2 inch rectangles
Pressing
Press seams away from center small rectangle.
Do not press final horizontal seam until assembly
Assembly
Sew into columns
Press alternating columns with the final seam and the joining seam up or down
All seams will nest
I like the straight set for this, making the look of handles on cases. I played with a staggered set that I liked too which gave a bit of a parkour look to the quilt.
My design. Use at your pleasure.
This has become the Rorschach test of patterns with every viewer seeing something different. I thought to call this Away, but that is the name of a suitcase company (a suitcase I own and really like) and I don't want to get into any copyright disagreements.
Vamoose is a word I don't think I've ever used. It was an exotic one we would hear on tv, one that someone from a city would use. And a funny word. (I now live in the city and have never heard it here either--I wonder if city people think it is something farm people say.)
So, Vamoose! it is.
Vamoose!
117 blocks set 9 by 13 to finish 81 by 91 inches
Block finishes 7 by 9 inches
Cut
Solid: one 5 1/2 by 1 1/2 inch rectangle, two 2 1/2 by 1 1/2 inch rectangle
Print: one 4 1/2 by 9 1/2 inch rectangle, three 3 1/2 by 2 1/2 inch rectangles
Pressing
Press seams away from center small rectangle.
Do not press final horizontal seam until assembly
Assembly
Sew into columns
Press alternating columns with the final seam and the joining seam up or down
All seams will nest
I like the straight set for this, making the look of handles on cases. I played with a staggered set that I liked too which gave a bit of a parkour look to the quilt.
My design. Use at your pleasure.
Labels:
solids on prints series,
top completed
Subscribe to:
Posts (Atom)