

top completed 2022
about 92 by 74 inches
Reds are from my shelves, my friends' shelves, and a bit of shopping.
White is Kona Snow.
My goal of having a stack of red and white quilts is making progress! One is quilted, two are tops. They will join my one previous red and white quilt. Four is a stack!
I am putting the fabrics to bed for now and may work on a few more next year.
I'm not giving full instructions, as it will change with size changes.
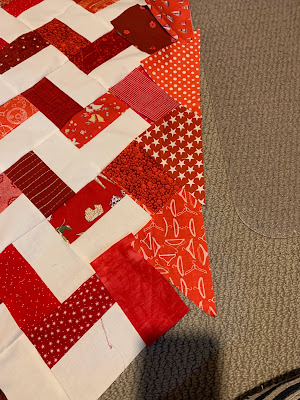
Every corner is different. Some resolved more gracefully than others! I will put how to resolve an on-point quilt in a separate post some day.
Block finishes 4 inches
Set on point 13 by 16 blocks, with a float.
Make about 344--not sure on the number, might be more, might be less!
Block cutting:
white: 2 1/2 by 4 1/2 inch rectangles
red: 2 1/2 by 4 1/2 inch rectangles
Also cut some extra red rectangles to resolve right edge--about 16
Setting cutting (overcut to give a float):
Setting triangles: 7 3/4 inch square, cut diagonally twice to yield 4 triangles
I trim one corner of the setting triangles to 4 1/2 inches. BUT I don't do it til I am ready to sew each row to make sure I trim the correct place.
Sew these trimmed triangles to the ends of the rows with the block on top and the triangle on the bottom to control the bias.
Cutting Corner triangles: These will all be different--wait to cut til ready for each corner.Sew the rectangles in pairs to make the basic block
Make about 344
Sew blocks into pairs for the basic unit
Make about 95 pairs
Why to I make pairs? It helps me control the direction of the blocks. And makes the quilt be well on its way when sewing together each row.
(Truth be told, I sew many of these pairs into 4s and 8s so when I lay them I am more efficient. I keep enough in pairs to easily shift the longer segments to keep a balance of what is going on as far as preventing prints touching.)


 |
| Pairs--I think "white dash at the bottom, reds make a 7" |

Keep enough single blocks to use in layout, one for each row on the right and on the bottom of the quilt
(For my quilt, that was about 30 blocks) and enough red rectangles for the right side of the quilt (about 16).
Lay out quilt. I wait til I see in real time how the right and bottom sides resolve. This can be done on graph paper, but I find I like to see it in actual fabric before I commit.
(I am making a separate post on these edge and corner resolve decisions.)
I keep myself organized by remembering the white dashes along the bottom of each row.
Everything nests--need to watch how you press the single red triangles on the right side to make sure they nest.
I press each row up til I am past the top right and bottom left corners, then I start pressing the remaining ones down.
Make sure you stay stitch the edges when all completed to protect them til quilting.

My directions (what they are...) for a traditional block and setting.
Use at your pleasure.


3 comments:
I love this quilt, and appreciate all your helpful hints on setting the edges and corners.
The diagonal set is SO much easier than making triangles! I love your fabric assortment.
I just found this tutorial you wrote--it is such a lovely quilt.. a different kind of zig-zag--I've only done 1/2 sq triangle ones...thanks so much...hugs, Julierose ;)))
Post a Comment