Wednesday, June 23, 2021

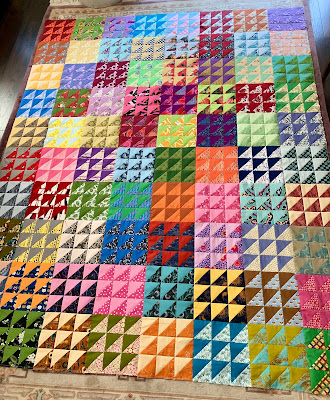
37 times around the sun: modern alphabet, top completed (setting directions)

37 times around the sun
82 by 59.5 inches
An Alphabet quilt made with letters from Moda Spell it with Fabric pattern

Note the pink letters? They are Andy and my initials. I made this quilt in commemoration of our 37th anniversary this year.

In January I started two alphabet quilts using the Moda Spell it with fabric pattern, this one with batik scraps and a second still in progress with 30's reproductions.
Here is a link to Moda's free booklet:
https://www.fatquartershop.com/moda-spell-it-with-fabric-quilt-free-pdf-pattern

I made lots of changes in construction. Their directions are for using 2 1/2 inch strips. Because I used scraps and yardage I was able to simplify many of the letters. For example, their Z uses 13 pieces. I made it with 5.
I also like my Q better than theirs!
Their letters are pleasing. I kept the silhouette for most of them, and many were made as written. 

Here are my directions for this modern set. I will later put up directions for the 30's repro set. Right now it is stalled out at the letter S.

Make the letters. They will measure 8 1/2 by 10 1/2 inches, to finish 8 by 10.

Sashing #1  Make 21
Cut 3 inches by 8 1/2 inches. 
Sew onto bottoms of letters A-U
Press towards the sashing

Sashing #2   Make 16
Cut 3 inches by 13 inches
Sew onto right sides of letters except for C, H, M, R, U, V, W, X, Y, Z
Wait with pressing

Sashing #3  Make 4
Cut 3 inches by 10 1/2 inches
Sew onto both sides of the V and the Y
Wait with pressing

Panel for top and bottom row  Make 2
Cut 13 inches by 21 1/2 inches
Sew onto left side of A and below the V & W
Wait with pressing

Lay out in rows as such:
Section A
Panel, A, B, C  press left
D, E, F, G, H    press right
I, J, K, L, M     press left
N, O, P, Q, R    press right

Section B
S, T, U    press left
X,Y, Z    press right
Press this section down

Section C
V, W    press left
panel
Press this section up

Sew B and C together, pressing the joining seam to the left.
It is then sewn to Section A
Press all rows down or up--your choice
All seams will nest.

Borders:
I used 5 inch cut scrap borders. I like my scrap borders to turn corners so I make sure there is enough of what will be on the corners to accommodate this.
Sides: cut two, 5 inches by 73 inches
Top and bottom: cut two 59.5 inches

Setting is my design.
Use at your pleasure.

Backing will be this fabulous Hoffman batik
that has been on my shelves way too long

Thursday, June 17, 2021

broken dishes, top completed

Broken dishes
98 by 84 inches

168 blocks set into 14 rows of 12 blocks
Block finishes 7 inches

Cutting
Solid:
four triangles cut from a 4 inch strip, using the EZ angle or Bonnie Hunter's Essential triangle tool
Print:
four triangles cut from a 4 inch strip, using the EZ angle or Bonnie Hunter's Essential triangle tool.
Hint with directional fabrics: cut a piece 18 inches. Fold it back on itself and make the cuts. The four resulting triangles will be oriented 4 different ways keeping the print directional in the resulting block.

Sewing and pressing
Lay out the triangles to watch for orientation. I lay it out on a reference block so I keep the orientations correct.

Read more details about block construction/pressing and assembly of top here:
https://kleinmeisjequilts.blogspot.com/2021/05/broken-dishes.html

My design using a traditional block.
Use at your pleasure.

Tuesday, June 08, 2021

horizon, top completed

Horizon
95 by 81 inches
180 blocks set into 10 rows of 18 blocks

Block finishes 9 1/2 by 4 1/2 inches

A very simple block. I am not alone in making a simple block with an inserted piece. There are many variations out there.
My block is adapted from my Riven design a couple years ago. Proportions could easily be changed. I am working on one with all batiks.
I'll probably use a wool batt because it is so large.

Block cutting
Solid: one rectangle cut 1 1/2 by 5 inch 
Print: one rectangle 5 by 3 1/2 inches, one rectangle 5 by 6 inches 
OR one rectangle cut 5 by 9 1/2 inches, then sub cut into  3 1/2 and 6 inch sections.

Press every other block horizontal seams up or down. Sew into pairs then into rows of 18. Make 10 rows. I pressed each row up.

You can read more about block construction and top assembly here:
https://kleinmeisjequilts.blogspot.com/2021/05/horizon.html

My design. Use at your pleasure.

Sunday, June 06, 2021

appliqué--applipops

One thing I can do but am clumsy with is appliqué. I will try this coming year to see if I can become better at it.
I invested in a full set of Applipops. They are a great invention and do exactly what they propose to do: make turned under circles ready to appliqué.
https://www.applipops.com/shop
By giving myself a year of steady work with it I hope my technique improves.
We shall see!

Tuesday, May 25, 2021

horizon

Horizon
Block finishes 9 1/2 by 4 1/2 inches 
I plan to set it 18 by 10, to finish 95 by 81 inches or 18 by 9, to finish 85 1/2 by 81 inches.

When making a complicated block I like to also make a simpler one to use as a break. This one was a good companion sewing project while making the Circled Squares.
It is a variation of the Riven block I made a couple years ago.
I like rectangle blocks. And this one gives a good amount of space to showcase prints. 

Cutting
Solid:
one 1 1/2 by 5 inch rectangle
Print:
one 9 1/2 inch by 5 inch rectangle, cut into a 6 by 5 inch rectangle and a 3 1/2 by 5 inch rectangle. 
(I do not always cut it from a 9 1/2 inch rectangle. When using scraps that are shorter than that I cut them individually.)

Sewing and pressing
Sew the solid rectangle between the print rectangles.
Do not press until time for assembly.

Assembly
I like to start by sewing all blocks into pairs. This gets me from 180 blocks to 90 units. 
Press every other block seams up or down.
I put pairs into the machine with the down pressing on top. At this point I have the most control over the blocks and by keeping the non-butting seams in this orientation, I save the more accurate butting together of the seams for when I am joining the units.

Then I sew three units together to have 30 large sections of 6 blocks.

These are put three sections to a row.
When rows are completed, press every other row left or right.
Join rows.
All seams will nest.
Watch for the completed top to be posted soon!

My design. Use at your pleasure.

Sunday, May 23, 2021

broken dishes

Broken Dishes
Block finishes 7 inches
I plan to set it 14 by 12, to measure 98 by 84 inches; 168 blocks.

I love this simple traditional block and knew I would eventually get around to using it for one of these quilts.

Cutting
Solid:
four triangles cut from a 4 inch strip, using the EZ angle or Bonnie Hunter's Essential triangle tool
Print:
four triangles cut from a 4 inch strip, using the EZ angle or Bonnie Hunter's Essential triangle tool.
Hint with directional fabrics: cut a piece 18 inches. Fold it back on itself and make the cuts. The four resulting triangles will be oriented 4 different ways keeping the print directional in the resulting block

Sewing and pressing
Lay out the triangles to watch for orientation. I lay it out on a reference block so I keep the orientations correct.

Sew triangle prints to solids. Press towards the prints.
Lay out the squares, watch for orientation. 
Sew them together into 2-square units
Press towards the solid triangle
Sew together the horizontal seam
Do not press this seam until assembly.

Assembly with long columns (making 12 long columns to sew together):
Keeping horizontal seams horizontal, sew into 12 columns of 14 blocks.
Press each odd column with all horizontal seams going to the top.
Press each even column with all horizontal seams going towards the bottom
Assemble columns.
All seams will nest.

OR
(this is how I am doing it--I hope to complete the top this week--watch for that post!)

Assembly into units (leaving just 3 long seams to sew together at the end):
Sew 144 blocks into 36 4-block columns
Press horizontal seams going up
Take two units and rotate one, sew into an 8-block unit 
Make 18 of these
Do not press the vertical seams yet

Also, sew 24 into 12 2-block columns
Press horizontal seams going up
Take two of these units and rotate one, sew into a 4-block 
Do not press the vertical seams yet.

Set the 8-block units into three rows of 6 units each row.
Set the 4-block units into one row of 6 units.
Press every other row's vertical seams left or right.
Sew rows together.
All seams will nest.

Watch for my post of the completed top soon.

My directions of a traditional block.
Use at your pleasure.

Wednesday, May 12, 2021

thousand triangles, top completed

 Thousand Triangles

90 by 72 inches

Block finishes 9 inches
80 blocks set 10 by 8

There are actually 1440 triangles in this quilt!
I love this simple block and how the scraps make different shapes with the blocks next to them.
Go here to read details of block construction and assembly:
https://kleinmeisjequilts.blogspot.com/2021/04/thousand-triangles.html

My design using a traditional block.
Use at your pleasure.

Thursday, April 29, 2021

thousand triangles


Thousand Triangles
Block finishes 9 inches

I plan to set it 8 by 10, to finish 72 by 90 inches.
80 blocks.

Another traditional block that has been on my mind quite a while.

(Note on the due-date fabric used above. When I worked as a library aide at the public library during college I never charged a late fee. I should probably send them a donation to make that up. Fabric by Heather Givans for Windham.)

Cutting
Solid:
nine triangles cut from a 3 1/2 inch strip using the EZ angle or Bonnie Hunter's Essential Triangle tool
Print:
nine triangles cut from a 3 1/2 inch strip using the EZ angle or Bonnie Hunter's Essential Triangle tool
Note: for directional prints you will need to cut 18 to get the 9 you need. You will just need to set them aside for another project! Or, embrace the chaos and don't pay attention to direction. 

Sewing and pressing
Sew solid triangles to the print
Press towards the print

Lay out in three rows and sew these
Make sure the print is always in the bottom right corner.
Press one row left and one row right. Sew these two rows together.

You will add the third row and need to make the blocks in one of two pressing configurations.
Block A has the top row pressed to the left on the back
Block B has the top row pressed to the right on the back
Press your remaining row to the right or left to make the block an A or a B.

Make half the blocks into A and half the blocks into B
Do not press horizontal seams until assembly

Lay out blocks into column, alternating A and B blocks. Sew these columns.
Press all horizontal seams in odd columns to the top
Press all seams in even columns to the bottom
All seams will nest

My directions for a traditional block.
Use at your pleasure.


Monday, April 26, 2021

circled squares, top completed

Circled Squares
96 by 84 inches
Block finishes 12 inches
56 blocks set 8 by 7

The origin of this design is murky. I see quilts from difference sources with the circled squares in a 9-patch construction dating to 2013, but cannot find who first came up with the idea. 
If you know who first came up with it, please let me know so I can edit this post and give credit. I include a link to my blog post that includes links to several patterns out there with the 9-patch construction below.

My adaptation was to change the piecing from a 9-patch to one with a rectangle in the center of the block. This cleans it up visually. 
I also developed a pressing method that ensures every seam in the setting of the quilt nests. This careful pressing may not make sense while piecing the blocks as seams do not meet when putting the three rows together. However, that pressing makes the top assembly work!
If you are sashing the blocks, no need to be as particular.

You can read about the quilts I researched and my adaptations in cutting, piecing, and pressing at my earlier post here:

https://kleinmeisjequilts.blogspot.com/2021/03/circled-squares.html

Layout
At this point none of your blocks have their horizontal seams pressed. That will wait until each column is assembled.

Use half your blocks as your "standard", oriented as such:

standard orientation

Use half your blocks as your "flipped", oriented as such:

flipped orientation

First Column and all odd columns
Use standard as your top left block.
Below it, a flipped block
Alternate for 8 blocks
Press all horizontal seams of odd columns towards the bottom

Second Column and all even columns
Use flipped for your top block
Below it, a standard block
Alternate for a total of 8 blocks
Press all horizontal seams of even blocks towards the top

Join columns. I decided to press all these seams to the right.

My adaptation of someone's idea--use my adaptations at your pleasure.

Sunday, March 28, 2021

make a paper palm

I remember making these with my mom out of the colored funnies.
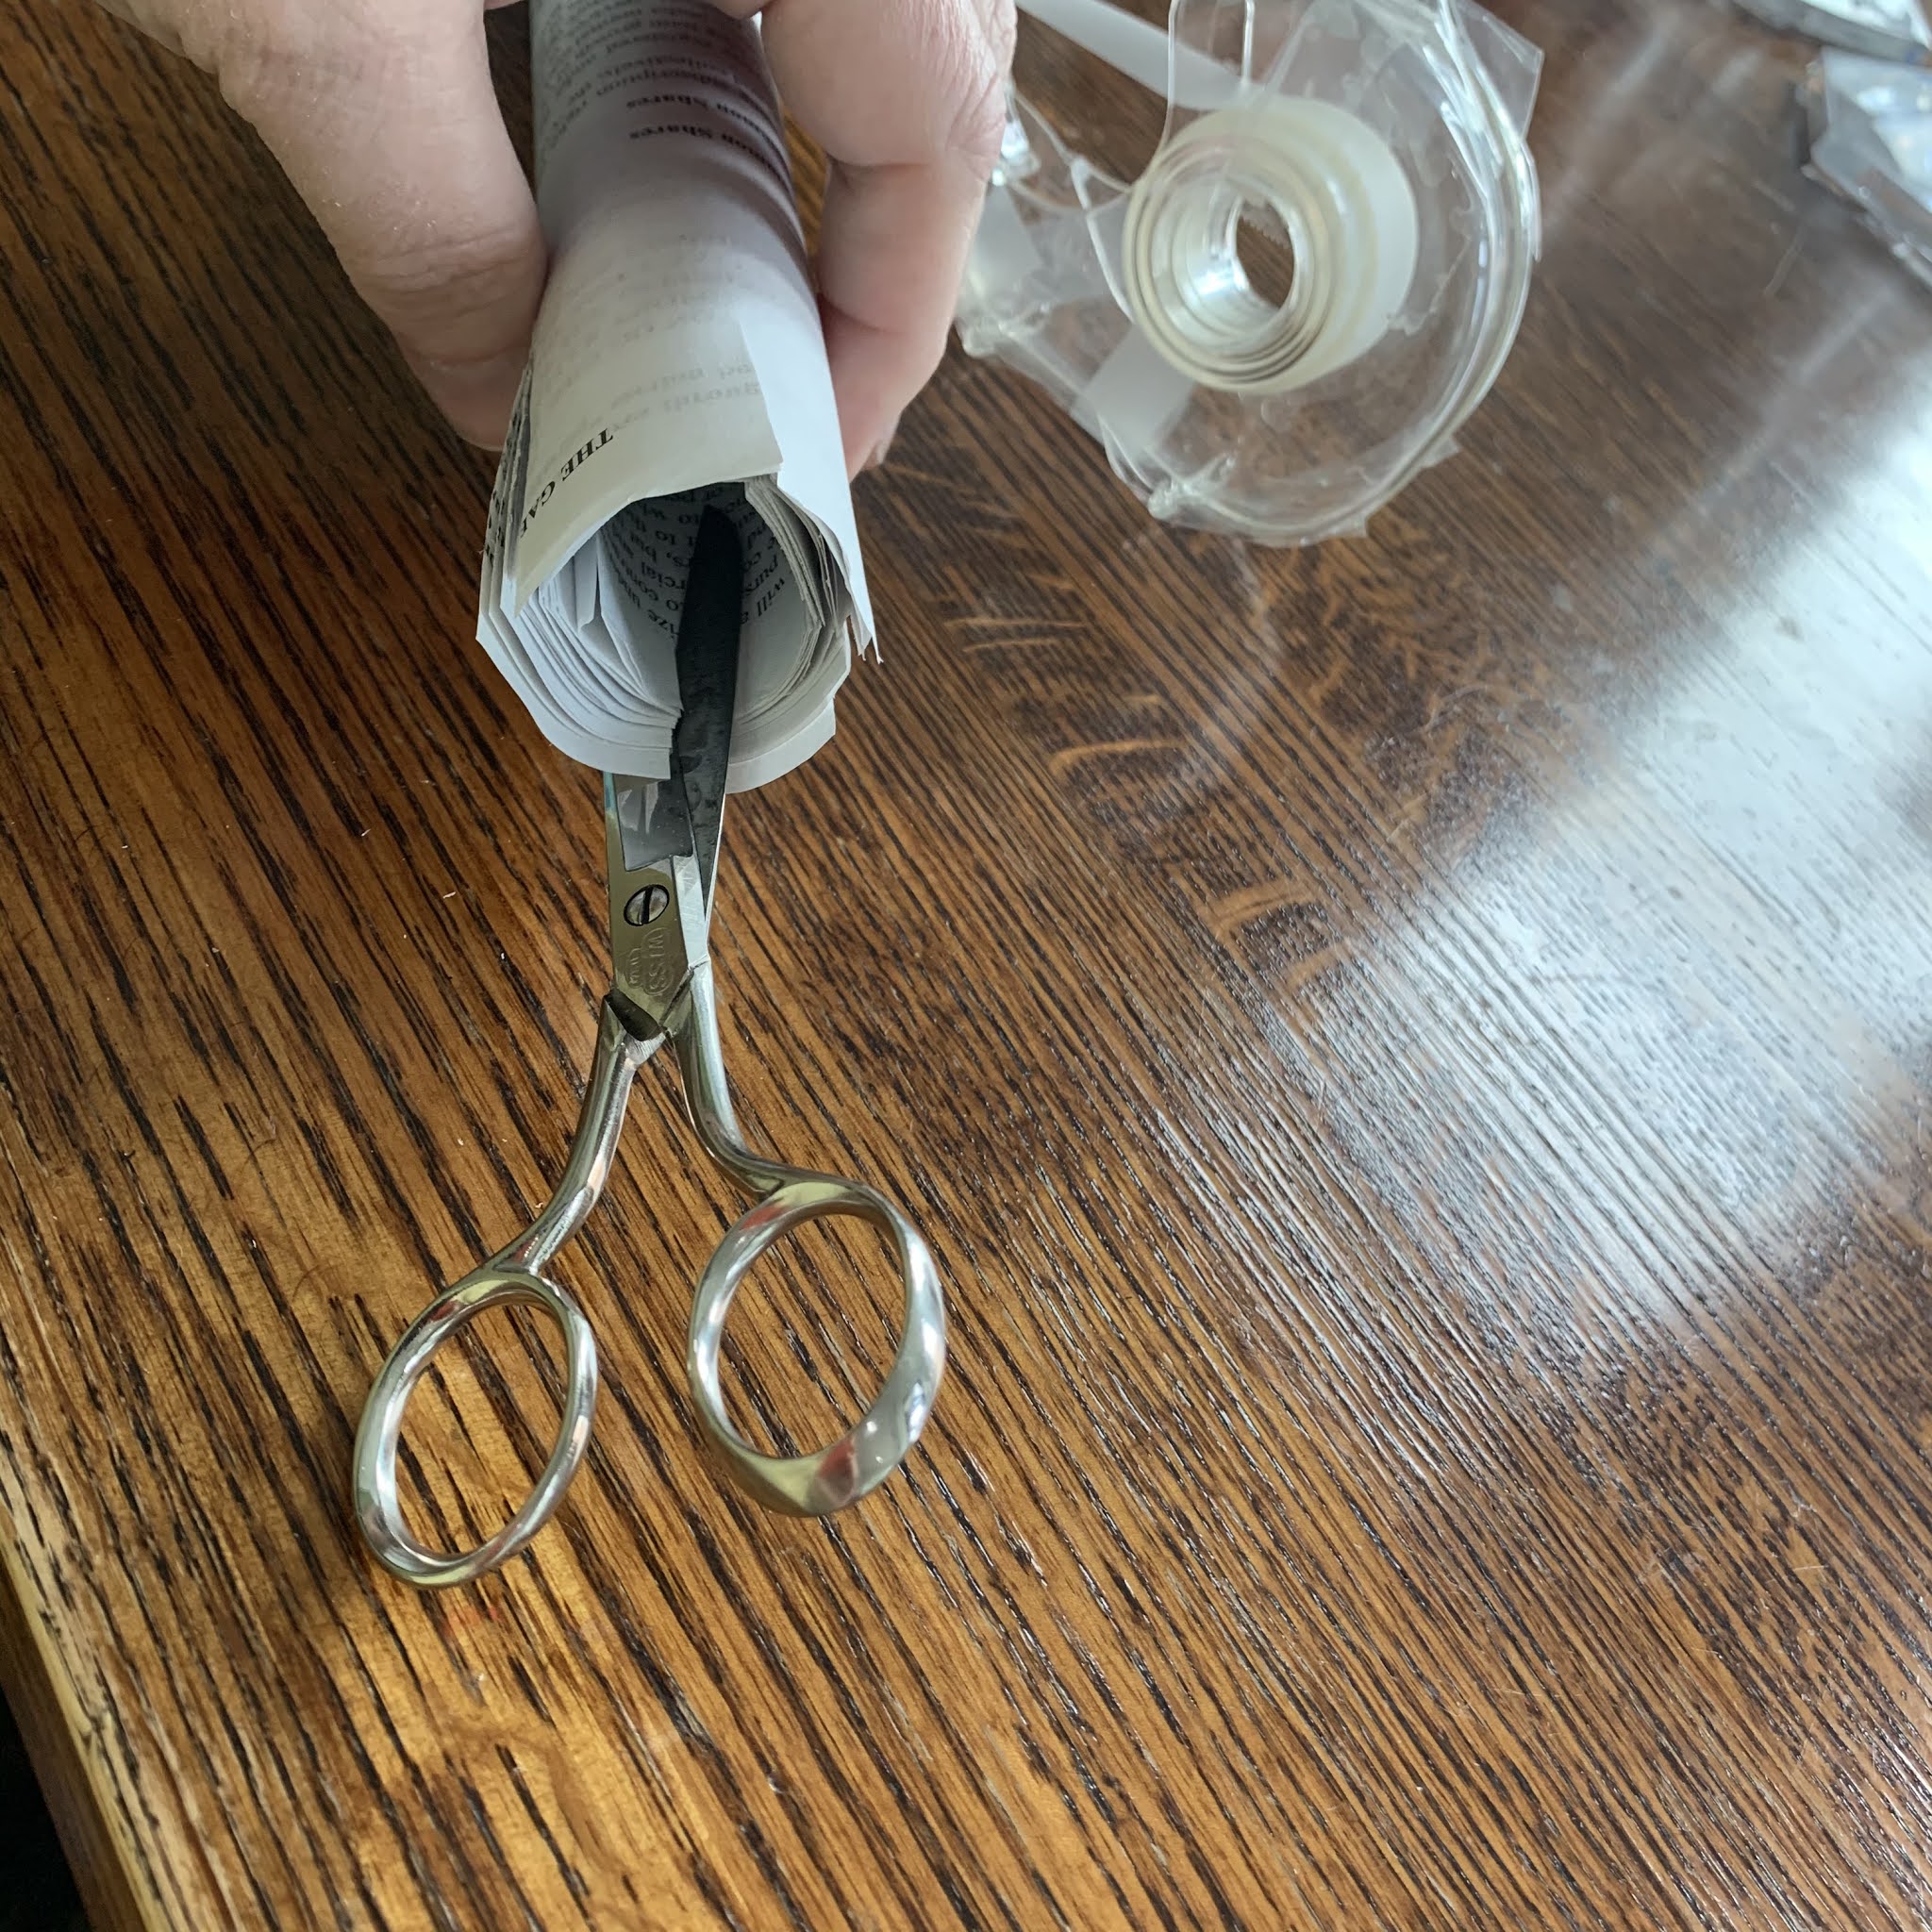
Gather supplies--paper (I used a financial prospectus), tape, and a good scissors BUT NOT THE GOOD SCISSORS.
Lay out the paper, overlapping by about an inch. Tape the junctures in two places.
Roll up the paper into a tube a bit smaller than a toilet paper tube. Tape about 4 inches from the bottom.
On the top end make four cuts in the cardinal directions, about 6 inches long.
Reach into the center and tug on a few pieces of the paper.
Pull out the palm. You can staple the base about 4 inches from the bottom for some stability.
You now have a paper palm to march around with on Palm Sunday!


Saturday, March 27, 2021

circled squares

Circled Squares

Block finishes 12 inches 
I plan to set this 7 by 6 (84 by 72) or 8 by 7 (96 by 84) so 42 or 56 blocks.

I have seen this block on the web. I have not been able to find the origin of it--if you know please let me know and I can include that information here.

UPDATE: Blog reader Mego says it is a block from a while back called Circle of Friends.
I did a bit of research and that name is used for several other blocks too, but one similar to this one I can trace to at least 2011.  I also saw it named as A Circle of Squares. All I have found had more pieces and were set in a 9-patch formation.
I'll update again when I learn more.
And, go check out Mego's blog--it is really fun!
https://basketfullofscraps.blogspot.com/
Reader JoyceLM reports Windham fabrics has a tutorial for the 9-patch version:
https://windhamfabrics.net/cgi-bin/fabricshop/projects.cgi?patternID=706
I am glad to see there are several versions of this out there so I am not appropriating one person's work. I do hope to eventually find out who came up with the idea.
There are also versions with circled triangles. Which are now on my list!


The blocks I saw were constructed in a 9-patch fashion.
Because I wanted to use prints for the background I re-drafted it to keep a larger portion un-pieced and oriented the corner units to keep their rectangles horizontal. This calms down the fracturing of the prints and allows the squares to visually float over the block.

Cutting
Solid:
eight squared 2 1/2 inches

Print: (be mindful of orientation of pieces with directional fabric)
one rectangle 4 1/2 by 6 1/2 inches 
six rectangles 1 1/2 by 4 1/2 inches
four rectangles 2 1/2 by 4 1/2 inches
four squares 2 1/2 inches
eight rectangles 2 1/2 by 1 1/2 inches

Block construction and pressing
Lay out block, keeping the 2 1/2 by 4 1/2 rectangles horizontal

Pressing is odd but it makes sense in keeping the block square and for when the quilt is ready for assembly. There is no nesting at all in block construction, so careful sewing is in order.
I press from the front of the blocks, so in the pictures when I say press to the right, some will show the back of the units and they will look like to the left--sorry about that bit of head twisting.

Corner units:
Sew four solid and print squares together, press towards the print
Sew the rectangles to the these units, lay out block and press the top two down towards the solid squares. Press the bottom two away from the solid squares.

Interior units:
Sew four solid squares and the 1 1/2 by 2 1/2 rectangles together, press towards the print. Sew the 1 1/2 by 4 1/2 rectangles to both sides of two of these units and to one side of the remaining two units. Sew those two to either side of the 4 1/2 by 6 1/2 rectangle.
Keeping the 4 1/2 sides vertical, sew them to the corner units.

Press the center unit so all seams go to the right.
row pressing shown from the back

Press the upper and lower unit so all seams go to the left. (except the seams around the solid squares--let them stay the way they were pressed earlier.
(In construction, some of the pressing is not necessary to be the way I do it. But it makes sense in keeping the pressing consistent in one direction for each row so I am not constantly thinking does this seam matter later on or not.)

Join the three rows. There are no seams to match, so be careful to not distort as you sew the long 12 inch seam.

Wait to press the final two horizontal seams until it is time for assembly.

Lay out the blocks is complicated to describe but is not complicated in process.
Lay into columns, rotating every other block, keeping the center row horizontal. Make sure you start each first block of a column rotated opposite of the one next to it, then rotate the blocks below it so all blocks nest both north and south and east and west.

Sew into columns.
Then, press all seams of odd columns up and even columns down.
Sew columns together. 
All seams will nest.

I will post pictures of this process when I assemble the quilt top. 

My adaptation of a block out there.
Use at your pleasure.