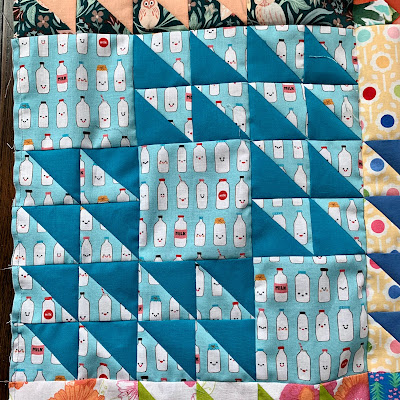
I plan to set it 7 by 8 blocks, so 56 blocks
To measure 84 by 96 inches
In researching this block, the triangles can be all in the same orientation, or can mirror along the diagonal. The same orientation works for a three-fabric block, but I chose to mirror as I am using just two fabrics. There are also versions with 4 fabrics that are really fun.
I will show four setting options at the end of this post.
I am doing a straight-set so my pressing directions are for that orientation.
I tried the block at 9 inches, and it worked, but was tedious so I scaled up to 12 inches.
Cut
Solid: 24 triangles from 2 1/2 inch strip using EZ Angle or Bonnie's Essential Triangle Tool
Print: Three 4 1/2 inch squares; 24 triangles from 2 1/2 inch strip using EZ Angle or Bonnie's Essential Triangle Tool
Note, either cut directional fabrics all the same for them to be directional in the block, or be happy with them going every-which way!
I like to keep directional fabrics oriented the same in these quilts to help calm the chaos a bit. There still is chaos, but it is curated chaos.
Piecing
Sew together all the triangles. Press them all to the print fabric.
I do not press again until the block is in three columns.

I make a reference block. Over this I lay out several blocks. I'll lay out 3-10 blocks at a time. Working in sections I keep the pressing plan in mind (having a second reference block helps) to orient the seams.
(Note: keep directional fabrics blocks all in pile A unless you carefully lay out upside-down directional fabrics to put into pile B)

Once the blocks are in three columns I press the outsides up and the center down.

I do not press these seams new seams until block assembly time.
Block assembly
Once blocks are completed, press half to the right (A) and half to the left (B).

Sew into columns of four and press towards the bottom. (see the red arrows in picture below)
Flip every other column. All seams will nest.

I will soon post the quilt assembly instructions.
My directions using a traditional pattern. Use at your pleasure.
There are also many ways to set the blocks, most frequently are four blocks rotated to come together with the large squares meeting. They can also be set on point.
I am setting my blocks set straight, with the large squares making a diagonal across the quilt.
 |
| Straight set, what I will do |
 |
| traditional set (but I see the top right block is not correct) |
 |
| on point with squares east and west |
 |
| on point with squares north and south |


2 comments:
Oh my, you certainly have to keep all those pieces oriented correctly. Lots of ways to set them with such different looks. Thanks for sharing.
That's a LOT of triangles! WOW! But it makes such a great quilt. Great fabric. Great job! ;^)
Post a Comment