Friday, February 24, 2012

an extravagant welcome--fashion forward children


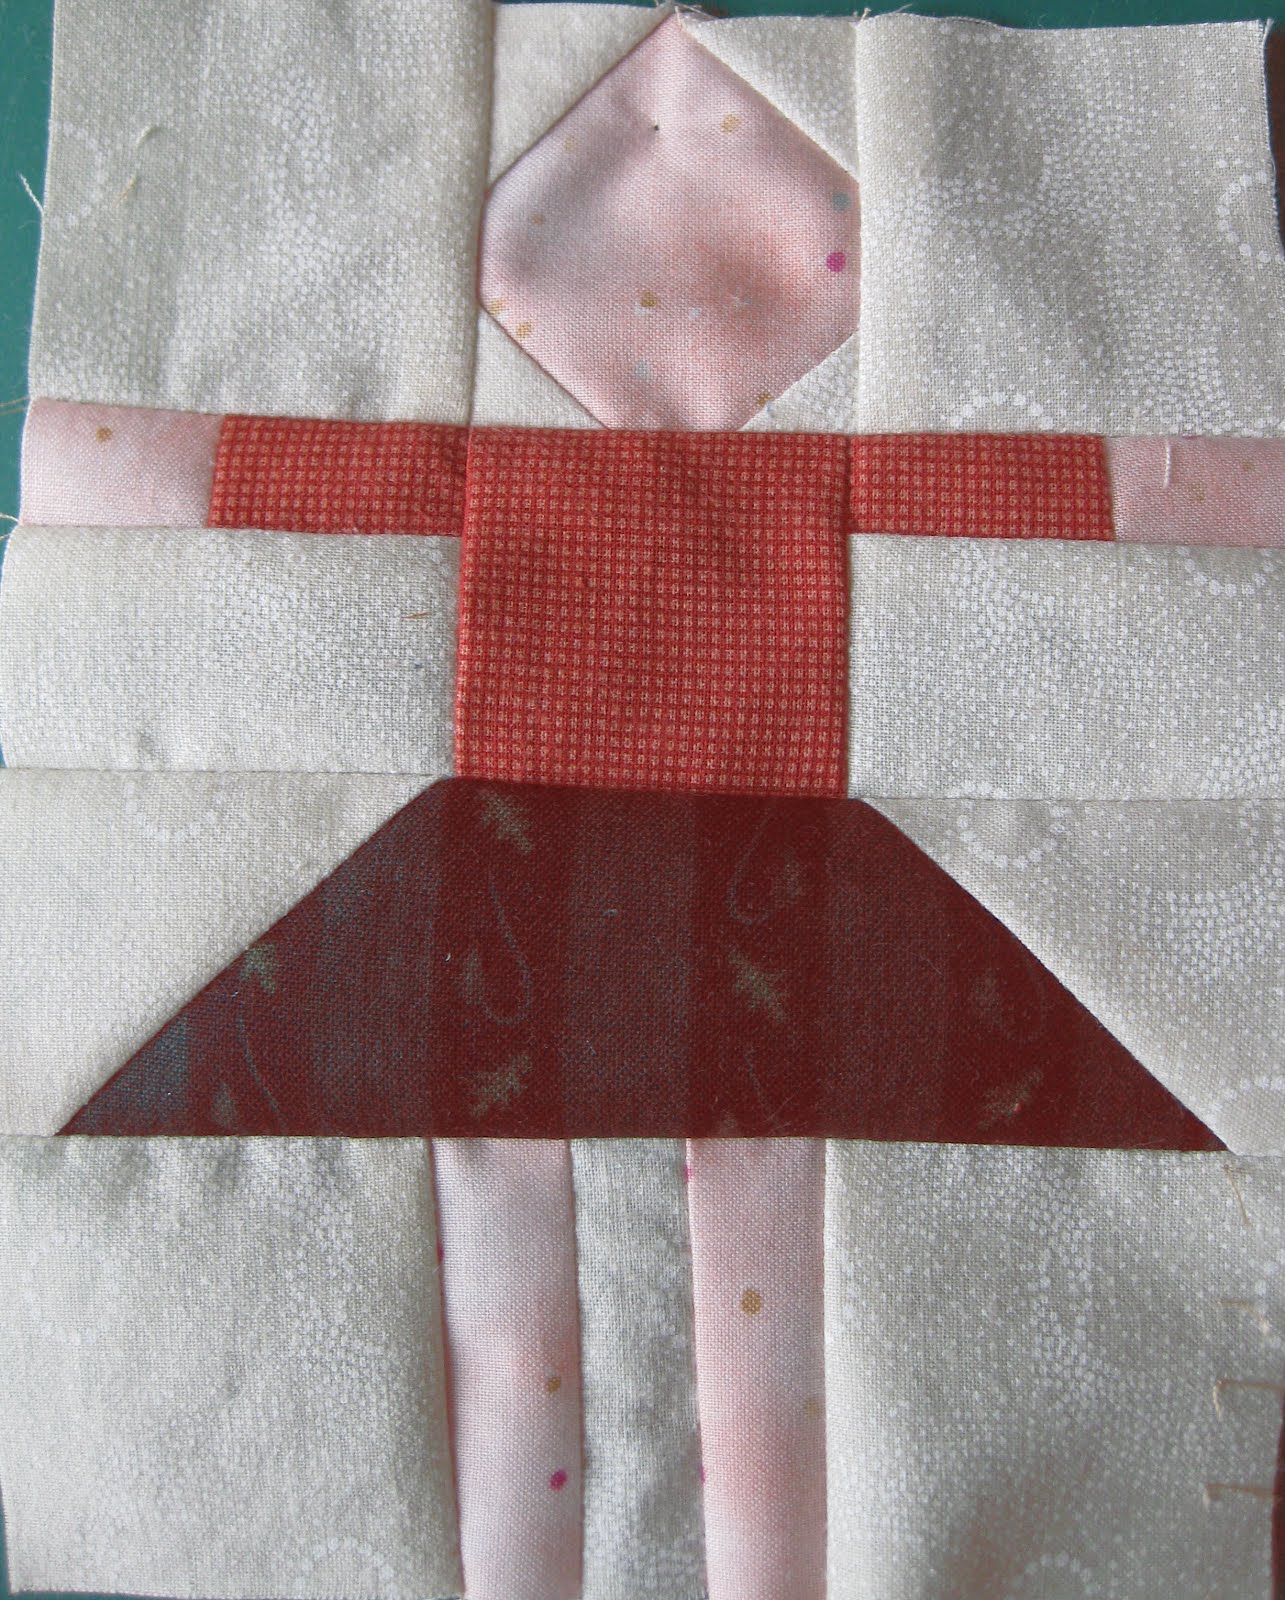
To mix things up a bit, try making some changes in the clothing.
I find it easiest to take graph paper, make a 6 by 4 1/2 inch grid block, fill in the head and arms, then sketch in some alternate lines.

Don't overdo this. There is a primitive feel to the block, and by messing too much with embellishments and such, you will lose that appeal.

I've made shorts, apron, skirt and blouse, robe, empire waist, swim suit, suspenders, belt, and short sleeves.

The simplest change to make is to give the child short sleeves. This works with both the shirt and the dress.
Everything is cut and sewn the same except the sleeves are cut 1 inch squares and the arms are 1 by 1 1/2 inch of the skin fabric.


Changing the silhouette:
Because I really, really hate paper piecing, I don't go that route.
Instead, to have a different silhouette of a dress, I make a mark at a certain point on the back of the 3 by 2 inch background rectangle and draw a line from that point to the outer corner. I then take an oversized 3 inch square piece of dress fabric, sew and flip, and trim to the 3 by 2 inch size. Then do so as a mirror image on the other side. This works best with a non-directional dress fabric


These three silhouettes were with marks made at 1/2 inch, 3/8 inch, and flush with the top corner, then down to the bottom corner.

Coming next, swim suits!

extravagant welcome--pushing the fabrics


In choosing fabrics, push yourself a bit.
To mix things up a bit, I have been having friends select fabrics. This adds some personality to the quilt. I've included scraps a friend brought home from Ghana, some pieces from my mother's sewing basket, treasured fabrics I bought in Japan, and used many from shirts I take apart.
(I do see the irony in taking clothing, deconstructing it, and making an image of clothing.)

Stripes are great for backgrounds--look like wallpaper.
And, little prints bring whimsy. I also use the back of some fabrics for a muted look.

If you wish to have a directional background consistent in a block, here is a time saver--
when laying out the little background squares to sew onto the head fabric, make sure the stripe is in the same direction for each little square.

When you sew and flip it, it will all be in a consistent direction. I don't always do this--with some I let things go every which way.

Wednesday, February 22, 2012

little white crib


This crib was used by my Grandma and Grandpa Scholten for their children. My mother is 82 years old, and thinks it was passed on to her parents, so it is from the post WWI era, maybe the early 1920s.
My generation of 26 grandchildren, born during the baby boom, had a lot of cross-over of baby times, so not all got to sleep in it, but my mom did use it for the four of us. Dad said he would stick his foot out from the covers to roll us back to sleep.
We three sisters used it with our 9 children, Seth being the last 14 years ago.
Janna is preparing to be the first grandmother of us. (Beth and I say we already are great aunts, now we get to be Great Aunts!)
I pulled it out of the attic for Janna to pick up.
It is not in the best of shape--note the bungee cords holding it together at the wheels.
I think it is time to use it for a ceremonial photograph, then grab that child to safety!

The quilt is a Puss in the Corner cut from 2 1/2 inch and 1 1/2 inch cut squares and 2 1/2 by 1 1/2 inch cut rectangles, finishing in a 4 inch square. It is ready to send to the quilter and Mom will bind it for her first great-grandchild.

For the backing I found a wonderful  print fabric of McCalls patterns that I am sure my mom sewed from!

Tuesday, February 21, 2012

shuttle


A time out for the children for now as, at my dear neighbor Sharon's request, I show how to make this Shuttle pattern.
I originally saw this in a McCall's magazine. I redrafted it smaller.

The scraps are 2 inch squares cut.
I saved all red scraps for use in the triangles and used all other colors in the other spots.

The solid (a Kona light aqua, much more beautiful than it is photographing) is cut into 3 1/2 inch squares and 3 1/2 by 6 1/2 inch rectangles

I am preparing to make this again out of shirt plaids.

Three blocks:

4-patch
made from four 2 inch scraps


Framed square
made from one 3 1/2 inch solid and twelve 2 inch scraps


Shuttle
made from one 6 1/2 by 3 1/2 inch solid rectangle and four red 2 inch scraps as sew-and-flip


There are also two finishing pieces to complete the pattern on the four edges of the top

Row
made from four two inch scraps
 

Flying goose
made from a 2 by 3 1/2 inch solid rectangle and two red 2 inch scraps as sew-and-flip

You will also need four 2 inch squares to complete the corners.

Enjoy! And Sharon, I'll be right over with that coffee pot I borrowed in early December....


Saturday, February 18, 2012

an extravagant welcome--playing with paper dolls


I loved playing with paper dolls as a child and these blocks bring back that same enjoyment.

Select background, body, and clothing and just have fun!

I make a few stacks, lay out three, then sew three blocks at a time.

an extravagant welcome--cutting dresses, pants, and shirts

Hint:
Do not cut all these in one grand cutting day. You want your children to have different personalities, and you will make different fabric choices on different days, depending on what is going on in your life. Some of my children are ready for work, others a good time. Some are rather morose and some are the life of the party. I have asked friends to give me scraps of their actual clothing so they can hunt for their doppelgangers.
Below are the standard clothing parts. Soon I will post a few variations.

Dress
From a 2 inch strip, cut:
one piece 2 by 3 1/2 inches for the dress center
two 2 by 2 inch squares for the skirt
two 1 inch pieces, then cut down to 1 by 1 1/2 inches for the sleeves

Pants
From a 1 inch strip cut:
one piece 1 by 2 inches for the top of the pants
two pieces 1 by 3 inches for the legs

Shirt
From a 2 inch strip cut:
one piece 2 by 2 inches square for the center of the shirt
two 1 inch pieces, then cut down to 1 by 1 1/2 inches for the sleeves.

an extravagant welcome--cutting body parts in mass


Previously I explained how to make the blocks and how to cut backgrounds in bulk.
This is how to cut multiple body parts.

Each dress block needs a head, two hands, and two legs.
Each shirt and pants block needs a head and two hands.

From smaller scraps I cut parts for one block at a time. But, I needed more variety than I had in the house so I bought several quarter yards of fabric (9 inches).

I stack 3 doubled pieces of fabric so there are 6 layers.
I cut from the selvage end one 2 by 9 inch strip and one 1 by 9 inch strip.

From the 2 inch strip I cut:
2 legs (yielding 12 total)
3 heads (yielding 18 total)
2 hands (yielding 12 total)

From the 1 inch strip I cut:
4 hands (yielding 24 total)
1 legs (yielding 6 total)

This is enough for 18 children-9 with dresses and 9 with shirts and pants.

The remainder of the 1 inch strip can be saved for the alternate clothing styles you may wish to try.

an extravagant welcome--cutting lots of backgrounds

Previously I described how to make the blocks.
Here is how to cut backgrounds in bulk.

Begin with a bunch of neutral background that are rather safe.
My usual style in scrap quilts is to have some arbitrary rule, follow it for about a third to a half of the blocks, then be rather loose with the rule for another third, then step back and see what is needed--more structure or abandon more rules.

So, I started with some white on white that remains in my stash though I thought I plowed through all of them long ago.
I've added on some backgrounds more in the tan area and have started a few shirting prints and stripes, and some gentle colors.
I am not cutting from full width yardages, wanting more variety than that will give me. My backgrounds are from fat quarters and smaller scraps.

I stack five or six 2 inch strips for cutting backgrounds.


Dress block:
From a 2 inch strip about 19 inches long:
cut two 2 by 3 inch rectangles (for the skirt sections)
cut four 2 by 2 inch squares (for the corners of the block)
cut one 2 by 1 inch rectangle (for between the legs)
cut two 2 by 1 inch rectanges and subcut into four 1 by 1 inch squares (for the head background)


Shirt and Pants block:
From a 2 inch strip about 18 inches long:
cut two 2 by 4 1/2 inch rectangles (for the bottom corners)
cut two 2 by 2 inch squares (for the top corners)
cut one 2 by 4 inch rectangle and subcut it into two 1 by 4 inch rectangles.
Subcut one of these into four 1 by 1 inch squares (for the head background)
Subcut the other into a 1 by 3 inch rectangle (for between the legs)

an extravagant welcome--shirt and pants block

These directions are for the shirt and pants block.
Previously I posted the dress block.
In later posts I will show some variations on these basic patterns and how to cut multiples of backgrounds and body parts.

This block is put together in three vertical sections.
It finishes 4 1/2 inches by 6 inches. (5 by 6 1/2 inches unfinished)
I capitalize PRESS so it is easier to find in the directions.

Left section:
background, arm, background
 
Middle section:
head, shirt, pants

Right section
background, arm, background
Cut background:
2 pieces 2 by 2 inches (used in top corners of block)
2 pieces 4 1/2 by 2 inches (used bottom corners of block)
1 piece 1 by 3 inches (between two legs)
4 pieces 1 by 1 inch (used on head done as sew and flip)

Cut shirt:
1 piece 2 by 2 inches (center shirt)
2 pieces 1 1/2 by 1 inches (sleeves)

Cut pants:
1 piece 1 by 2 inches (top of pants)
2 pieces 1 by 3 inches (legs)

Skin color:
1 piece 2 by 2 inches (head)
2 pieces 1 by 1 inches (hands)


Prep:
Head--sew 1 inch background squares to head fabric as sew and flip in each corner. (I do NOT cut away the triangles as I like the stability on these little pieces of the head)

Arms--sew hands to sleeves. PRESS towards the sleeve.

Pants--sew background between pants legs. PRESS towards pants.
Then, sew pants top to pants legs. PRESS towards pants top.
Lay out the sections
Sew background rectangles and squares to arms--make sure you have it laid out so one arm is pointing left and one is pointing right. PRESS towards the background.

Sew head to shirt. PRESS towards shirt.
Sew shirt to pants. PRESS towards pants.

Sew sections together. PRESS towards background, away from the body.


Friday, February 17, 2012

an extravagant welcome--dress block


These directions are for the dress block.
Next I will post the shirt and pants block.
In later posts I will show some variations on these basic patterns and how to cut multiples of backgrounds and body parts.

This block is put together in three horizontal sections.
It finishes 4 1/2 inches by 6 inches. (5 by 6 1/2 inches unfinished)
I capitalize PRESS so it is easier to find in the directions.
Top section:
background, head, background

Middle section:
left skirt and arm, center dress, right skirt and arm

Bottom section
background, legs, background

Cut background:
4 pieces 2 by 2 inches (used in four corners of block)
2 pieces 3 by 2 inches (used for skirt pieces done as sew and flip)
1 piece 1 by 2 inches (between two legs)
4 pieces 1 by 1 inch (used on head done as sew and flip)

Cut dress:
1 piece 2 by 3 1/2 inches (center dress)
2 pieces 2 by 2 inches (skirts done as sew and flip)
2 pieces 1 1/2 by 1 inches (sleeves)

Skin color:
1 piece 2 by 2 inches (head)
2 pieces 2 by 1 inches (legs)
2 pieces 1 by 1 inches (hands)

Prep:
Head--sew 1 inch background squares to head fabric as sew and flip in each corner. (I do NOT cut away the triangles as I like the stability on these little pieces of the head)

Arms--sew hands to sleeves. PRESS towards the sleeve.

Skirt--sew and flip a skirt section to a 3 by 2 inch background, make sure you make mirror images. I DO cut away the underlying triangles to reduce bulk.
Then, sew arms to the top of each skirt section--making sure you have the arm pointing left on the left skirt, and the arm pointing right on the right skirt. PRESS towards the arm.

Legs--sew background between legs. PRESS towards legs.

Lay out the sections:
Sew background squares to head. PRESS toward background squares, away from the head.

Sew arm and skirt sections to dress center. PRESS towards the dress center

Sew background squares to legs. PRESS towards background, away from the legs.

Sew sections together. PRESS towards the dress, away from the head, and PRESS towards the dress, away from the legs.

Monday, February 13, 2012

an extravagant welcome begins


Melissa Kane organized the wonderful quilt of little blocks of children for our guild's raffle about 5 years ago. She put the blocks (made by guild members) together, I put on the borders, and Sue DiVarco quilted it.
It needed a name so I decided to call it An Extravagant Welcome because of those outstretched arms.
It is a phrase the United Church of Christ uses in its materials, and I really wanted to win the quilt to hang in one of St Pauls' Sunday School rooms.
I have spent the last half decade pouting that I did not win this quilt.
(That shows how much I must listen in church.)
Yesterday I decided it was time to replicate the quilt and there are now 13 little children on my design wall.
If that pace keeps up, I could have them all made in a month.
I'll post directions and my progress over the next weeks.

Wednesday, February 01, 2012

exuberant color

This little quilt, just 11 1/2 by 13 inches, was a study for a class I took nearly 20 years ago with Wanda Hanson, now of the wonderful blog Exuberant Color.
I've been to quite a few workshops. Some are very active and fun and silly and a good time, some are not so much fun.
But this one with Wanda has stayed with me all these years. I left that day with a sense of reverence. She showed such respect for her work and ours, and made me feel like what I was doing really mattered.
While cleaning my studio last week I discovered this little piece and thought it was time to give it its due. I machine quilted it with a squiggle grid and bound it this morning. There are a few other studies from that workshop around here somewhere, and I will finish them up too.

pink lemonade--Humble Quilts quilt-a-long

Thanks again to Lori at Humble Quilts for her delightful quilt-a-long with this project.
I really enjoyed using some of my special brown and pink fabrics--about 6 fabrics are from repurposed shirts. My nod to the lemonade part of the challenge was one little half block of yellow fabric. Head over to her blog to see many other takes on this pattern.
The back is this wonderful print of double pears from Moda. I machine quilted it in parallel squiggle lines.
And, it was bound with some leftover binding I had on spools!