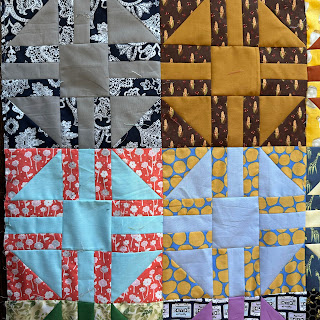
Fragments
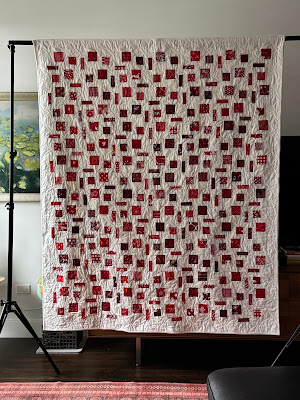
(Floating Fragments pattern by Jamie Siel)
Quilt completed 2024
78.5 by 65 inches
Quilted by Sue DiVarco
White is Kona Snow
Red scraps
Jamie Siel of Sew Brainy Designs has a delightful pillow pattern series she does for Riley Blake. Her October 2023 "Floating Fragments" pillow begged to be scaled up to quilt size.
Her description of it is HERE.
The pattern tutorial is HERE.
My adaptation is described HERE.
My final finish for 2024.
Tuesday, December 31, 2024
fragments, quilt completed
Wednesday, December 25, 2024
Saturday, December 21, 2024
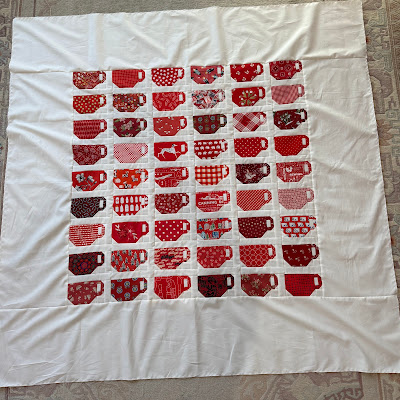
teacups: I Need a Cup of Tea, top completed
Teacups
I Need a Cup of Tea
about 54 inches square
54 blocks
Block finishes 3 by 5 inches
I describe how to make the block HERE.
And how to do the sashings HERE
Quilt was constructed in vertical columns and no outside sashings so outer blocks touch the borders.
A good quilt to piece and quiet my mind. A calming cup of tea was in order in November.
Love it in the red and white. And I am making it in the Solids + Prints style too as a long range project.
I included 10 inch wide borders, a place for Sue DiVarco to do her longarm magic.
My design, use at your pleasure.
 |
| Backing is this delightful Ski Hill by Corrine Wells for Riley Blake. LOVE those crabapple shaped gondolas. |
Friday, December 20, 2024
Jump on In designed by Julia Davis of Red Rainboots Handmade, top completed
Jump on In (designed by Julia Davis)
top completed 2024
96 by 80 inches
Last winter Julia Davis of Red Rainboots Handmade (her main business is making wooden barn quilts--those tulips are calling me) had a fabric swap and quilt-along called Jump on In. I did not participate in the swap, but purchased her pattern and watched the progress of the project on instagram.
The pattern is available HERE.
Read about the swap HERE. It was a fun process to follow on her Instagram. She was very organized!
And HERE is a link to the hashtagged quilts made by the participants.
I kept the idea on the back burner, cutting triangles while cutting reds for other projects and sewing stacks of the units behind the scenes.
Two things I changed to fit my sewing preferences:
I dislike trimming down units, so I cut my triangles from strips to finished size using the Easy Angle or Bonnie Hunter's Essential Triangle tool.
Are my triangles a bit less accurate than if I over-cut/pieced/trimmed?
Yes.
And I am ok with that.
I also dislike sewing lots and lots of long rows together onto a mothership, so I sewed the units into 16-patch style blocks. Once the 16-patches were made I laid out, I sewed into rows, pressing each row east or west, alternating.
All seams nest.
 |
| Sew into strips of 4. Press half of these strips up and half down. Make half-block of 8 units. Do not press these units yet |
 |
| Sew two half-blocks together into a block Do not press these units yet |
My reds range from tomato/madder to berry/maroon. The white is Kona Snow.
Thanks, Julia, for the delightful design!
 |
| Backing by Timeless Treasures |

Thursday, December 19, 2024
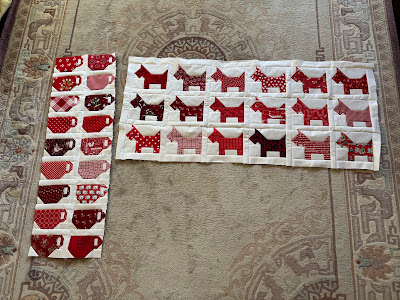
scottie dogs, top completed
top completed 2024
68 by 62 inches
48 blocks set 6 across and 8 down
Block finishes 5 by 6 inches
I used Kona Snow for the white
I love my little emotional support scottie dogs! Each was a pleasure to make.
See HERE for my block directions.
See HERE for L sashing overview.
After adding the L sashings, I resolved the top and left blocks so that the pieced center of the quilt would have the sashings all around the field.
The field was constructed in horizontal rows.
I added wide borders, cut 10 inches, from a fabulous Riley Blake plaid print which I plan to use as straight cut binding.
The white of the border is not an exact match to the white of the blocks, and I am ok with that. It makes a good frame and the center glows in contrast.
My design. Use at your pleasure.
 |
| Backing from Timesless treasures |
 |
| Border fabric by Riley Blake |
Saturday, December 07, 2024
tutorial: using L sashing, two examples

Cornerstones keep you honest. They help line up blocks when making the field of a sashed quilt. But they also add a visual that I don't always want in a quilt.
When I want to have sashings but NOT cornerstones, I don't like the pinning/easing/moving/instability that happens with long segments of sashings joining rows
My work-around is using L sashings.
I don't know if there is another word for this, but I call it L or 7 as that is the shape it makes around two sides of the block.
*note--the outer blocks may be treated differently as I will explain later.
Measure the block. Decide on a sashing width.
Do the math to make sure you cut the sashings the correct size. complete a sample block before cutting all the sashings.
If an asymmetrical block, put the first sashing on the most irritating side of the block. (I should have done this with the snout side of the dogs but didn't figure this out until I was too far into the quilt.)
Here is an example using my Scottie Dog blocks.
*I decided to have the sashings go all around the field, so some blocks will need to be resolved.
The block finishes 6 inches across and 5 inches down.
Unfinished it is 6 1/2 by 5 1/2 inches.
I used a 1 inch finished sashing, so I cut 1 1/2 inch strips.
I sashed the longer side of rectangle blocks first, so I cut this piece 6 1/2 inches and sewed onto the bottom of the blocks.
Sewn on the block height is now also 6 1/2 inches.
Press towards the sashing
I sash the right side at 6 1/2 inches.
DO NOT press yet.
The sashed block now measures 7 1/2 by 6 1/2 inches, to finish 7 by 6 inches.
See how the sashes make a L or 7 shape?

*I decided to have sashings surround the field so:
I resolved the left blocks with a 6 1/2 inch sashed on the left sides.
I resolved the top blocks with a 7 1/2 inch sashed top sides EXCEPT the top right corner block
I resolved the top right corner block with a top sash of 8 1/2 inches
 |
| resolved left side blocks |
 |
| resolved top row blocks |
 |
| resolved top corner block |
Lay out the quilt and sew into rows or columns I did rows for the dogs. Press sashings to the left or right on alternate rows.
Everything nests.
Now an example with the Teacups.
*I decided NOT to have the sashing go around the field, so I set aside the Right and Top blocks.
The block finishes 5 inches across and 3 inches down.
I want to use a 1 inch finished sashing, so I cut1 1/2 inch strips.
This time I remembered to sash the irritating side first, so I cut the initial cup ear sashes 3 1/2 inches. Press to the sash.
Sewn on the block width is now 6 1/2 inches.
I sash the bottom at 6 1/2 inches. DO NOT press yet.
The sashed block now measures 6 1/2 by 4 1/2 inches, to finish 6 by 4 inches.

*Resolving the sides:
I eliminate the side sash of the right edge blocks and just put the lower sash on them (except for the bottom right corner block which remains unsashed). These sashes were cut 5 1/2 inches.
I eliminate the bottom sash on the bottom row and just put the side sash, cut 3 1/2 inches, on all of the lower row blocks (except the bottom right corner block which remained un-sashed).
Lay out the quilt and sew into rows or columns I did columns for the teacups. Press sashings up or down on alternate columns.
Everything nests.
Watch for these tops to be completed soon. The semester is ending!
Tuesday, December 03, 2024
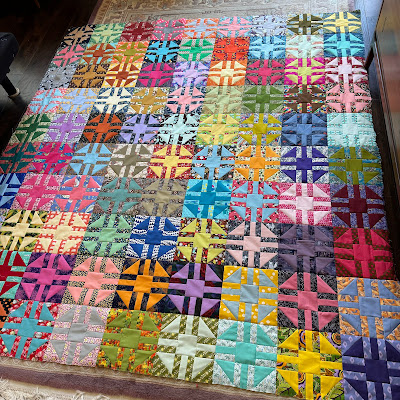
pavement, top completed, construction details
top completed 2024
90 by 80 inches
block finishes 10 inches
72 blocks set 8 across and 9 down
Block construction HERE
It is a simple block and a good one to use if you are experimenting with this solids + prints concept.
All blocks are made with the same pressing plan.
In layout, every other block is rotated so all seams nest.
Set aside 8 blocks to be the bottom blocksSew remaining 64 blocks into 32 pairs, rotating blocks so one is oriented horizontal and one is vertical. These are 2-block units---press away from the horizontal oriented blocks
Sew into 16 4-block units, making sure to sew a horizontal block to a vertical block--press consistent with the previous

Layout the 4-block units to make two rows of 8 columns, rotating every other unit to nest to the blocks next to each other. Make sure to keep columns consistent in orientation.
Layout remaining 8 blocks to make a 9th row, making sure to orient horizontal or vertical to nest into the blocks above.
I sewed these 9th row blocks to the 4-block units above them, making 5-block units--pressing consistently

Then sewed into two sections, pressing one section east and one west.
Sew together into top, pressing final seam north.
Everything nests!
My directions and design using a traditional block.
Use at your pleasure.
 |
| back is by Dear Stella |


Wednesday, November 13, 2024
paths and stiles, top completed, construction details
Paths and Stiles
top completed 2024
90 by 81 inches
block finishes 9 inches
90 blocks set 9 across and 10 down
See block construction HERE.
Blocks are rotated every other block so all seams nest.
I pieced in pairs--2-block units--made 45 pairs
 |
| 4-block units |
Then set aside 9 pairs and with remaining 36 pairs, made 18 units of 4, pressing seams consistently with the previous pressing.
Lay out two rows of the 4-block units and one row of the 2 block units, making sure keeping columns consistent with either horizontal oriented unit on top or vertical oriented unit on top.
Sew into to rows
Press center row east, top and bottom rows west
Sew rows together
Press final rows up or down
Everything nests!
My design and directions using a traditional block.
Use at your pleasure.
 |
| Backing by Dear Stella |
