Saturday, July 25, 2015

wedding quilt--process

My niece Emilee asked me to plan a signature quilt for her wedding to her Andy last September. (We have three Andy's in the family now, so each is referred to by the woman he belongs to.)

I decided to use Bonnie Hunter's Bricks and Stepping Stones pattern.
http://quiltville.blogspot.com/2005/06/bricks-stepping-stones.html

I cut out 3 1/2 by 6 1/2 rectangles from a variety of paler lavenders and periwinkles and sat at a table at the wedding helping people ink their sentiments. 
It was a clash of cultures. Her northwest Iowa family and friends tended to write blessings and prayers. Some of his central Iowa family and friends were inclined to include sly references to what would happen in the bed this quilt would end up covering.

Yesterday I decided it was time to get this put together before it became a millstone. There were about 58 signed patches. I am making the quilt with 144, so they can get additional signatures added once it is done--her parents and sisters didn't get to the table, and I assured them I'd have plenty blank ones for them.
(I did play the aunt card and threw away one block that was very vulgar. Yeah, I'm that aunt...)

Most of the blocks will need to be gone over with the ink to darken them. I'll do that with my sister when it is finished.

I bought an Accuquilt Studio Cutter this spring and have the strip dies. I used the 2 inch strips for making the four patches. I tore off 13 inches from the purple and the floral batiks, used the die to get twenty 13" strips, sewed them, then ran through the cutter again to get 120 2-patches to sew into 60 4-patches. I did this 3 times, so I have 180 4-patches to work with.
It was an efficient process and a good way to get to know the cutter better. I've used it on a few other projects this summer and am seeing its potential.

I hope to have this off to the quilter before Faculty Week starts mid August. My summer of sewing is drawing to a close.

Wednesday, July 15, 2015

another sew-a-long! Calico Rose

I thought I had one shoe box of 2 inch squares--then this weekend found another that was pretty close to being full.
In a quest to find a project to use some up, I came across Deanna's Calico Rose sew-a-long on her Wedding Dress Blue blog.

https://weddingdressblue.wordpress.com/calico-rose-quiltalong/

The sew-a-long started in March, so I will have to fit in lots of machine time in to be ready for the August show and tell. But, with all the squares at the ready, I think I can make it!
And, I am enjoying my birthday flowers--Eve told them to make it wild and yellow.


Sunday, July 12, 2015

birthday!

I remember this cake! It was beautiful, mom!
It looks like 3 candles, so 54 years ago.
 We celebrated at a new restaurant--the Dutch and Indonesian influenced De Quay on Lincoln Avenue. Stroopwafels for dessert!
My small group gives fabric based on the birthday member's theme choice. This year I requested "man made objects".
What a delightful assortment!
typewriters
windows
trains
sphygmomanometers and stethoscopes
license plates
purses and shoes
bicycles

Saturday, July 11, 2015

rail fence in streak of lightning set, top completed

It is huge! About 84 by 102 inches.
The unit (finishing 6 inches) is a rail fence, with two rails made from 2 1/2 inch cut squares and the third with a solid 2 1/2 by 6 1/2 inch cut strip. I used a Moda Blue.
I put 4 of these units into a 12 inch block. If you go to my earlier post you will see my pressing plan.
You may notice the odd floating units along one edge. I could have figured out how to make that edge flow, but decided the simplest solution was the lazy way, and let them float.

And, it used up 1/4th of my 2 1/2 inch squares! Just one and a half shoe boxes left of them. I am trying to pull together my sewing room, so I fear they both will be full again soon. I need a new 2 1/2 inch square project...

Friday, July 10, 2015

paint box--top completed

I saw this idea on Aunt Marti's blog from a kit called "Bit 'o Color" from Nala's shop.
http://www.52quilts.com/2015/01/on-design-wall.html
http://nalasquiltshoppe.webs.com/

I drafted my own using 2 inch cut strips. I had all the color centers already in my solid scraps bin.
The black and whites are cut two pieces 2 by 5 inches and two pieces 2 inches.
A hint in cutting the black and whites, as I used fabrics in different lengths.
Cut one 5 inch strip and one 2 inch strip from the fabric. Then cut 2 inch pieces from each, and you will have pairs of each to make the blocks. When I tried cutting them from just 2 inch strips I was always loosing count of how many of each size I was cutting.

By flipping the blocks there are only corner seams to match. I included both white and black and cream and black.

It looks like the watercolor paint boxes from my grade school days. They would be all dirty when we opened them. We would run the boxes under water, washing off the mixtures, and the little squares of clear color would be revealed.
The solids have the illusion of hovering over the quilt.


Thursday, July 09, 2015

...and all ships at sea--top completed


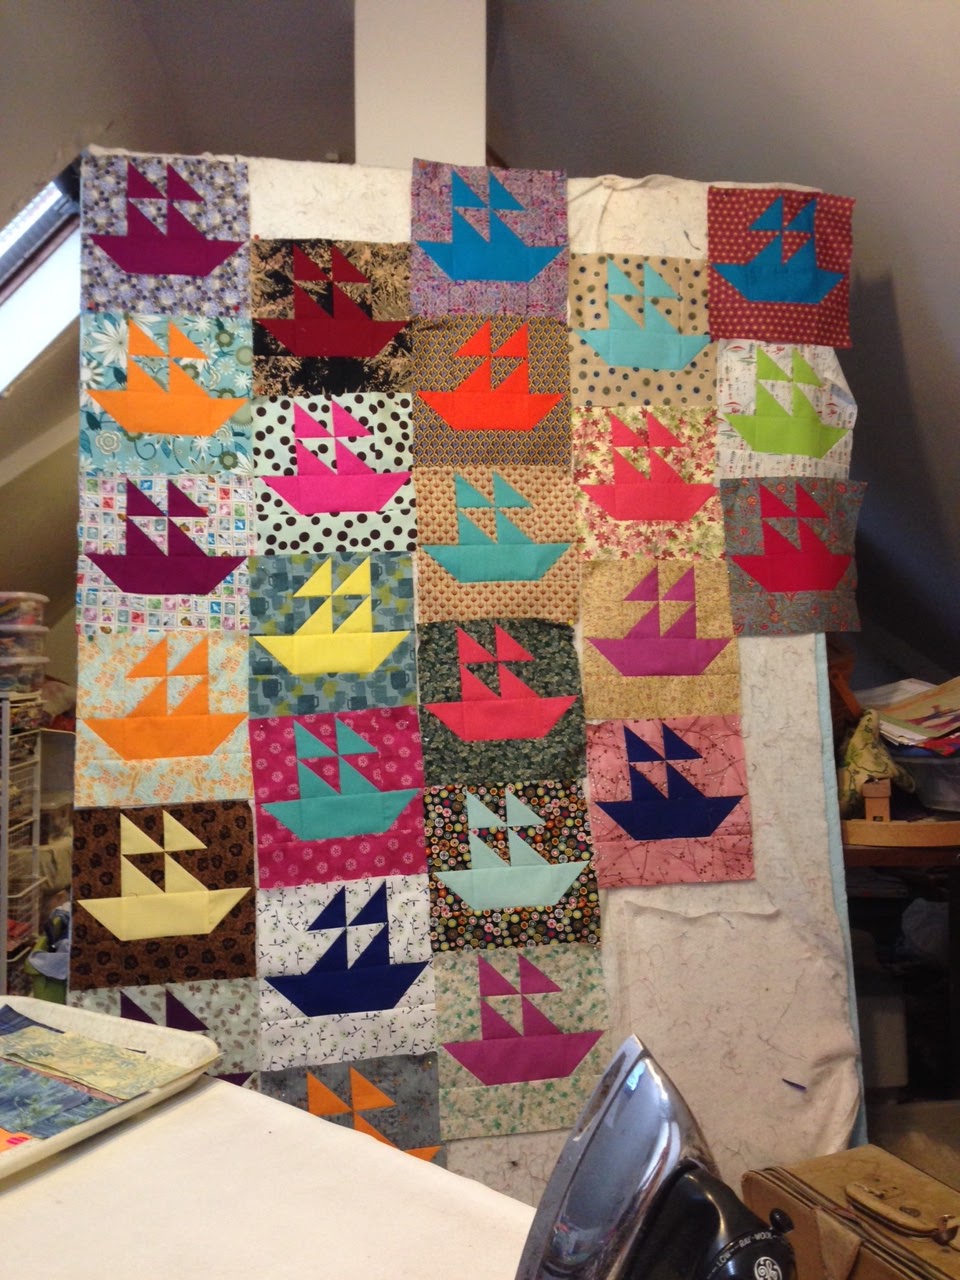
This quilt was made from the tutorial on Claire Witherspoon's blog Cspoonquilt. She wrote it inspired by a vintage quilt posted by Barbara Brackman. You can follow the ships label below to my previous posts showing the process of making this quilt. The block is 10 inches finished and the top measures 70 by 80.

One thing I found in putting the quilt together, I first was forcing the pressing method to ensure no twisted seams. I discovered the top would go together easier and lay flatter by allowing those "twisted sisters" to happen. By letting the seams decide how to lay by the end of putting it together it was easier. (I did not go back and resew those I forced.)

Thanks, Claire and Barbara for your inspiration.

Here is the tutorial:
http://cspoonquilt.blogspot.com/2015/06/june-bom-accurate-piecing-continuing.html#comment-form
Here is the quilt on Barbara's blog.
http://civilwarquilts.blogspot.com/2015/03/symbolism-in-abolition-quilt.html

It was so much fun pairing big loud prints and solids. I have several favorites but especially like the hot pink ship on the pistachio ground with big brown dots. I purchased that fabric at Mood in New York and the cutter smiled when he saw I chose that fabric.


Thursday, June 25, 2015

rail fence streak of lightning--process

My 2 1/2 inch square shoebox has become two shoeboxes and I have been looking for a project to use them. I saw a picture of a quilt using squares in a rail fence block in a straight set--I decided to try to set them on point.

Sew the squares into 3 piece units, press to one side.
Then, sew two units together BUT, in two different ways.
Set 1 sew with the seam allowance toward the needle.
Set 2 sew with seam allowance away from the needle.
Keep these sets separate, and sew a solid 6 1/2 by 2 1/2 inch piece on to each set.
Set 1 press all seams to the solid fabric.
Set 2 press all seams away from fabric.
I keep one block of each by the machine to keep this sewing and pressing plan in front of me as I make more blocks.
Sew two of the same set together. Pictured has set 1 on top and set 2 on the bottom
Then, using one section from each set, put together into one large block.
All this sorting allows for the seams to nest. Eventually  in putting the top together there will be some twisting ones, but I can live with that.  If you wish, you can make all the rail fence blocks the same and just deal with more twisted seams.
I am keeping some sets unsewn into blocks so they will be available to fill in on the edges once I decide how I am going to do that.
 This is using up a lot of squares!

Monday, June 22, 2015

an extravagant welcome, installed

It was such a delight making this quilt. If you click the label below, you will be brought to all posts I made while making the quilt, along with detailed tutorials on how to make the various blocks.
The project was made replicating the ideas and lay-out of a group quilt designed by Melissa Kane for a raffle quilt made by members of Illinois Quilters, Inc.
Beautifully quilted by Sue DiVarco.
Measures about 80 by 120. Blocks finish 4 by 6.

Andy and I donated it to St Pauls with gratitude for our children's church school education. It was installed in the Social Hall.


Saturday, June 20, 2015

ships, progressing


I keep making more blocks, heading to set it 7 by 8.
It is fun working with the odd prints from my shelves (and from my floor...).

Sunday, June 14, 2015

ships


Claire Witherspoon over at Cspoonquilt has put together a tutorial inspired by an antique quilt from Barbara Brackman's blog.

Here is the tutorial:
http://cspoonquilt.blogspot.com/2015/06/june-bom-accurate-piecing-continuing.html#comment-form
Here is the quilt on Barbara's blog.
http://civilwarquilts.blogspot.com/2015/03/symbolism-in-abolition-quilt.html

My first quilt was a ships quilt made for my nephew back in 1980.
I have started some new blocks using Claire's directions. I have changed up the pressing a bit to accommodate my sewing quirks, and have discovered I really hate trimming half square triangles to size, but will persevere. Her directions are well written and her blocks are great inspiration.

A funny story about ship quilts. When my sister curated a display of military artifacts, one family brought in a quilt a neighbor made for them in memory of their brother who died at sea in WWII.
I remarked, "Oh, a ships quilt," to which the woman said, "What?" For 60 years she just saw it as abstract triangles and rectangles--she didn't see a ship depicted. Now she wonders how they missed that!

postage stamp--top completed

Pieces cut 1 1/2 inch squares, made into 64 patch blocks, with 32 each solids and scraps.
I didn't do any strip piecing for this--all scraps from my shoebox of 1 1/2 inch squares and solids from my stash--most solids were Kona.
It used a lot of thread!

Saturday, June 13, 2015

tessellated crosses top completed

It was so much fun to make this design again. I used lots of odd fabrics.
Each cross is cut from 2 1/2 in strips, with one 6 1/2 inch rectangle and two 2 1/2 inch squares. A few 4 1/2 inch pieces to even out edges.
I don't think I repeated any fabrics.


Thursday, June 04, 2015

next up, tessellated crosses

In my small group we choose a fabric type for the others to give us on our birthdays. Kathryn asked for strips of fabrics we were working with for a tessellated cross quilt.
I enjoyed making one about  20 years ago, so while cutting for Kathryn, I decided to make one too.

My pieces are cut from 2 1/2 inch strips, with two 2 1/2 squares and one 6 1/2 inch rectangle for each cross. A few 4 1/2 inch rectangles are needed on the ends here and there to complete the pattern.

I am working from the bottom up, but sideways so I can use the length of my design board for the width of the quilt.
I lay out about 3-5 rows, sew them together, then lay out 3-5 more.  It goes fairly fast.
Many fabrics are from my mother's stash of scraps sewing for us as children.
I am enjoying my first weeks of a reduced summer work schedule. Lots of machine time and hand bindings work. Now, to find someone in this house willing to hold some quilts for pictures!

Wednesday, June 03, 2015

postage stamp progress


It is nearly finished! I haven't posted about this quilt since February. After a rapid start, it needed to be set aside due to a very busy semester. I fit in a few blocks here and there, and today completed the final two blocks. Along the way I decided to make it larger than originally planned.
It is 81 blocks, 9 by 9.
I made each block with scraps from my 1 1/2 inch scrap bin--which is greatly reduced but still has several quilts in it. The scraps include many of my mother's. The solids were also in my stash as small yardage pieces.
I sew them together in 2s, then 4s, then 8. I press to one side and nest the 8 rows together into a block.
The block is then pressed all to one side.
This pressing allows the whole quilt to have butted seams.
I put the quilt together into nine sections of nine blocks each.
Then, put these together in sections, leaving only one long seam that goes for the whole 9 block length.

I have 5 seams left to go!

Tuesday, June 02, 2015

from Lorraine's stash

This little doll quilt was made from my neighbor Lorraine's stash. I will give it to the Block Party this year for the raffle.
I worked on this one at the same time I made one for Lori's Humble Quilt exchange.

Sunday, May 31, 2015

a decade ago

I made this parament for my father-in-law's funeral ten years ago. I was happy to see it in use this morning in the chapel at St Pauls.

Saturday, May 30, 2015

graduation a year ago today

Here are some photographs from Eve's graduation from Wellesley College a year ago today. I was delighted my mother and sister Janna were able to attend. Andy had the pictures on his camera and I finally got access to them!
Wellesley has a wonderful tradition of the women processing from the classrooms through the quad and to Severance Green where the outdoor ceremony is held, then forming a tunnel for their professors to walk through. We sang America the Beautiful, which was penned by Wellesley professor Kathrine Lee Bates in 1893, substituting "sisterhood!" for brotherhood.
If your daughters/granddaughters are on their college searches, I highly recommend giving the women's colleges a look.