57 by 45.5 inches
Top completed 2022
 |
| Three reds clash Many, many reds are marvelous |
While cutting reds for the red and white checkerboard and stars quilt, I cut a pile of 2 inch squares anticipating making this quilt (also pieces for a third quilt to come). The white is Kona Snow.
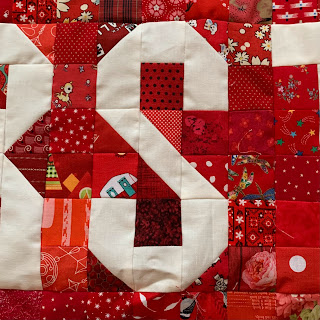
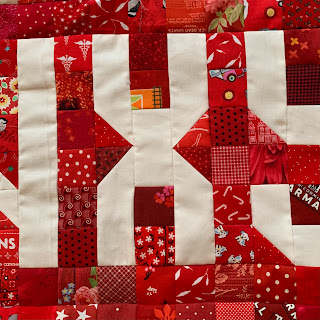
I used the Missouri Star Easy Alphabet, changing the scale down to 2 inch cut and 1 1/2 inch finished. I altered construction, using larger pieces for the white when possible. The Doug Leko mini ruler is a great tool for doing this. I also changed the V and the X.
Some tips for construction:
-Cut 29 white rectangles 2 by 9 1/2 inches to have ready to use whole or to nip off corners with the Doug Leko ruler. Love that thing.
-Don't nip off ahead of time, wait til you are doing each letter to make sure you nip off the correct ones.
-Have a pile of red triangles ready to sew onto the nipped ends. I use the Easy Angle or Bonnie Hunter's Essential tool for these
-Sew a bunch of red squares in pairs and then some into 4s and some into 6s. These are ready to pull from as you lay out each letter. If 3s or 5s are needed, grab a single square to add to one of the units in layout. Replenish these sewed units every few blocks. Don't press these units until block construction
-Make some 2 inch red/white triangle squares to have ready for where they are needed
-Have some white 2 inch squares ready
-Have some lengths of 2 inch white ready to cut down as needed for the other pieces and a few flying geese using Bonnie's ruler.
I kept a chart showing the lengths for other pieces handy for when I need to prepare each block; some of these will be nipped with Doug Leko's ruler:
One square 2"
Two squares 2 by 3 1/2"
Three squares 2 by 5"
Four squares 2 by 6 1/2"
Five squares 2 by 8"
Six squares 2 by 9 1/2"--these are used as the sashings
The letters were made in sequence so I could adjust the pressing of the sashings between the letters to nest. There are a few twisted sisters in here but not many.
Each row of letters was pressed to the left (except for a few sections pressed open to reduce bulk), and the spacer rows were pressed to the right. I pressed theses spacer rows towards the letter rows and this helped keep the quilt square.
Spacer rows were 25 squares.
I added each spacer row to the bottom of each letter row as completed, then attached to the mothership. Spacer row always on top going into machine.
I added an extra row of squares all around the quilt to get to the size/proportions I liked. I was considering 16 patches of red again around it--that would get it to bed size--but I was satisfied with the proportions where I stopped.
The reds are from my shelves and from my friends' sharing. And a bit of shopping. I pushed from red towards the madder/orange reds with a few in the purple reds. It feels festive.
My objective to have a stack of red and white quilts has me up to three!
And the series of alphabet quilts is now at G.
My adaptation of the Missouri Star pattern. Use my changes at your pleasure.
Buy the pattern! The illustrations are helpful in construction even with adaptations.
I always buy patterns that I adapt--I want to support the designers out there!
 |
| A very pleasing S |
 |
| My V variation |
 |
| My X variation |
 |
| love these reds!! |


You are on a roll! I have really enjoyed your recent finishes and have screen-shot them for scrap quilt ideas for the upcoming year. Thanks for sharing!
ReplyDeleteWhat a wonderful quilt! Thanks for all the tips.
ReplyDeleteLove the red and white and like you I buy the pattern. Sometimes I buy the pattern only for the picture and adapt pretty much everything else. However I would not continue to have the inspiration if I do not support my designers :) I have made my banket again this year. thank you for the recipe.
ReplyDeleteI love your alphabet quilts. Thanks for sharing.
ReplyDeleteIncredible. I love it.
ReplyDeleteSharon