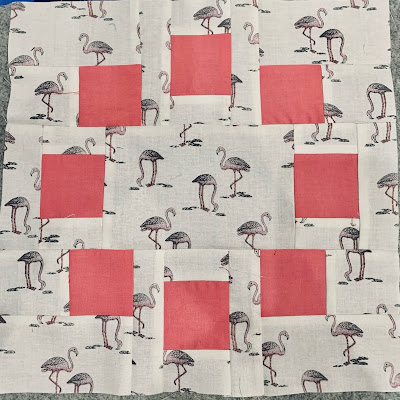
Circled Squares
Block finishes 12 inches
I plan to set this 7 by 6 (84 by 72) or 8 by 7 (96 by 84) so 42 or 56 blocks.
I have seen this block on the web. I have not been able to find the origin of it--if you know please let me know and I can include that information here.
UPDATE: Blog reader Mego says it is a block from a while back called Circle of Friends.
I did a bit of research and that name is used for several other blocks too, but one similar to this one I can trace to at least 2011. I also saw it named as A Circle of Squares. All I have found had more pieces and were set in a 9-patch formation.
I'll update again when I learn more.
And, go check out Mego's blog--it is really fun!
https://basketfullofscraps.blogspot.com/
Reader JoyceLM reports Windham fabrics has a tutorial for the 9-patch version:
https://windhamfabrics.net/cgi-bin/fabricshop/projects.cgi?patternID=706
I am glad to see there are several versions of this out there so I am not appropriating one person's work. I do hope to eventually find out who came up with the idea.
There are also versions with circled triangles. Which are now on my list!
The blocks I saw were constructed in a 9-patch fashion.
Because I wanted to use prints for the background I re-drafted it to keep a larger portion un-pieced and oriented the corner units to keep their rectangles horizontal. This calms down the fracturing of the prints and allows the squares to visually float over the block.
Cutting
Solid:
eight squared 2 1/2 inches
Print: (be mindful of orientation of pieces with directional fabric)
one rectangle 4 1/2 by 6 1/2 inches
six rectangles 1 1/2 by 4 1/2 inches
four rectangles 2 1/2 by 4 1/2 inches
four squares 2 1/2 inches
eight rectangles 2 1/2 by 1 1/2 inches
Block construction and pressing
Lay out block, keeping the 2 1/2 by 4 1/2 rectangles horizontal

Pressing is odd but it makes sense in keeping the block square and for when the quilt is ready for assembly. There is no nesting at all in block construction, so careful sewing is in order.
I press from the front of the blocks, so in the pictures when I say press to the right, some will show the back of the units and they will look like to the left--sorry about that bit of head twisting.Corner units:
Sew four solid and print squares together, press towards the print
Sew the rectangles to the these units, lay out block and press the top two down towards the solid squares. Press the bottom two away from the solid squares.
Interior units:
Sew four solid squares and the 1 1/2 by 2 1/2 rectangles together, press towards the print. Sew the 1 1/2 by 4 1/2 rectangles to both sides of two of these units and to one side of the remaining two units. Sew those two to either side of the 4 1/2 by 6 1/2 rectangle.
Keeping the 4 1/2 sides vertical, sew them to the corner units.
Press the center unit so all seams go to the right.
 |
| row pressing shown from the back |
Press the upper and lower unit so all seams go to the left. (except the seams around the solid squares--let them stay the way they were pressed earlier.
(In construction, some of the pressing is not necessary to be the way I do it. But it makes sense in keeping the pressing consistent in one direction for each row so I am not constantly thinking does this seam matter later on or not.)
Join the three rows. There are no seams to match, so be careful to not distort as you sew the long 12 inch seam.
Wait to press the final two horizontal seams until it is time for assembly.
Lay out the blocks is complicated to describe but is not complicated in process.
Lay into columns, rotating every other block, keeping the center row horizontal. Make sure you start each first block of a column rotated opposite of the one next to it, then rotate the blocks below it so all blocks nest both north and south and east and west.
Sew into columns.
Then, press all seams of odd columns up and even columns down.
Sew columns together.
All seams will nest.
I will post pictures of this process when I assemble the quilt top.
My adaptation of a block out there.
Use at your pleasure.


